Build a DIY Backyard Waterfall for Under $200 (No Plumber Needed)

You don’t need a contractor, a big budget, or any plumbing experience to add a backyard waterfall to your outdoor space. If you’ve been staring at your yard thinking it needs something — this is it. A DIY backyard waterfall is one of the most rewarding weekend projects you can tackle, and yes, you can genuinely pull it off for under $200.
This guide is for homeowners, renters with outdoor space, and anyone who wants a relaxing water feature without the hefty price tag.
Here’s what you’ll walk away knowing:
- How to plan your waterfall design so you don’t waste money buying the wrong materials
- Exactly what supplies you need and where to grab them without overspending
- How to build and maintain your waterfall so it keeps running beautifully season after season
No fluff, no guesswork — just a straight path from an empty patch of yard to a backyard feature your neighbors will ask about.


Plan Your Waterfall Design Without Overspending
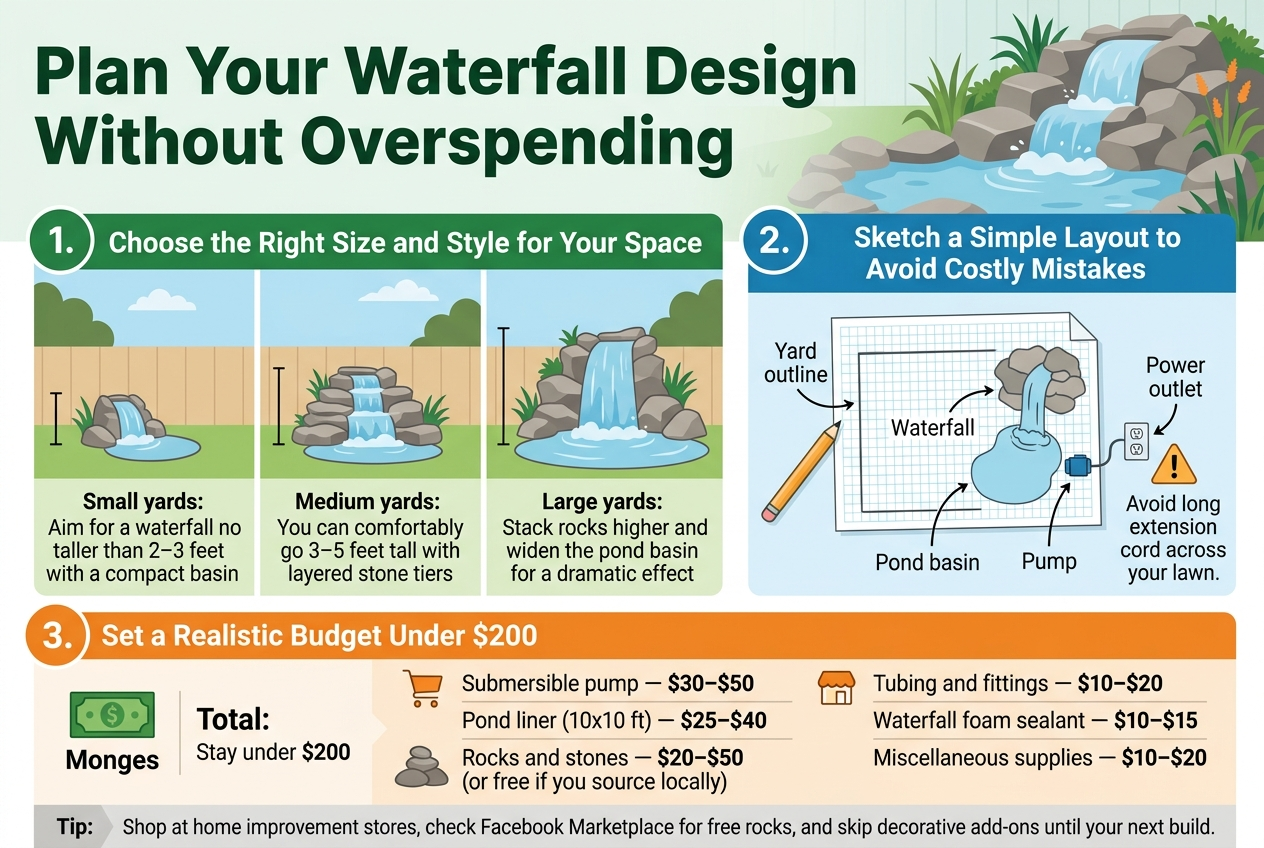
Choose the Right Size and Style for Your Space
Before you spend a single dollar, take a good look at your backyard and figure out what actually fits. A small corner pond with a gentle trickle works beautifully in tight spaces, while a wider yard gives you room to stack larger rocks and create a bolder flow. Your waterfall should feel like it belongs there, not like it was squeezed in as an afterthought.
- Small yards: Aim for a waterfall no taller than 2–3 feet with a compact basin
- Medium yards: You can comfortably go 3–5 feet tall with layered stone tiers
- Large yards: Stack rocks higher and widen the pond basin for a dramatic effect
Sketch a Simple Layout to Avoid Costly Mistakes
You don’t need fancy software — grab a pencil and a piece of graph paper. Draw your yard’s rough outline, then sketch where your waterfall, pond basin, and pump will sit. Mark where your power outlet is, because your pump needs to reach it without an extension cord running across your lawn. A quick sketch helps you spot problems before they cost you money.
Set a Realistic Budget Under $200
Here’s a simple breakdown to keep your spending on track:
| Item | Estimated Cost |
|---|---|
| Submersible pump | $30–$50 |
| Pond liner (10×10 ft) | $25–$40 |
| Rocks and stones | $20–$50 (or free if you source locally) |
| Tubing and fittings | $10–$20 |
| Waterfall foam sealant | $10–$15 |
| Miscellaneous supplies | $10–$20 |
Stick to this range by shopping at home improvement stores, checking Facebook Marketplace for free rocks, and skipping decorative add-ons until your next build.
Gather All the Materials You Need Before You Start
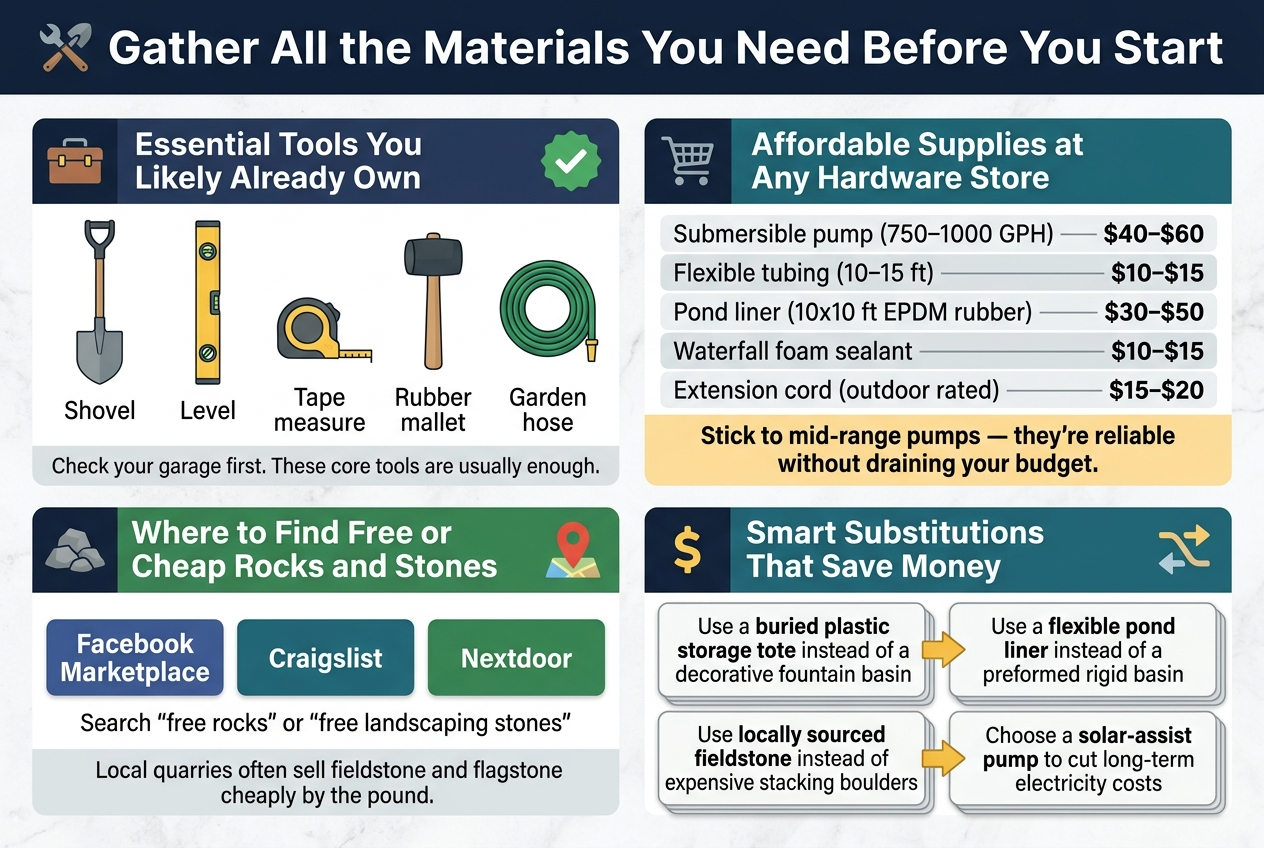
Essential Tools You Likely Already Own
Before you spend a single dollar, check your garage first. You probably already have a shovel, a level, a tape measure, a rubber mallet, and a garden hose. These are your core tools, and you genuinely don’t need anything fancier to pull this project off successfully.
Affordable Supplies Available at Any Hardware Store
Here’s a quick breakdown of what you’ll need to grab:
| Supply | Estimated Cost |
|---|---|
| Submersible pump (750–1000 GPH) | $40–$60 |
| Flexible tubing (10–15 ft) | $10–$15 |
| Pond liner (10×10 ft EPDM rubber) | $30–$50 |
| Waterfall foam sealant | $10–$15 |
| Extension cord (outdoor rated) | $15–$20 |
Stick to mid-range pumps — they’re reliable without draining your budget.
Where to Find Free or Cheap Rocks and Stones
Your best sources for free rocks are Facebook Marketplace, Craigslist, and Nextdoor. Search “free rocks” or “free landscaping stones” and you’ll be shocked how many people want them gone from their yards. Local quarries also sell fieldstone and flagstone cheaply by the pound.
Smart Substitutions That Save Money Without Sacrificing Quality
- Swap decorative fountain basins for a simple buried plastic storage tote
- Use a flexible pond liner instead of a preformed rigid basin
- Replace expensive stacking boulders with locally sourced fieldstone
- Choose a solar-assist pump to cut long-term electricity costs
Prepare Your Backyard for a Smooth Installation
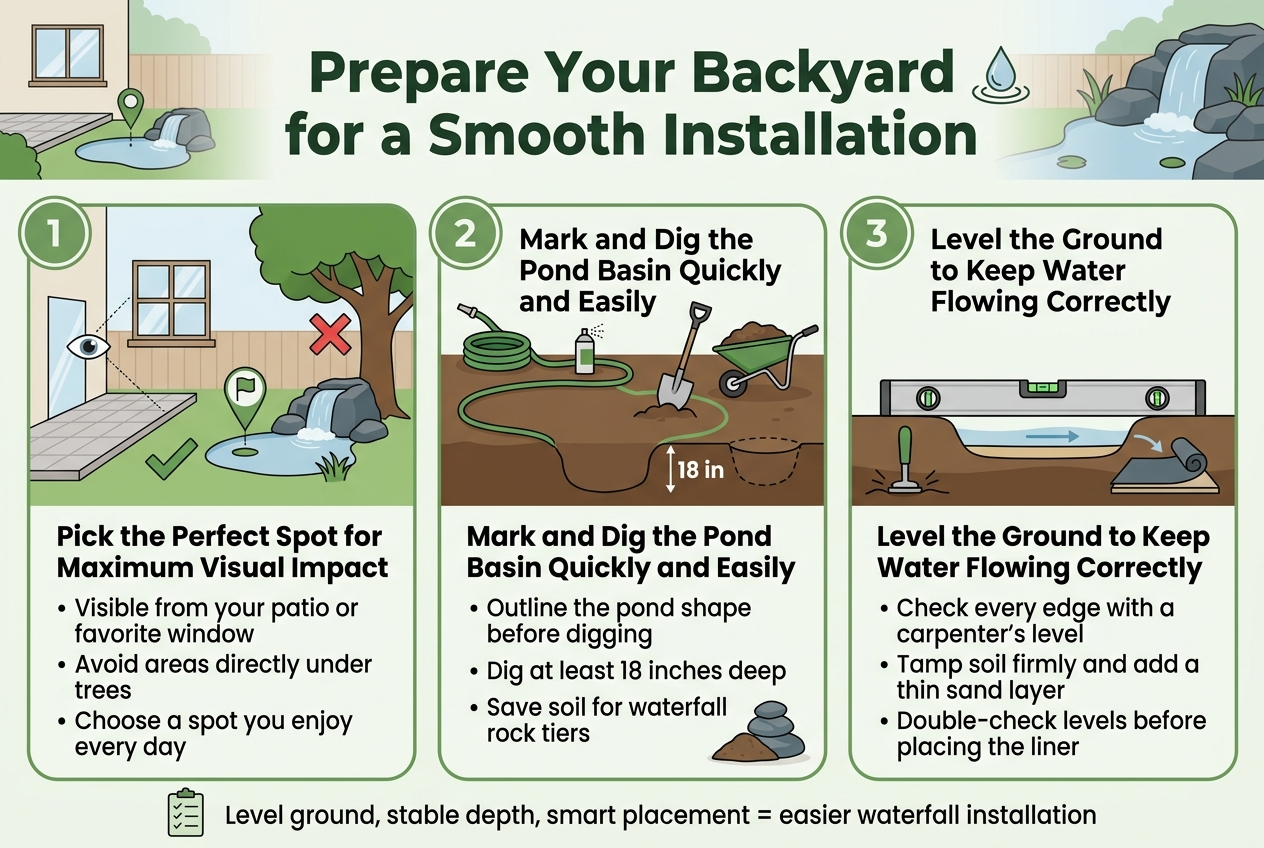
Pick the Perfect Spot for Maximum Visual Impact
Walk around your backyard and pay attention to where your eyes naturally land. You want a spot that’s visible from your patio or a favorite window so you actually enjoy it daily. Avoid areas directly under trees, since falling leaves will constantly clog your pump and turn your peaceful waterfall into a maintenance nightmare.
Mark and Dig the Pond Basin Quickly and Easily
Grab a garden hose or spray paint to outline your pond shape before you dig a single scoop of dirt. Your basin should be at least 18 inches deep to keep water temperatures stable and reduce evaporation. Start digging from the center outward, and set aside the soil in a nearby wheelbarrow — you’ll reuse some of it to build up your waterfall’s rock tiers later.
Level the Ground to Keep Water Flowing Correctly
Your waterfall’s performance lives or dies by how well you level your ground. Grab a long carpenter’s level and check every edge of your dug-out basin before moving forward. If one side sits higher than the other, water will spill unevenly and drain out of the pond fast. Tamp down the soil firmly, add a thin sand layer for extra smoothness, and double-check your levels one more time before placing your liner.
Build the Waterfall Step by Step

Install the Pond Liner to Prevent Leaks
Lay your pond liner carefully into the dug-out base, smoothing out any folds as you go. Press it firmly against the edges and weigh down the sides with rocks temporarily so it stays put while you work. Give yourself extra liner on all sides — you can always trim it later, but you can’t add it back.
Stack Rocks Securely for a Natural Look
Start with your largest, flattest rocks at the base and work your way up, slightly angling each layer backward so water cascades forward naturally. Wiggle each rock before moving on — if it wobbles, reposition it. Your goal is a tight, stable stack that looks like it grew there on its own.
Set Up the Water Pump Without Any Plumbing Skills
Drop your submersible pump into the deepest part of your pond area and plug it into a nearby outdoor-rated outlet. No tools, no pipe wrenches, no headaches. Just make sure your pump’s flow rate matches the size of your waterfall — check the packaging for the recommended gallons-per-hour output before you buy.
Connect the Tubing to Control Water Flow
Attach your flexible vinyl tubing directly to the pump’s outlet nozzle and run it up behind your rock stack to the very top. Secure it with zip ties along the way so it doesn’t slip. Tuck the tubing between rocks so it stays hidden — your waterfall should look natural, not like a garden hose experiment.
Test the System Before Adding Finishing Touches
Fill your pond with water, plug in the pump, and watch where the water actually goes. Adjust any rocks that redirect flow the wrong way, and check every tubing connection for drips. Testing now saves you from moving heavy rocks later, so take your time and get the flow exactly where you want it.


