The Hog Wire Railing Trick Every DIYer Is Doing Right Now (Step-by-Step)

If you’ve been scrolling through home improvement feeds lately, you’ve probably noticed hog wire railings showing up everywhere — on decks, porches, and staircases that used to look completely forgettable. There’s a good reason for that. This DIY hog wire railing project gives you a clean, modern look without the price tag of hiring a contractor, and it’s more doable than you’d think even if you’re not a seasoned builder.
This guide is for you — the homeowner who wants a solid weekend project that actually adds value and curb appeal to your space.
Here’s what you’ll get out of this:
- A full step-by-step breakdown of how to build your hog wire railing from scratch, including the tools and materials you need before you touch anything
- The most common mistakes DIYers make so you can skip the frustrating part and get it right the first time
- Easy ways to customize your railing so it fits your style, not just the trend
By the end, you’ll know exactly what to buy, what to avoid, and how to keep your railing looking sharp for years to come. Let’s get into it.


Why Hog Wire Railings Are Taking Over DIY Projects
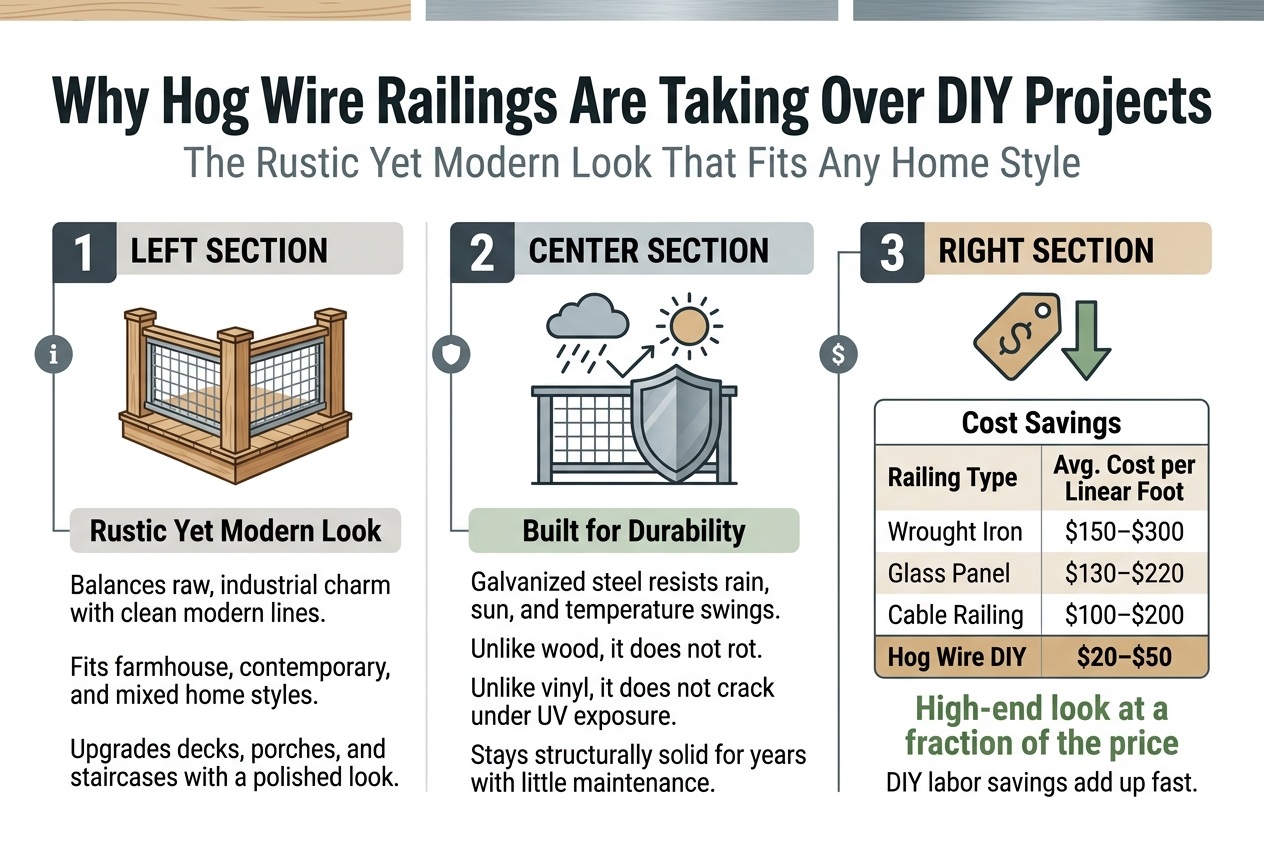
The Rustic Yet Modern Look That Fits Any Home Style
Hog wire railings give your space that perfect balance of raw, industrial charm and clean modern lines. Whether your home leans farmhouse, contemporary, or somewhere in between, this style slots right in without looking forced. Your deck, porch, or staircase instantly gets a character upgrade that feels intentional and polished.
How Hog Wire Outperforms Traditional Railing Materials in Durability
When you choose hog wire, you’re picking a material built to handle real outdoor punishment. Unlike wood that rots or vinyl that cracks under UV exposure, galvanized steel hog wire shrugs off rain, sun, and temperature swings without flinching. Your railing stays structurally solid for years with very little effort on your end.
The Cost Savings That Make This Project a No-Brainer
Here’s a quick comparison so you can see exactly what your wallet is dealing with:
| Railing Type | Avg. Cost per Linear Foot |
|---|---|
| Wrought Iron | $150–$300 |
| Glass Panel | $130–$220 |
| Cable Railing | $100–$200 |
| Hog Wire DIY | $20–$50 |
You’re getting a high-end look at a fraction of the price, and since you’re doing it yourself, the labor savings stack up fast.
Tools and Materials You Need Before You Start
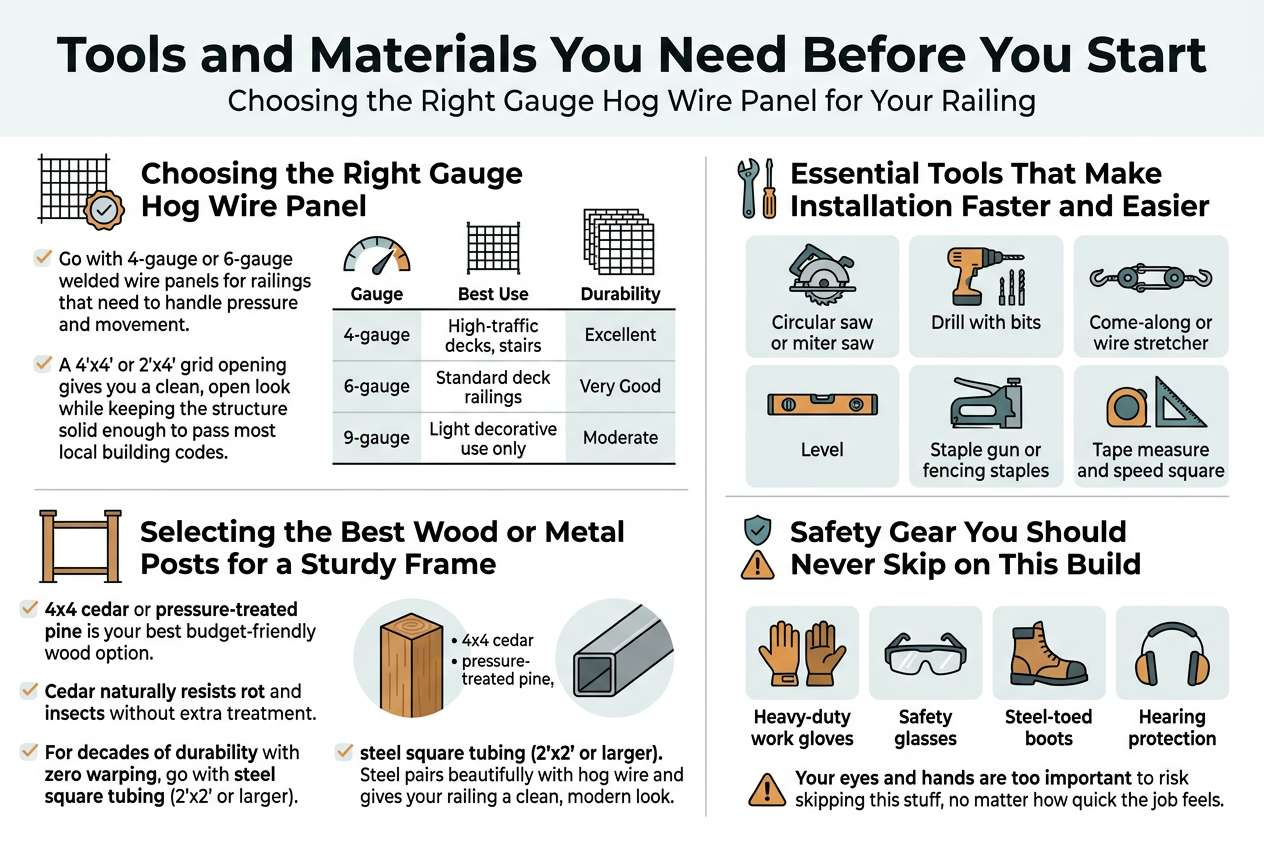
Choosing the Right Gauge Hog Wire Panel for Your Railing
Your panel choice makes or breaks the whole project. Go with 4-gauge or 6-gauge welded wire panels for railings that need to handle pressure and movement. Thinner gauges flex too much and look cheap fast. A 4″x4″ or 2″x4″ grid opening gives you that clean, open look while keeping the structure solid enough to pass most local building codes.
| Gauge | Best Use | Durability |
|---|---|---|
| 4-gauge | High-traffic decks, stairs | Excellent |
| 6-gauge | Standard deck railings | Very Good |
| 9-gauge | Light decorative use only | Moderate |
Essential Tools That Make Installation Faster and Easier
Having the right tools in your hands before you start saves you a frustrating mid-project hardware store run. Here’s what you actually need:
- Circular saw or miter saw for clean post cuts
- Drill with bits for pilot holes and screws
- Come-along or wire stretcher to pull panels tight without sagging
- Level to keep everything straight
- Staple gun or fencing staples for securing wire edges
- Tape measure and speed square for accurate spacing
Selecting the Best Wood or Metal Posts for a Sturdy Frame
Your posts carry the whole load, so don’t cut corners here. 4×4 cedar or pressure-treated pine is your best budget-friendly wood option — cedar naturally resists rot and insects without extra treatment. If you want something that lasts decades with zero warping, go with steel square tubing (2″x2″ or larger). Steel pairs beautifully with hog wire and gives your railing a clean, modern look that wood sometimes can’t match.
Safety Gear You Should Never Skip on This Build
Working with wire panels and power tools means sharp edges and flying debris are part of the deal. Always wear:
- Heavy-duty work gloves — hog wire edges are razor sharp when cut
- Safety glasses — wire snips send tiny metal pieces flying at eye level
- Steel-toed boots — panels are heavy and drop fast
- Hearing protection — if you’re cutting metal posts with a grinder or saw
Your eyes and hands are too important to risk skipping this stuff, no matter how quick the job feels.
Step-by-Step Guide to Building Your Hog Wire Railing
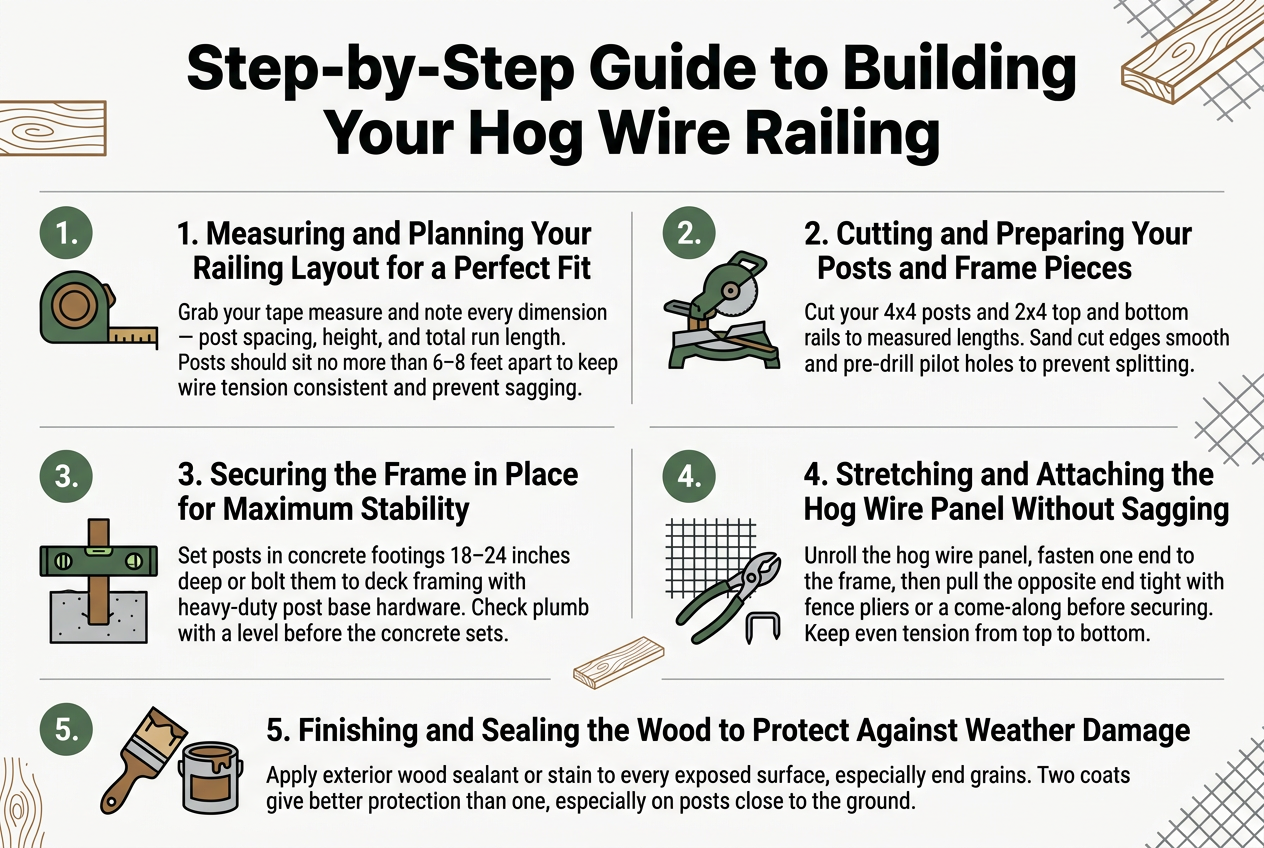
Measuring and Planning Your Railing Layout for a Perfect Fit
Grab your tape measure and note every dimension — post spacing, height, and total run length. Your panels work best when posts sit no more than 6–8 feet apart, keeping wire tension consistent and preventing future sagging.
Cutting and Preparing Your Posts and Frame Pieces
Cut your 4×4 posts and 2×4 top and bottom rails to your measured lengths using a miter saw. Sand every cut edge smooth so your hands don’t catch splinters during assembly, and pre-drill pilot holes to stop the wood from splitting when you drive your screws in.
Securing the Frame in Place for Maximum Stability
Set your posts in concrete footings at least 18–24 inches deep, or bolt them directly to your deck framing using heavy-duty post base hardware. Check plumb on every post with a level before your concrete sets — a crooked post throws off your entire railing line.
Stretching and Attaching the Hog Wire Panel Without Sagging
Unroll your hog wire panel, start stapling or screwing one end to your frame using fence staples or hog ring clips, then pull the opposite end tight with fence pliers or a come-along before fastening. Work top to bottom, keeping even tension across the whole panel so no section bulges outward.
Finishing and Sealing the Wood to Protect Against Weather Damage
Once your railing is assembled, apply a quality exterior wood sealant or stain to every exposed surface, working it into end grains where moisture loves to sneak in and cause rot fastest. Two coats give you far better protection than one, especially on posts sitting close to the ground.


