Skip to content

[email protected] | About Us | Privacy Policy | Terms Of Use

Facebook Pinterest
logo
  • Home ImprovementExpand
    • Deck
    • Barn Doors
    • Patio
    • Bathroom
    • Garden Beds
    • Winter Home Prep
  • Mobile HomeExpand
    • Crawl Space
    • Skirting
  • BackyardExpand
    • Landscaping
    • Curb Appeal
    • Water Features
  • Porch
  • Garden
  • Contact
logo
Water Features

How to Build a Rock Waterfall for Your Backyard — Step-by-Step Guide

A backyard rock waterfall turns a plain outdoor space into something you actually want to spend time in. If you’re a DIY homeowner ready to roll up your sleeves and add a water feature that looks like it belongs there, this guide is for you.

You don’t need landscaping experience to pull this off — you just need the right steps in the right order.

Here’s what you’ll walk away knowing: how to plan and design your rock waterfall before you touch a single stone, which materials and tools you actually need (and which ones you can skip), and how to build the structure layer by layer so it holds up and flows the way you want it to.

Let’s get into it.

Contents

Toggle
    • You Might Also Love These Ideas
      • 12 DIY Solar Fountain Ideas to Refresh Your Outdoor Space
      • How to Build a DIY Pool Deck: Complete Construction Guide…
      • 12 Small Corner Backyard Waterfall Ideas That Transform Your Outdoor…
  • Plan Your Rock Waterfall Before You Break Ground
      • Choose the Perfect Spot in Your Backyard
      • Decide on the Size and Style That Fits Your Space
      • Set a Realistic Budget to Avoid Surprises
      • Gather Inspiration to Bring Your Vision to Life
  • Gather the Right Materials and Tools for the Job
      • A. Select the Best Rocks for a Natural, Stunning Look
      • B. Choose a Reliable Pump to Keep Water Flowing Smoothly
      • C. Stock Up on Essential Tools to Work Efficiently
  • Prepare the Site for a Strong and Lasting Foundation
      • A. Mark Out the Layout to Guide Your Build
      • B. Dig the Pond Basin to the Right Depth
      • C. Level the Ground to Prevent Shifting Over Time
      • D. Line the Basin to Keep Water Where It Belongs
      • You Might Also Like!

You Might Also Love These Ideas

10 Mistakes to Avoid When Designing an Outdoor Oasis: Lessons…

Backyard Water Park

12 Stunning Backyard Water Park Ideas That Transform Your Outdoor…

pool deck

How to Build a DIY Pool Deck: Complete Construction Guide…

Plan Your Rock Waterfall Before You Break Ground

Create a clean professional infographic illustration in a 3:2 aspect ratio with a full-bleed wide layout, no poster frame, no inset border, and no narrow centered stack. Use a modern garden-inspired color palette of deep green, slate gray, warm beige, and soft blue accents. Use bold sans-serif typography for headings and readable sans-serif body text. Top header across the full width:Title in large bold text: "Plan Your Rock Waterfall Before You Break Ground"Below the title, arrange four wide horizontal content blocks or a 2x2 grid of panels with clear spacing and visual hierarchy, each panel with a colored number badge and an icon.Panel 1 on the upper left:Number badge: "1"Icon: a backyard map pin, small slope line, house window, and power outlet symbolHeading text: "Choose the Perfect Spot in Your Backyard"Body text:"Walk your backyard and look for a spot that feels natural — somewhere with a slight slope, good visibility from your patio or windows, and easy access to a power outlet for your pump.""Avoid areas directly under large trees, since falling leaves and roots can clog your system and damage the liner over time."Add small visual markers for slope, visibility, outlet, tree roots, and falling leaves.Panel 2 on the upper right:Number badge: "2"Icon: stacked rocks and a style paletteHeading text: "Decide on the Size and Style That Fits Your Space"Body text:"Your waterfall should feel like it belongs in your yard, not dropped in from somewhere else.""Small, intimate space = compact, single-tier design.""Large yard = bold, multi-tiered design.""Natural, rugged look = irregular boulders.""Cleaner, structured style = stacked flat stones."Include three small style illustrations aligned horizontally beneath the text: a rugged boulder waterfall, a formal stepped waterfall, and a pondless waterfall symbol.Inside the lower left section, include a neat comparison table with clear lines and alternating light background rows. Table heading above it: "Style | Best For | Rock Type"Table rows exactly:"Natural/Rustic | Large, informal yards | Boulders, fieldstone""Formal/Structured | Smaller, manicured spaces | Flat flagstone, slate""Pondless Waterfall | Low-maintenance setups | Mixed stone"Add tiny rock icons beside each row.Panel 3 on the lower left or centered left:Number badge: "3"Icon: dollar sign, invoice, rocks, pump, liner, tubing, gravelHeading text: "Set a Realistic Budget to Avoid Surprises"Body text:"Before you buy a single rock, write down your expected costs for materials, equipment, and labor.""Rocks, liner, pump, tubing, and gravel add up fast.""A basic backyard waterfall can run anywhere from $500 to $3,000 depending on size.""Knowing your number upfront keeps your project on track."Show a small cost breakdown graphic with labeled cost items and a price range bar displaying "$500 to $3,000".Panel 4 on the lower right:Number badge: "4"Icon: smartphone, Pinterest pin, YouTube play button, landscape photo thumbnailHeading text: "Gather Inspiration to Bring Your Vision to Life"Body text:"Browse Pinterest, YouTube, and landscape design sites to collect images you genuinely love.""Save photos that match your yard's vibe, your home's style, and your maintenance comfort level.""Having a clear visual reference before you start saves you from second-guessing every decision once the rocks are already in your hands."Show a collage strip of three inspiration thumbnails labeled "Pinterest", "YouTube", and "Design Sites", plus small bookmark icons.Use a subtle illustrated background with faint garden textures, stones, and flowing water accents, but keep all text highly legible. Use crisp iconography, neat alignment, and balanced spacing. Make the infographic feel organized, practical, and homeowner-friendly, with wide horizontal flow and clear section separation.

Choose the Perfect Spot in Your Backyard

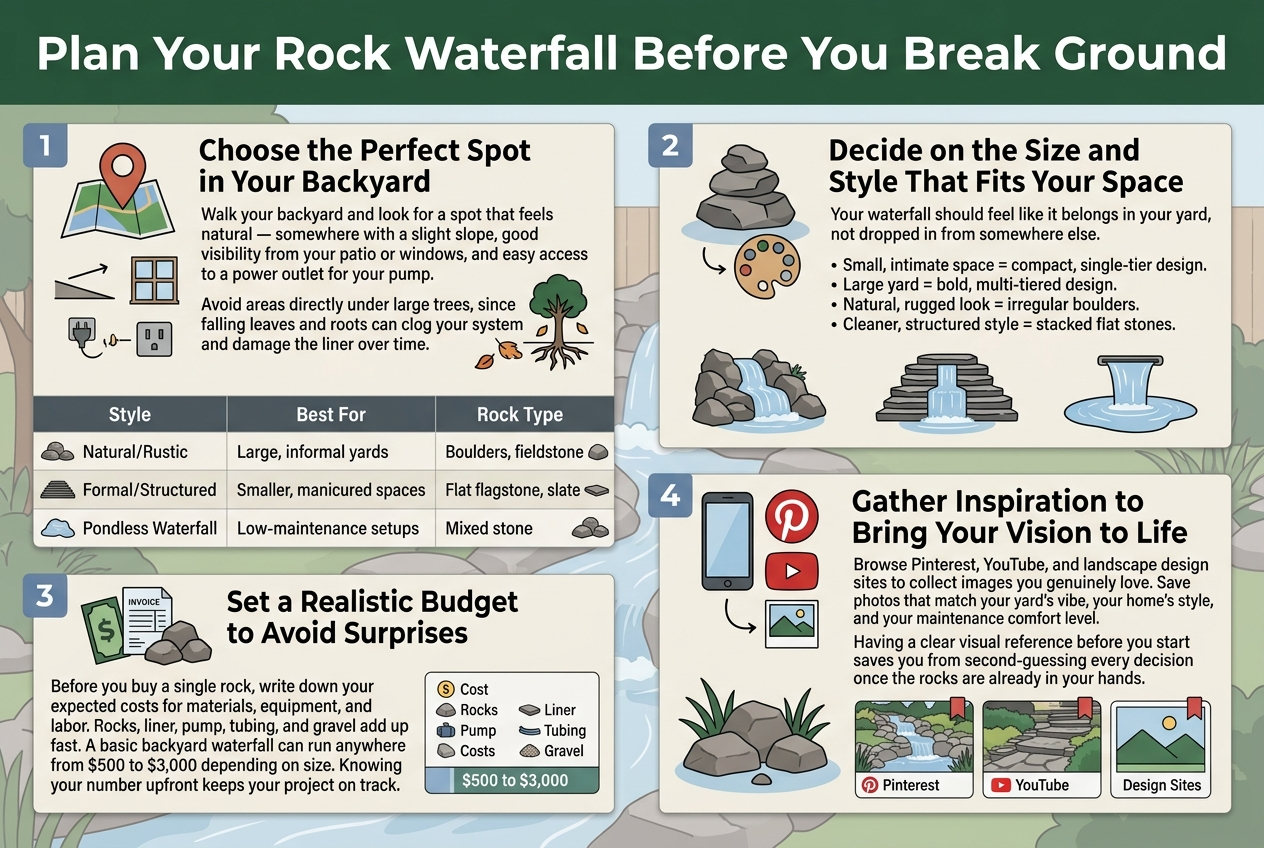
Walk your backyard and look for a spot that feels natural — somewhere with a slight slope, good visibility from your patio or windows, and easy access to a power outlet for your pump. Avoid areas directly under large trees, since falling leaves and roots can clog your system and damage the liner over time.

Also Read  10 Water Feature Lighting Ideas That Create Stunning Night Ambience

Decide on the Size and Style That Fits Your Space

Your waterfall should feel like it belongs in your yard, not dropped in from somewhere else. A small, intimate space calls for a compact, single-tier design, while a larger yard can handle something bold and multi-tiered. Think about whether you want a natural, rugged look with irregular boulders or a cleaner, more structured style with stacked flat stones.

StyleBest ForRock Type
Natural/RusticLarge, informal yardsBoulders, fieldstone
Formal/StructuredSmaller, manicured spacesFlat flagstone, slate
Pondless WaterfallLow-maintenance setupsMixed stone

Set a Realistic Budget to Avoid Surprises

Before you buy a single rock, write down your expected costs for materials, equipment, and labor. Rocks, liner, pump, tubing, and gravel add up fast. A basic backyard waterfall can run anywhere from $500 to $3,000 depending on size, so knowing your number upfront keeps your project on track.

Gather Inspiration to Bring Your Vision to Life

Browse Pinterest, YouTube, and landscape design sites to collect images you genuinely love. Save photos that match your yard’s vibe, your home’s style, and your maintenance comfort level. Having a clear visual reference before you start saves you from second-guessing every decision once the rocks are already in your hands.

Gather the Right Materials and Tools for the Job
Create a full-bleed professional infographic in a clean modern style, aspect ratio 3:2, with a wide horizontal layout and no poster frame. Use a natural outdoor color palette of deep green, slate gray, river blue, tan, and warm brown, with white background panels and subtle stone-texture accents. Use bold sans-serif fonts for headings and smaller readable sans-serif body text.Top header across the full width: large bold title in dark green text, "Gather the Right Materials and Tools for the Job", with a small waterfall-and-rock icon beside it.Main content arranged in three wide horizontal sections with clear visual hierarchy:Section 1 on the left, titled in a bold green bar: "A. Select the Best Rocks for a Natural, Stunning Look"Include a large illustration cluster of mixed natural stones and a waterfall edge. Show different rock sizes layered naturally, with larger anchor rocks at the base and smaller stones filling gaps. Add four labeled rock cards in a 2x2 grid with small stone icons:- "River Rock" with subtext "Base and edging" and "Smooth, rounded, natural"- "Flagstone" with subtext "Flat water shelves" and "Layered, elegant"- "Fieldstone" with subtext "Main structure" and "Rugged, earthy"- "Boulders" with subtext "Anchor points" and "Bold, dramatic"Include small circular icons showing each rock type.Section 2 in the center, titled in a bold blue bar: "B. Choose a Reliable Pump to Keep Water Flowing Smoothly"Show a large submersible pump illustration connected to a waterfall stream, with a water-flow arrow. Add a simple gauge icon labeled "GPH" and a measurement graphic showing width-to-flow relationship. Include short callout text in two bullets:- "Match flow rate to waterfall height and width"- "At least 100 GPH per inch of waterfall width"Add two small pump option icons with labels:- "Submersible pumps" for smaller builds- "External pumps" for larger, more demanding setupsSection 3 on the right, titled in a bold brown bar: "C. Stock Up on Essential Tools to Work Efficiently"Show a neat tool spread with labeled icons arranged in a clean 2-column grid:- Shovel and pickaxe- Level- Rubber mallet- EPDM liner- Waterfall foam sealant- Work glovesUse simple line icons with subtle color fills. Add a small note banner reading "Ready before you start digging"Include thin connector lines, checkmark markers, and subtle numbered section indicators "A", "B", and "C". Keep all text crisp and legible, with strong spacing and balanced alignment. Use a clean infographic layout, modern, informative, and visually polished.

A. Select the Best Rocks for a Natural, Stunning Look

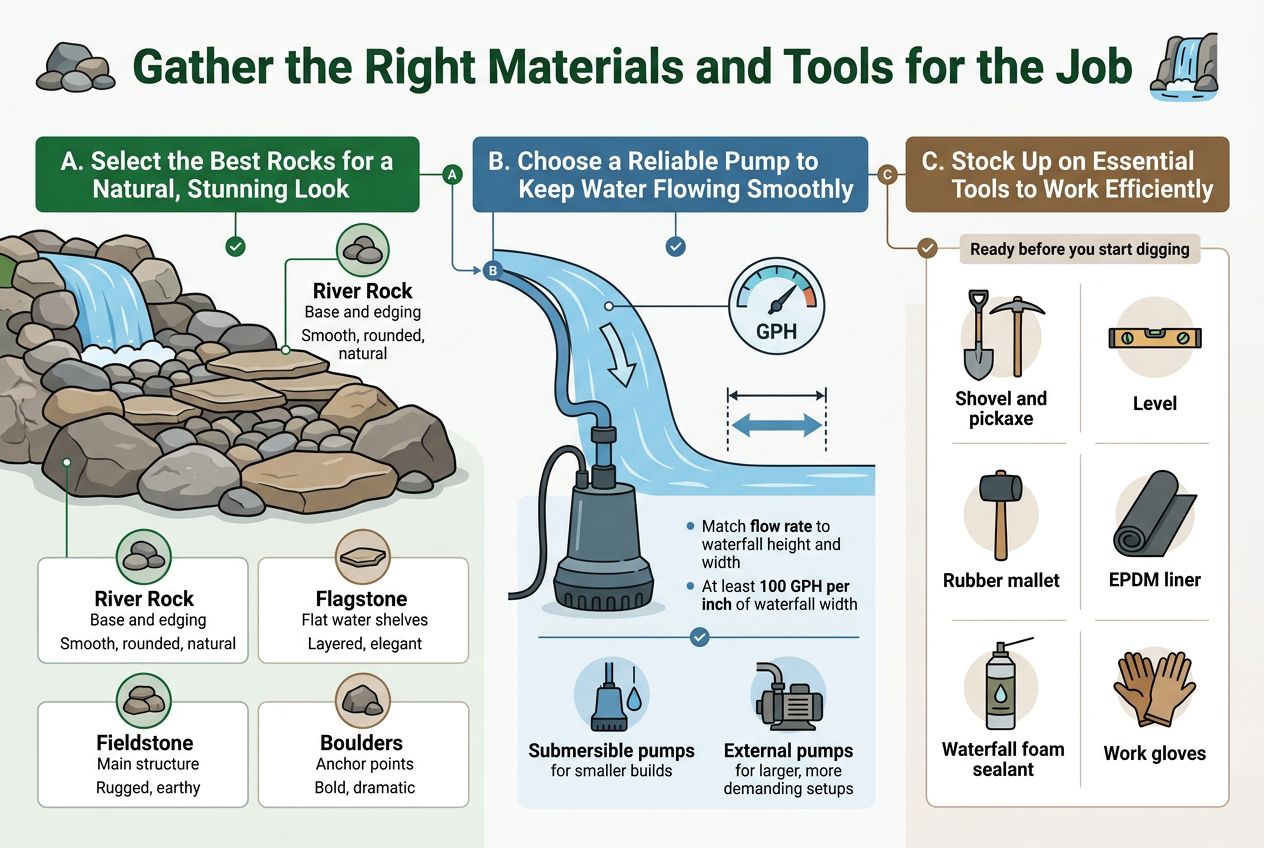
Your rock choices make or break the whole look of your waterfall. Go for natural stones like fieldstone, flagstone, or river rock — they blend beautifully with outdoor landscapes. Mix sizes to create depth and avoid that “fake” stacked look. Bigger anchor rocks at the base give your structure stability, while smaller stones fill gaps and guide water naturally.

Also Read  12 Stunning, Raised, Small Backyard Koi Pond Designs That Transform Any Space
Rock TypeBest UseLook & Feel
River RockBase and edgingSmooth, rounded, natural
FlagstoneFlat water shelvesLayered, elegant
FieldstoneMain structureRugged, earthy
BouldersAnchor pointsBold, dramatic

B. Choose a Reliable Pump to Keep Water Flowing Smoothly

Your pump is the heart of the whole setup, so don’t cut corners here. Match your pump’s flow rate (measured in GPH — gallons per hour) to the height and width of your waterfall. A general rule: you need at least 100 GPH per inch of waterfall width. Go submersible for smaller builds or external pumps for larger, more demanding setups.


C. Stock Up on Essential Tools to Work Efficiently

Having the right tools on hand saves you time and frustration. Here’s what you’ll want ready before you start digging:

  • Shovel and pickaxe — for breaking ground and shaping your excavation
  • Level — to keep rocks even and water flowing in the right direction
  • Rubber mallet — to tap rocks into place without cracking them
  • EPDM liner — to waterproof your basin and prevent leaks
  • Waterfall foam sealant — to direct water flow between rocks naturally
  • Work gloves — your hands will thank you

Prepare the Site for a Strong and Lasting Foundation
Create a clean professional infographic illustration in full-bleed 3:2 landscape format about pond and waterfall site preparation, with a modern outdoor landscaping style, blue-green earthy color palette, crisp white background panels, dark charcoal headings, and accent colors of teal, moss green, tan, and soft blue. Add a bold top title across the full width: "Prepare the Site for a Strong and Lasting Foundation".Below the title, organize the content into four wide horizontal sections or four equal columns across the page, each with a large numbered circle icon and a simple construction/landscaping illustration.Section 1 on the left: a spray paint can and garden hose icon beside a marked pond outline on soil. Heading text: "1. Mark Out the Layout". Body text: "Outline the waterfall and pond area with spray paint or a garden hose. Walk around it and adjust the shape before digging." Add a small note line: "Your layout is your blueprint."Section 2: a shovel and dug basin icon with depth markers. Heading text: "2. Dig the Pond Basin". Body text: "Dig at least 18–24 inches deep and slightly wider than the marked outline. Angle the walls outward to help prevent collapse." Show a vertical depth gauge labeled "18–24 in" and a wider excavation shape.Section 3: a carpenter's level resting across the basin edge with a balanced waterline. Heading text: "3. Level the Ground". Body text: "Use a long carpenter's level to keep the basin even. Uneven ground can cause water to pool and rocks to shift over time." Include a small level bubble graphic centered.Section 4 on the right: a flexible black EPDM liner laid inside the basin with sand or underlayment beneath it and overlapping edges. Heading text: "4. Line the Basin". Body text: "Place smooth sand or underlayment first, then lay the EPDM rubber liner loosely into the basin. Overlap the edges by at least 12 inches on all sides." Add a small label near the edge: "12 in overlap".Use clear typography with bold section headings, smaller readable body text, and simple vector-style icons. Include subtle arrows and checkmarks to guide the eye. Keep the layout spacious, balanced, and easy to read, with all text legible and aligned in a clean infographic grid.

A. Mark Out the Layout to Guide Your Build

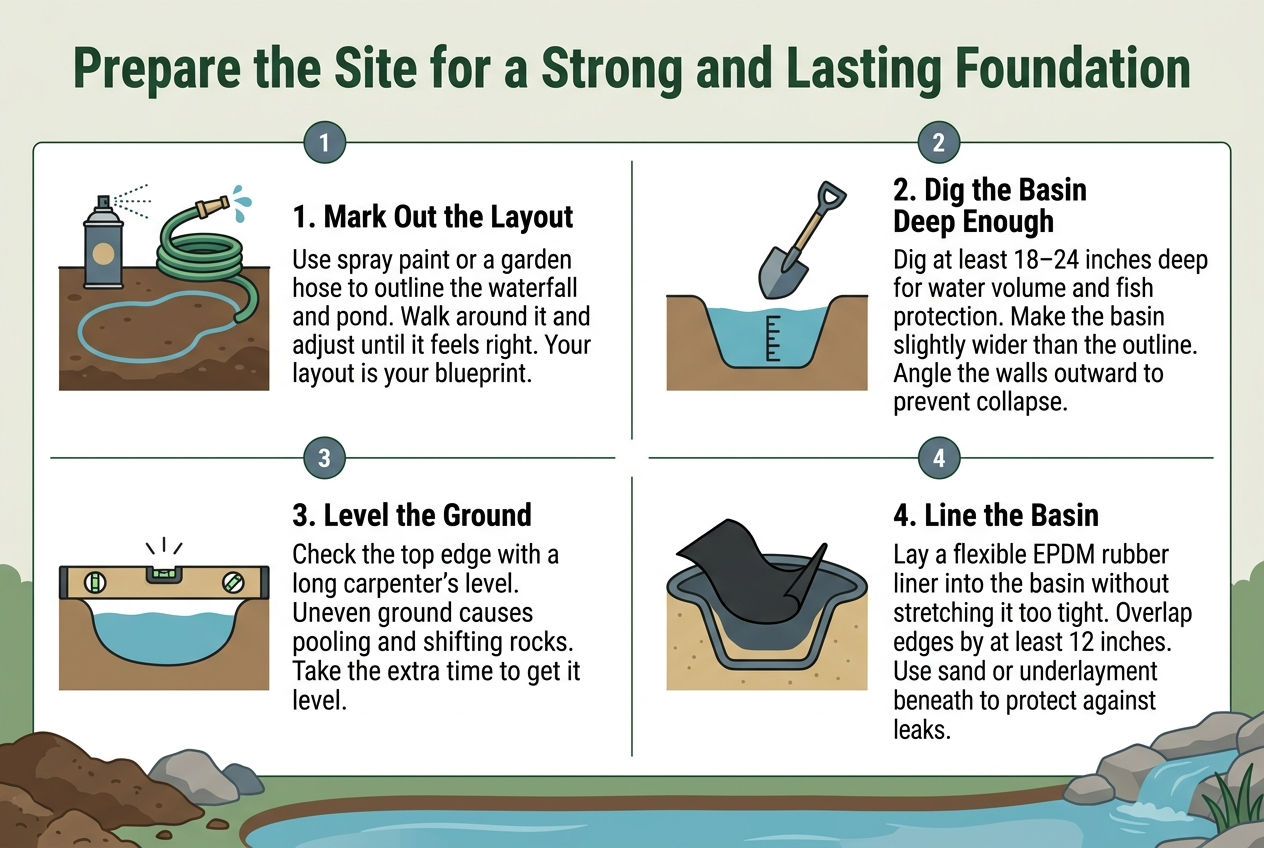
Grab some spray paint or a garden hose and outline exactly where your waterfall and pond will sit. Walk around it, look at it from your patio, and adjust until it feels right. Your layout is your blueprint — getting this step right saves you from costly repositioning later.

Also Read  12 Stunning Backyard Waterfall Ideas to Transform Your Outdoor Space Instantly!

B. Dig the Pond Basin to the Right Depth

Your basin should be at least 18–24 inches deep to support a healthy water volume and protect fish if you plan to add them. Dig slightly wider than your marked outline to give yourself room to work. As you dig, keep the walls angled slightly outward so the soil doesn’t collapse inward on you.

C. Level the Ground to Prevent Shifting Over Time

Use a long carpenter’s level across the top edge of your dug basin. If one side is higher than the other, your water will pool unevenly and your waterfall rocks will eventually shift and lean. Take the extra 20 minutes to get this right — your future self will thank you.

D. Line the Basin to Keep Water Where It Belongs

Lay a flexible EPDM rubber liner over the entire basin, pressing it gently into the contours without stretching it too tight. Overlap the edges by at least 12 inches on all sides. Place smooth sand or an underlayment pad beneath the liner first to protect it from sharp rocks that could cause slow, frustrating leaks down the road.

You Might Also Like!

  • A serene outdoor patio set up with rattan chairs and a wooden table, perfect for relaxation.
    How to Create a Cheap No-Grass Backyard: Step-by-Step Guide!
  • DIY Garden Box
    DIY Garden Box, Step by Step Guide
  • DIY Garden Fountain Ideas
    Easy Guide to Creating a Small Backyard Garden: The Complete Step-by-Step Guide
Rafay Khan

Post navigation

Previous Previous
Build a Deck Railing for Under $300 That Looks Custom-Built
NextContinue
The Swing Set Trick That Makes Any Backyard Feel Like a Park

You Might Also Like!

  • A serene outdoor patio set up with rattan chairs and a wooden table, perfect for relaxation.
    How to Create a Cheap No-Grass Backyard: Step-by-Step Guide!
  • DIY Garden Box
    DIY Garden Box, Step by Step Guide
  • DIY Garden Fountain Ideas
    Easy Guide to Creating a Small Backyard Garden: The Complete Step-by-Step Guide

Search More!

About DearWorld

We share practical DIY tips, budget-friendly ideas, and creative inspiration for mobile homes, backyards, patios, porches, gardens, and skirting. Helping you make every space feel like home — one project at a time.

  • About Us
  • Privacy Policy
  • Terms & Conditions
  • Blog

© 2026 Dear World - WordPress Theme by Kadence WP

Facebook Instagram Pinterest
Scroll to top
  • Home Improvement
    • Deck
    • Barn Doors
    • Patio
    • Bathroom
    • Garden Beds
    • Winter Home Prep
  • Mobile Home
    • Crawl Space
    • Skirting
  • Backyard
    • Landscaping
    • Curb Appeal
    • Water Features
  • Porch
  • Garden
  • Contact
Search