How To Build A Stunning DIY Floating Rock Fountain That Looks Store-Bought

You don’t need to spend hundreds of dollars on a professional water feature to create an eye-catching centerpiece for your garden or patio. This step-by-step guide shows DIY enthusiasts and homeowners exactly how to build a stunning floating rock fountain that rivals expensive store-bought models.
Perfect for beginners with basic handyman skills and experienced crafters looking for their next weekend project, this tutorial breaks down a seemingly complex water feature into manageable steps. You’ll discover the essential tools and materials needed for professional-looking results, plus learn the advanced assembly techniques that separate amateur projects from polished, store-quality finishes.
We’ll also cover the maintenance secrets that keep your DIY floating rock fountain looking brand new for years to come, so your investment in time and materials pays off long-term.
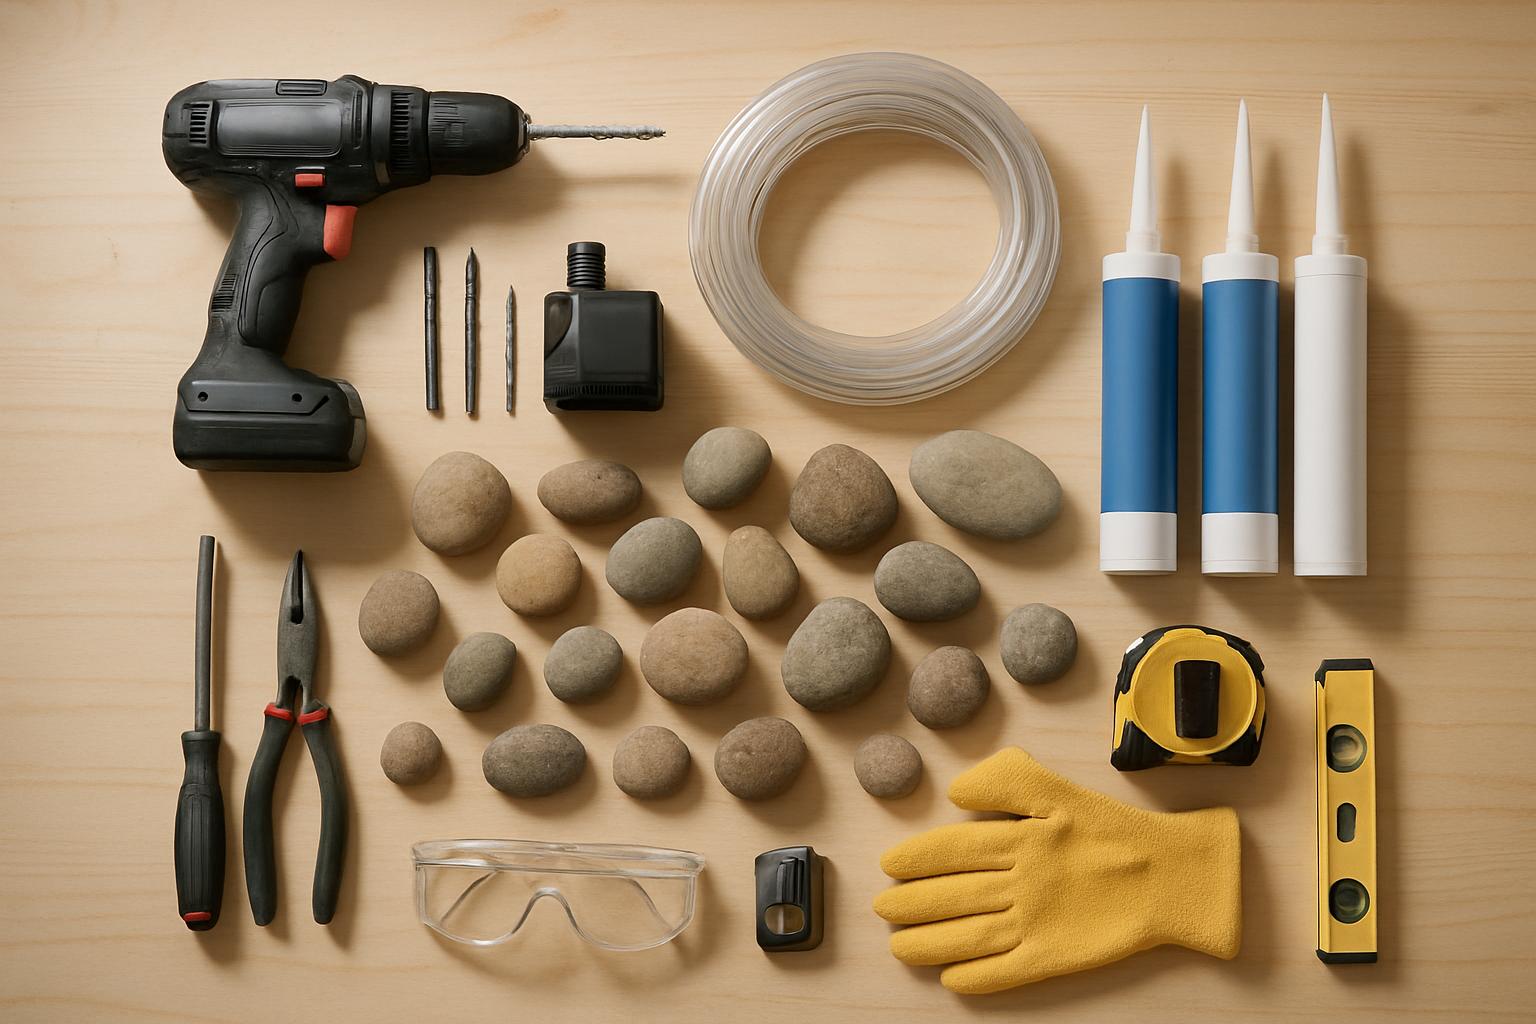
Essential Tools and Materials for Professional Results
You Might Also Love These Ideas


Power tools that make installation effortless
Your circular saw with a masonry blade will become your best friend when cutting through thick stone bases. A high-quality hammer drill with carbide bits makes quick work of creating precise holes for pump housing and water lines. Don’t forget a diamond-tipped grinder for smoothing rough edges and creating professional-looking channels for your plumbing system.
Specialized fountain components for durability
You’ll need a submersible pump rated for continuous outdoor use, typically 300-500 gallons per hour for most residential fountains. Flexible vinyl tubing in 1/2-inch diameter works perfectly for most setups, while stainless steel fittings resist corrosion and maintain water pressure. A GFCI outlet protector keeps your electrical connections safe, and adjustable flow valves let you fine-tune water height and volume.
Natural stone selection for authentic appearance
Choose porous stones like sandstone or limestone that develop beautiful water patterns over time. Your foundation rock should weigh at least 20-30 pounds to provide stability, while accent stones can be smaller for visual interest. Look for natural holes or drill strategic openings where water can bubble through naturally. Avoid overly smooth river rocks that look artificial and don’t create the textured water flow you want.
Waterproofing supplies that prevent costly mistakes
Marine-grade silicone sealant creates watertight connections around pump housings and stone joints. You’ll also need waterproof electrical tape for protecting wire connections and rubber gaskets for pipe fittings. A quality pond liner underneath catches any overflow, while waterproof wire nuts keep electrical connections dry. These small investments prevent water damage that could cost hundreds to repair later.
Choosing and Preparing Your Perfect Rock Foundation
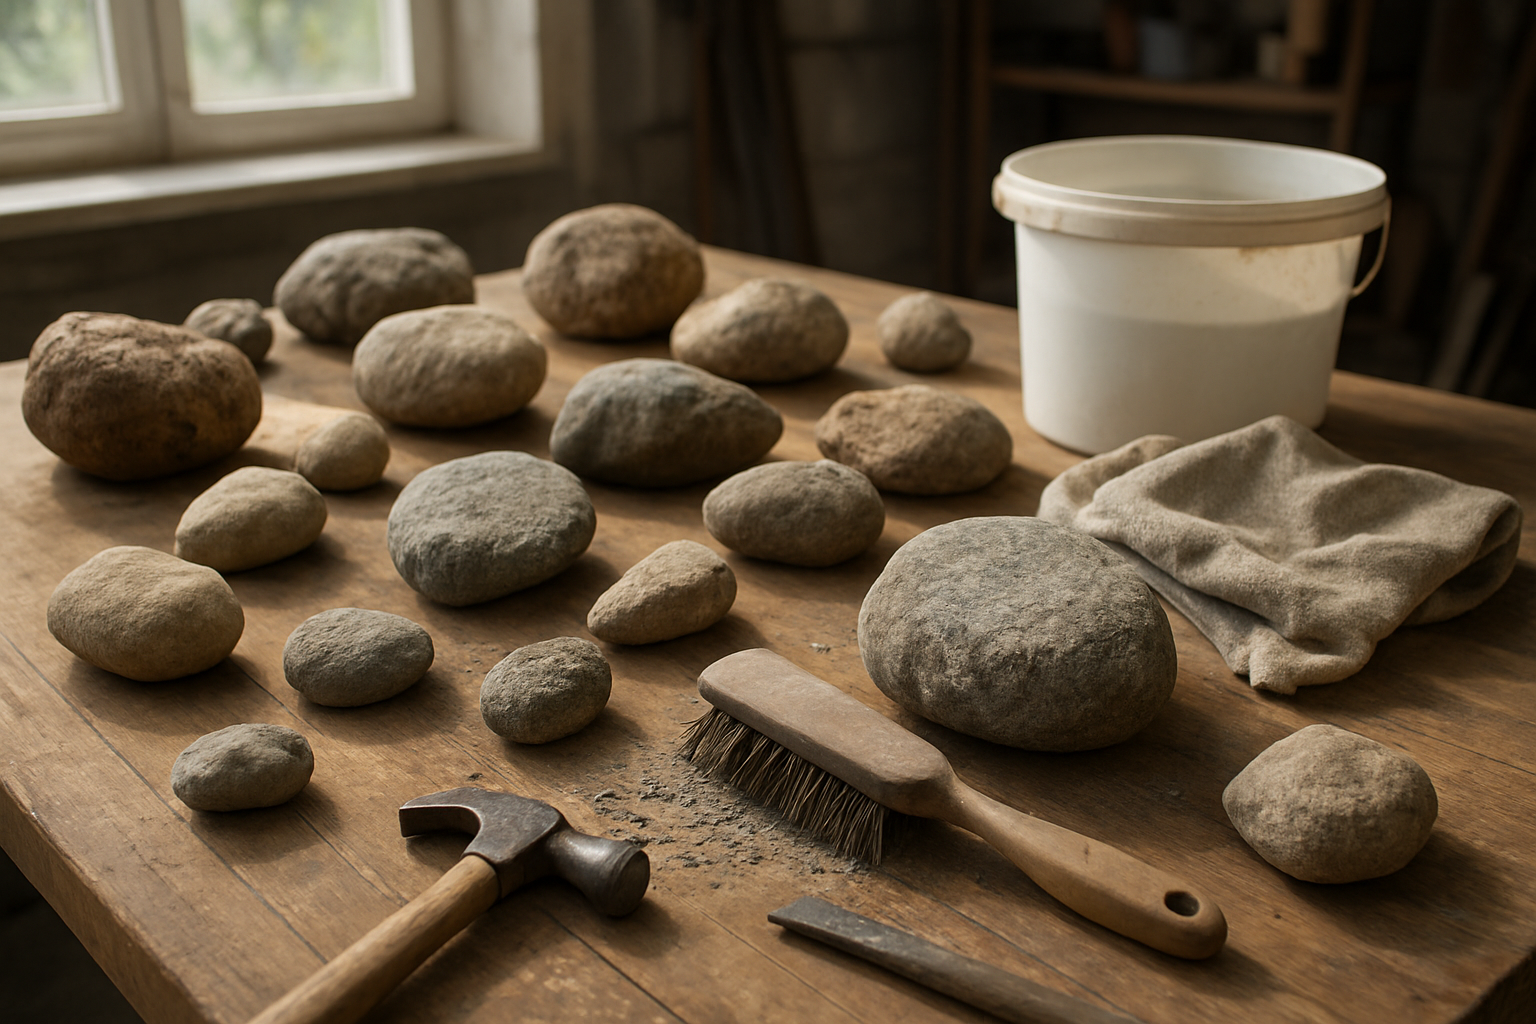
Identifying rocks with natural drilling potential
You’ll want to scout for sedimentary rocks like sandstone or limestone, which drill cleanly without unexpected fractures. Avoid granite or extremely hard volcanic rocks that can shatter your drill bits and create jagged holes. Look for stones with visible grain patterns running horizontally – these indicate stable layers that won’t split when you drill vertically through them.
Creating precise holes without cracking or splitting
Start your drilling with a small pilot hole using a masonry bit, then gradually step up to larger diamond-tipped hole saws. Keep your drill speed low and apply steady, gentle pressure while frequently backing out to clear debris. Always drill from both sides of thicker rocks, meeting in the middle to prevent blowout cracks on the exit side.
Achieving smooth surfaces for seamless water flow
Sand the interior walls of your drilled holes using progressively finer grits, starting with 120-grit and finishing with 400-grit sandpaper wrapped around a dowel. This creates a glass-smooth channel that allows water to flow without turbulence or gurgling sounds. Clean all stone dust thoroughly with compressed air and wipe surfaces with a damp cloth before final assembly.
Building the Hidden Pump and Plumbing System
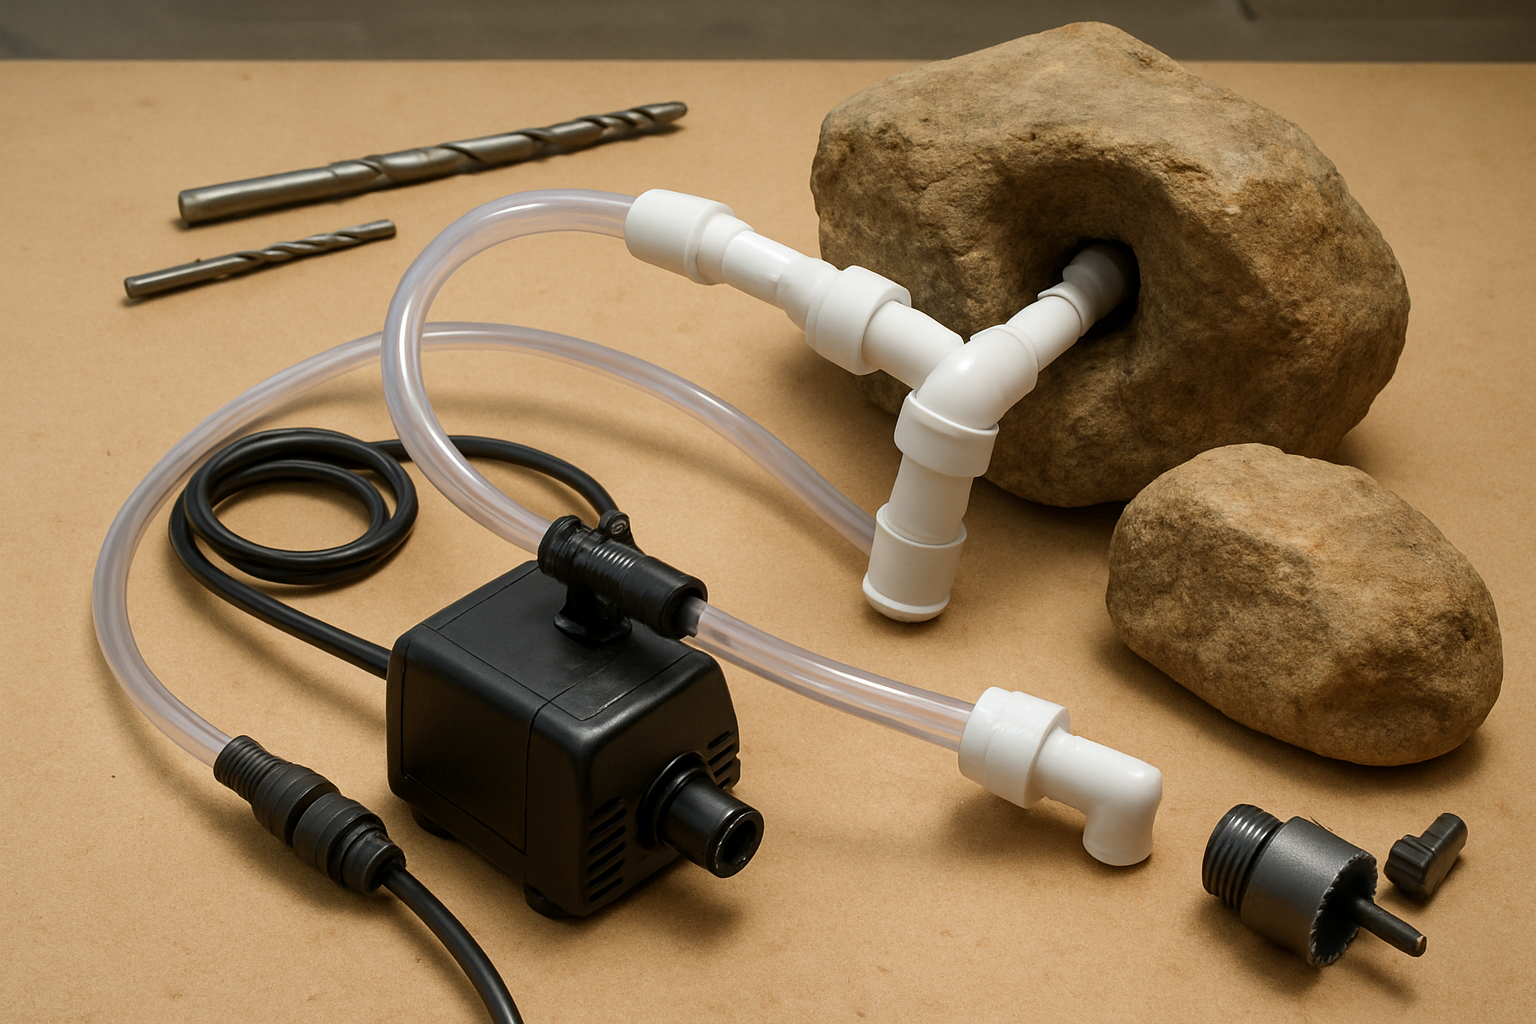
Selecting the right pump size for optimal water pressure
Calculate your pump requirements based on the fountain’s height and water volume. For most DIY rock fountains, you’ll need a submersible pump rated between 200-400 gallons per hour. Consider the vertical lift distance – every foot of height requires additional pump power. Choose a pump with adjustable flow control so you can fine-tune the water pressure for your desired effect.
Installing underground tubing for invisible operation
Bury your tubing at least 6 inches deep to prevent freeze damage and maintain the illusion of naturally flowing water. Use flexible vinyl tubing rated for outdoor use, and create gentle curves rather than sharp bends to maintain water pressure. Run the tubing from your pump’s location to the base of your rock fountain, keeping the path as short and direct as possible.
Creating efficient water circulation pathways
Design your water flow to maximize circulation while minimizing energy consumption. Position your pump intake away from the water return point to prevent short-cycling. Create multiple circulation paths if possible – this helps distribute oxygen throughout the water and prevents stagnant areas where algae can form. Angle your return lines slightly upward to encourage surface movement.
Adding filtration components for crystal clear water
Install a pre-filter at your pump intake to catch larger debris before it enters the system. Add a UV sterilizer to control algae growth naturally without harsh chemicals. Consider including a small biological filter with beneficial bacteria to break down organic waste. Position all filtration components where they’re easily accessible for regular cleaning and maintenance.
Weatherproofing all electrical connections safely
Use only outdoor-rated electrical components and GFCI protection for all fountain connections. Seal all wire nuts with waterproof connectors and wrap joints with self-amalgamating tape. Install junction boxes above ground level and use conduit to protect underground wiring. Keep all electrical connections at least 6 feet away from water features and test your GFCI monthly for proper operation.
Advanced Assembly Techniques for Store-Quality Finish
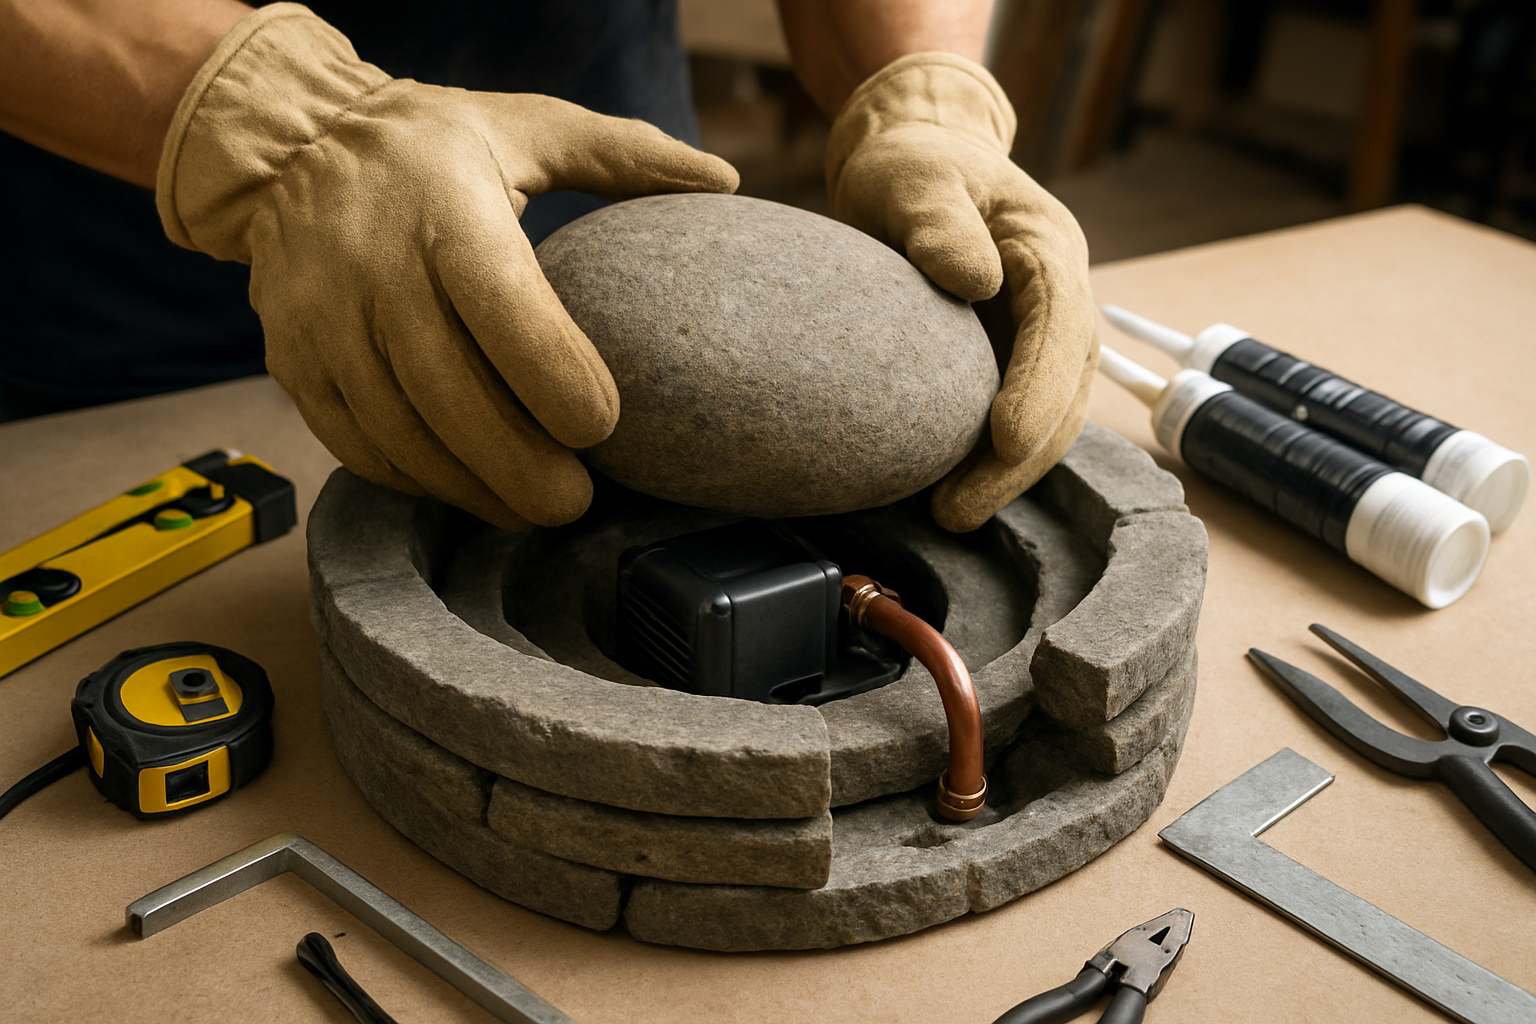
Stacking Rocks for Maximum Visual Impact
Your rock arrangement makes or breaks the fountain’s appeal. Start with your largest, most striking stone as the base, then work upward with progressively smaller pieces. Create natural-looking gaps between rocks where water can flow freely. Avoid perfect symmetry – nature doesn’t work that way. Angle rocks slightly inward to direct water flow toward the center, and leave deliberate spaces for cascading water to catch light and create movement.
Concealing All Mechanical Components Completely
Hide every trace of modern technology to maintain the illusion. Route your pump cord through natural rock crevices, using black aquarium tubing that blends invisibly with wet stone. Tuck the pump deep within your rock pile, ensuring it’s completely surrounded but still accessible for maintenance. Paint any visible metal components with stone-textured spray paint. Cover the power cord’s exit point with loose gravel or a strategically placed decorative stone.
Balancing Water Flow for Gentle Cascading Sounds
Perfect water flow creates a soothing soundtrack without overwhelming noise. Start with your pump on low and gradually increase until you achieve a gentle babbling sound. Adjust individual rock positions to control flow direction – slightly tilting stones changes how water moves across their surface. Create multiple small streams rather than one powerful cascade. Test different flow rates throughout the day, as ambient noise levels affect how your fountain sounds.
Securing the Structure Against Weather and Settling
Your fountain needs rock-solid stability to survive seasons of weather. Pack gravel tightly around your base stones, then add a layer of sand for extra stability. Use clear construction adhesive sparingly on contact points between major stones – just enough to prevent shifting without creating obvious joints. Build a slight slope away from your fountain’s base to prevent water from pooling underneath. Check and re-level your structure monthly during the first season as natural settling occurs.
Final Touches That Elevate Your Fountain Design
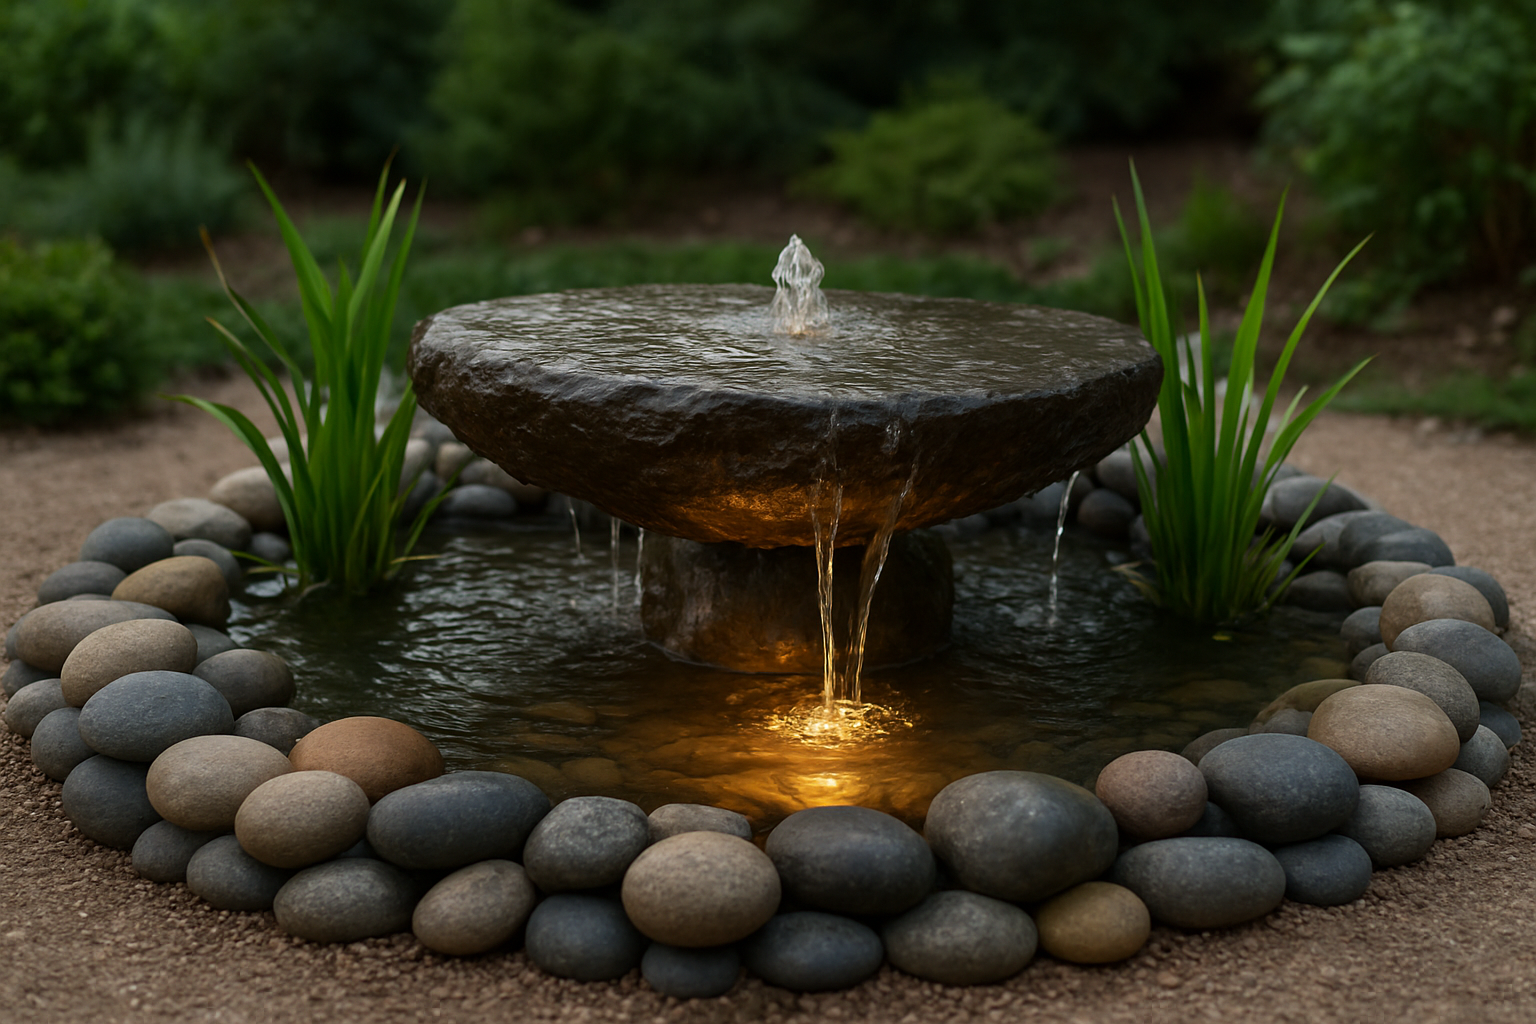
Strategic lighting placement for nighttime ambiance
Position LED spotlights at 45-degree angles beneath your fountain to create dramatic upward illumination through the cascading water. Install submersible lights directly in the basin for an enchanting glow that transforms your fountain into a mesmerizing centerpiece after dark.
Adding natural elements like plants and pebbles
Surround your fountain with moisture-loving plants like ferns, hostas, and moss to create a naturalistic setting. Scatter river rocks and smooth pebbles around the base to hide plumbing connections while adding authentic texture that makes your DIY fountain look professionally landscaped.
Fine-tuning water pressure for perfect flow patterns
Adjust your pump’s flow rate gradually until you achieve that perfect sheet of water flowing smoothly over your rock’s surface. Test different pressure settings to find the sweet spot where water cascades evenly without splashing excessively or creating unwanted noise that disrupts your peaceful outdoor sanctuary.
Maintenance Secrets to Keep Your Fountain Looking New
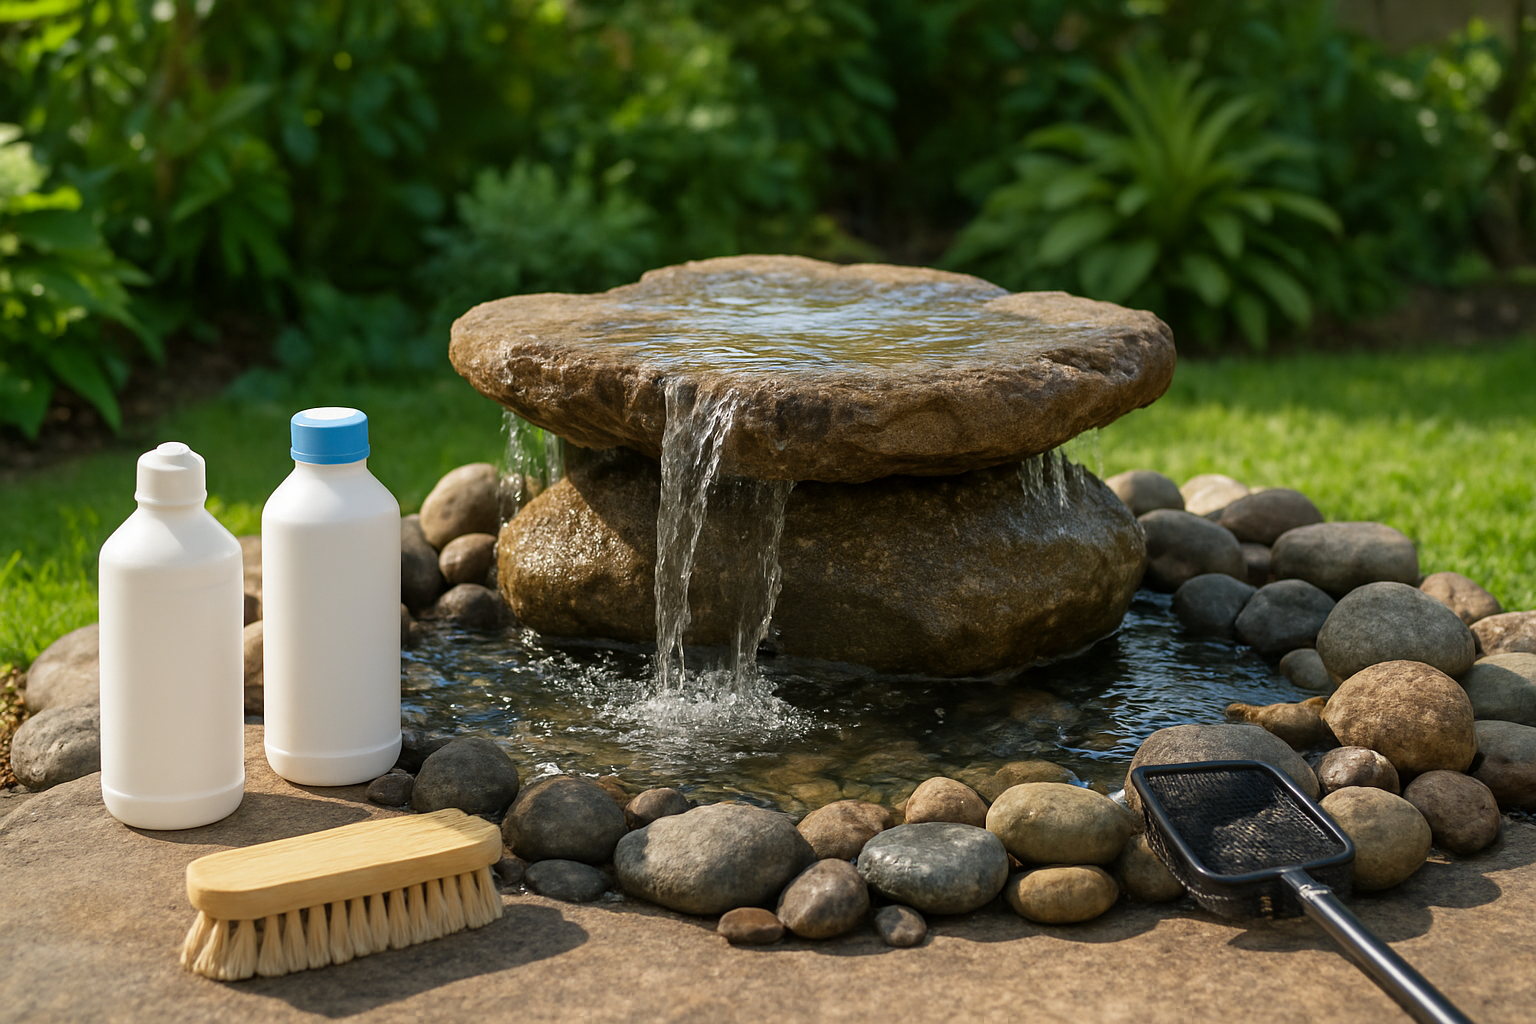
Seasonal cleaning routines that preserve beauty
Clean your fountain every two weeks during active months and monthly during cooler seasons. Remove debris with a soft brush, drain the water completely, and scrub all surfaces with a mild vinegar solution. Replace the water with fresh, clean water and check your pump for any clogs or mineral buildup.
Preventing algae growth with natural methods
Add barley straw extract or beneficial bacteria to your water system monthly. Position your fountain away from direct sunlight for more than six hours daily. Install a UV sterilizer in your pump system to kill algae spores naturally. Keep fish or aquatic plants that consume algae, creating a balanced ecosystem that maintains crystal-clear water.
Winterizing techniques to avoid freeze damage
Drain your entire system before temperatures drop below freezing. Remove and store your pump indoors in a dry location. Disconnect all plumbing connections and blow out remaining water with compressed air. Cover your rock fountain with a breathable tarp to protect surfaces from ice damage while allowing moisture to escape.
Troubleshooting common issues before they become problems
Check your water levels weekly and refill as needed to prevent pump damage. Listen for unusual sounds that indicate worn bearings or clogs. Test your electrical connections monthly for corrosion or loose wires. Keep spare pump parts and extra tubing on hand for quick repairs that prevent costly downtime.


