Build a Deck Railing for Under $300 That Looks Custom-Built

You don’t need to spend thousands of dollars to get a deck railing that looks like a pro installed it. If you’re a DIY homeowner who wants a sharp, sturdy railing without blowing your weekend budget, this guide is for you.
Here’s what you’ll walk away with: a clear plan for designing a railing that looks intentional and polished, a straightforward breakdown of the best budget-friendly materials that don’t look cheap, and a step-by-step build process that takes the guesswork out of getting a professional finish.
Building a custom deck railing for under $300 is completely doable — you just need to know where to put your money and where to save it.
Plan Your Railing Design to Maximize Style on a Budget
You Might Also Love These Ideas


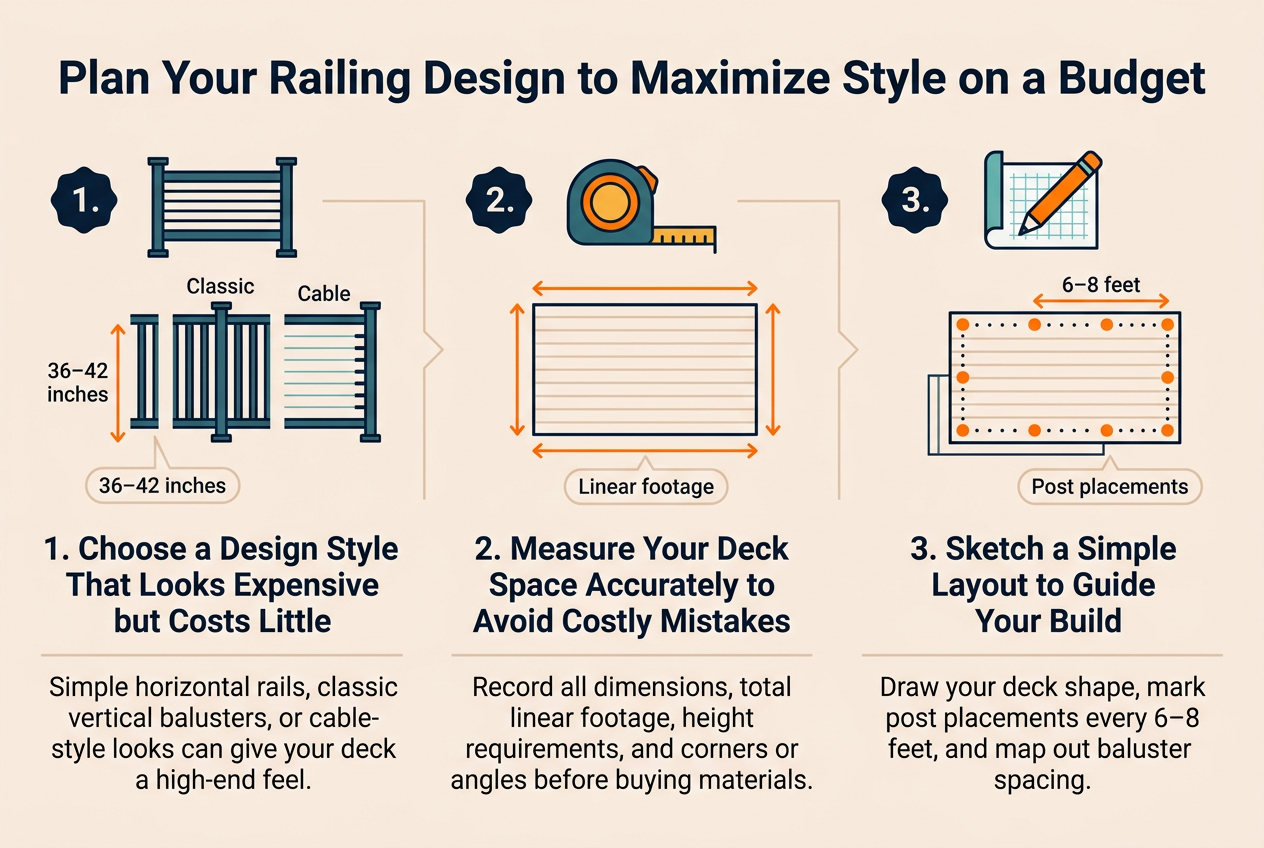
Choose a Design Style That Looks Expensive but Costs Little
Your railing doesn’t need to cost a fortune to look stunning. Simple horizontal rail designs, classic vertical balusters, or even a cable-style look using affordable materials can give your deck a high-end feel. Pick a style that complements your home’s exterior, and you’re already ahead of the game.
Measure Your Deck Space Accurately to Avoid Costly Mistakes
Before buying a single board, grab your tape measure and record every dimension of your deck perimeter carefully. Note the total linear footage, the height requirement (typically 36–42 inches depending on your local code), and any corners or angles. Double-checking your numbers now saves you from wasting money on materials later.
Sketch a Simple Layout to Guide Your Build
You don’t need fancy software — a pencil and graph paper work perfectly. Draw your deck’s shape, mark post placements every 6–8 feet, and map out baluster spacing. Your sketch becomes your shopping list and your roadmap, keeping your build organized and your budget tight from the very first cut.
Select the Right Materials Without Overspending
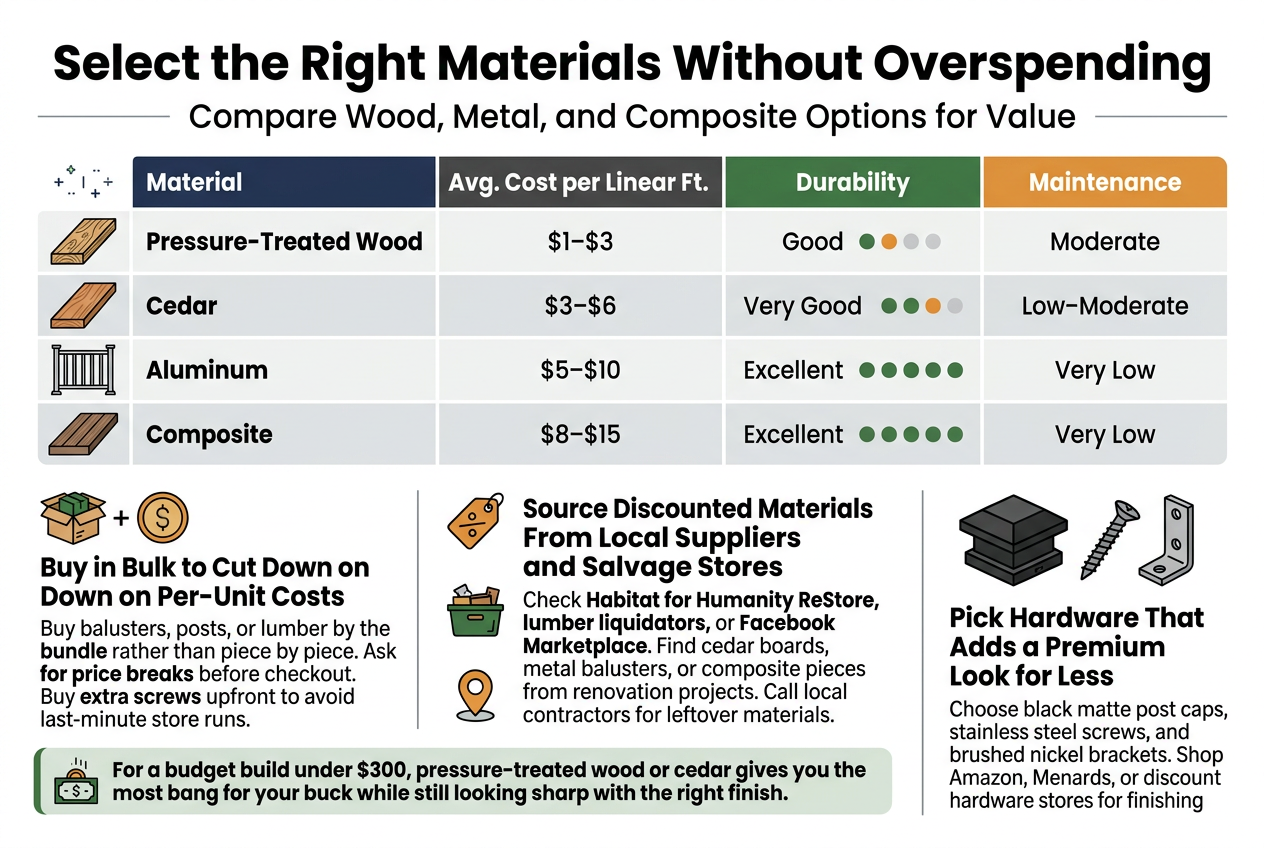
Compare Wood, Metal, and Composite Options for Value
Picking the right material is where you either save big or blow your budget fast. Here’s a quick breakdown to help you decide:
| Material | Avg. Cost per Linear Ft. | Durability | Maintenance |
|---|---|---|---|
| Pressure-Treated Wood | $1–$3 | Good | Moderate |
| Cedar | $3–$6 | Very Good | Low–Moderate |
| Aluminum | $5–$10 | Excellent | Very Low |
| Composite | $8–$15 | Excellent | Very Low |
For a budget build under $300, pressure-treated wood or cedar gives you the most bang for your buck while still looking sharp with the right finish.
Buy in Bulk to Cut Down on Per-Unit Costs
When you buy balusters, posts, or lumber by the bundle rather than piece by piece, your per-unit cost drops significantly. Most lumber yards reward bulk purchases with automatic price breaks, so always ask before you check out. Even grabbing an extra box of screws upfront saves you a last-minute hardware store run that always costs more.
Source Discounted Materials From Local Suppliers and Salvage Stores
Your local Habitat for Humanity ReStore, lumber liquidators, or Facebook Marketplace can be goldmines for railing materials at a fraction of retail prices. You can often find cedar boards, metal balusters, or composite pieces pulled from renovation projects — all in solid condition. Calling local contractors about leftover materials is another smart move most people skip.
Pick Hardware That Adds a Premium Look for Less
Your choice of hardware does more heavy lifting than you’d expect. Black matte post caps, stainless steel screws, and brushed nickel brackets make your railing look like it came from a high-end showroom without the price tag. Shop Amazon, Menards, or discount hardware stores to find these finishing pieces for a fraction of what big-box stores charge.
Gather the Tools You Need Before You Start
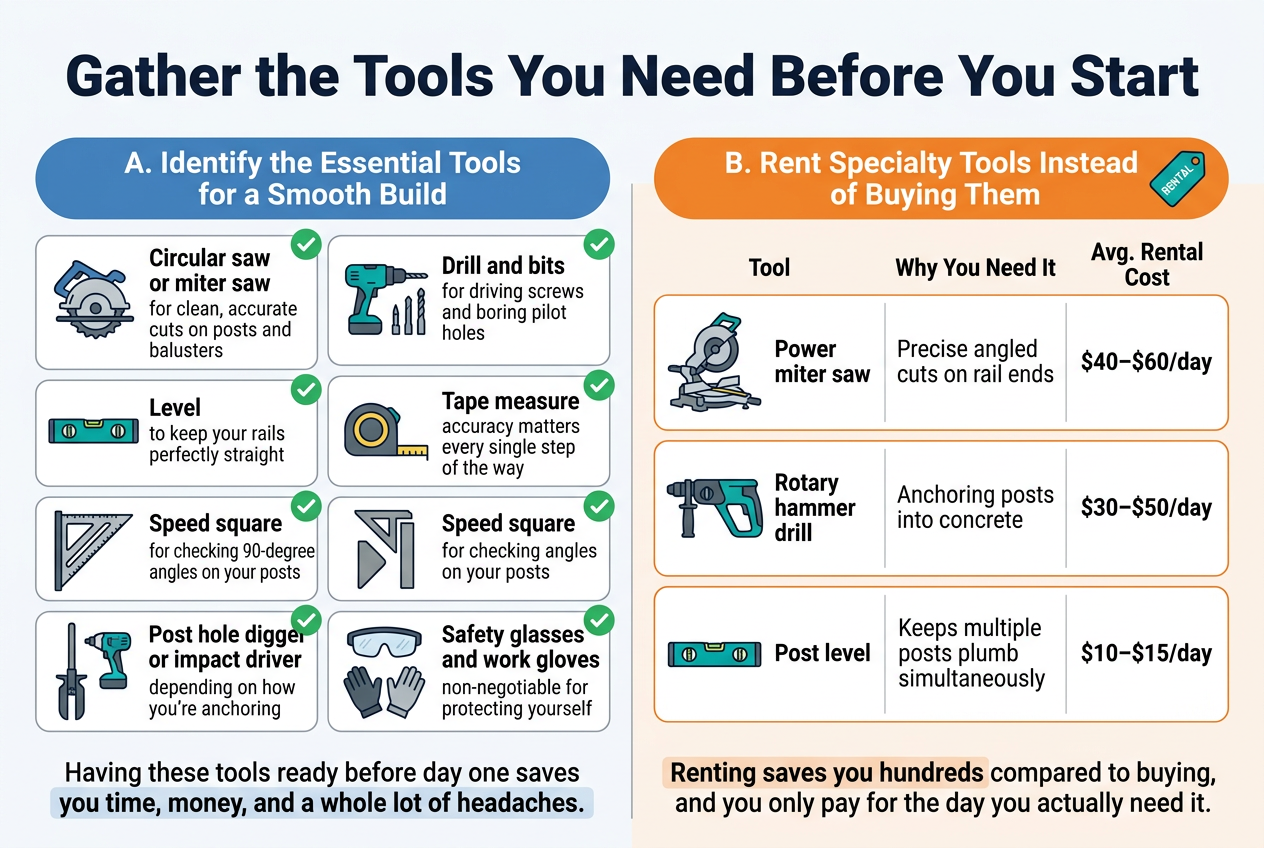
A. Identify the Essential Tools for a Smooth Build
Before you cut a single board, make sure your workspace has everything you need to avoid frustrating mid-project runs to the hardware store. Your basic toolkit should include:
- Circular saw or miter saw – for clean, accurate cuts on posts and balusters
- Drill and bits – for driving screws and boring pilot holes
- Level – to keep your rails perfectly straight
- Tape measure – accuracy matters every single step of the way
- Speed square – for checking 90-degree angles on your posts
- Post hole digger or impact driver – depending on how you’re anchoring
- Safety glasses and work gloves – non-negotiable for protecting yourself
Having these tools ready before day one saves you time, money, and a whole lot of headaches.
B. Rent Specialty Tools Instead of Buying Them
Some tools are only worth having if you build decks every weekend. For a one-time project, renting makes way more sense for your wallet. Check your local home improvement store or tool rental shop for these:
| Tool | Why You Need It | Avg. Rental Cost |
|---|---|---|
| Power miter saw | Precise angled cuts on rail ends | $40–$60/day |
| Rotary hammer drill | Anchoring posts into concrete | $30–$50/day |
| Post level | Keeps multiple posts plumb simultaneously | $10–$15/day |
Renting saves you hundreds compared to buying, and you only pay for the day you actually need it.
Build the Railing Step by Step for a Professional Finish
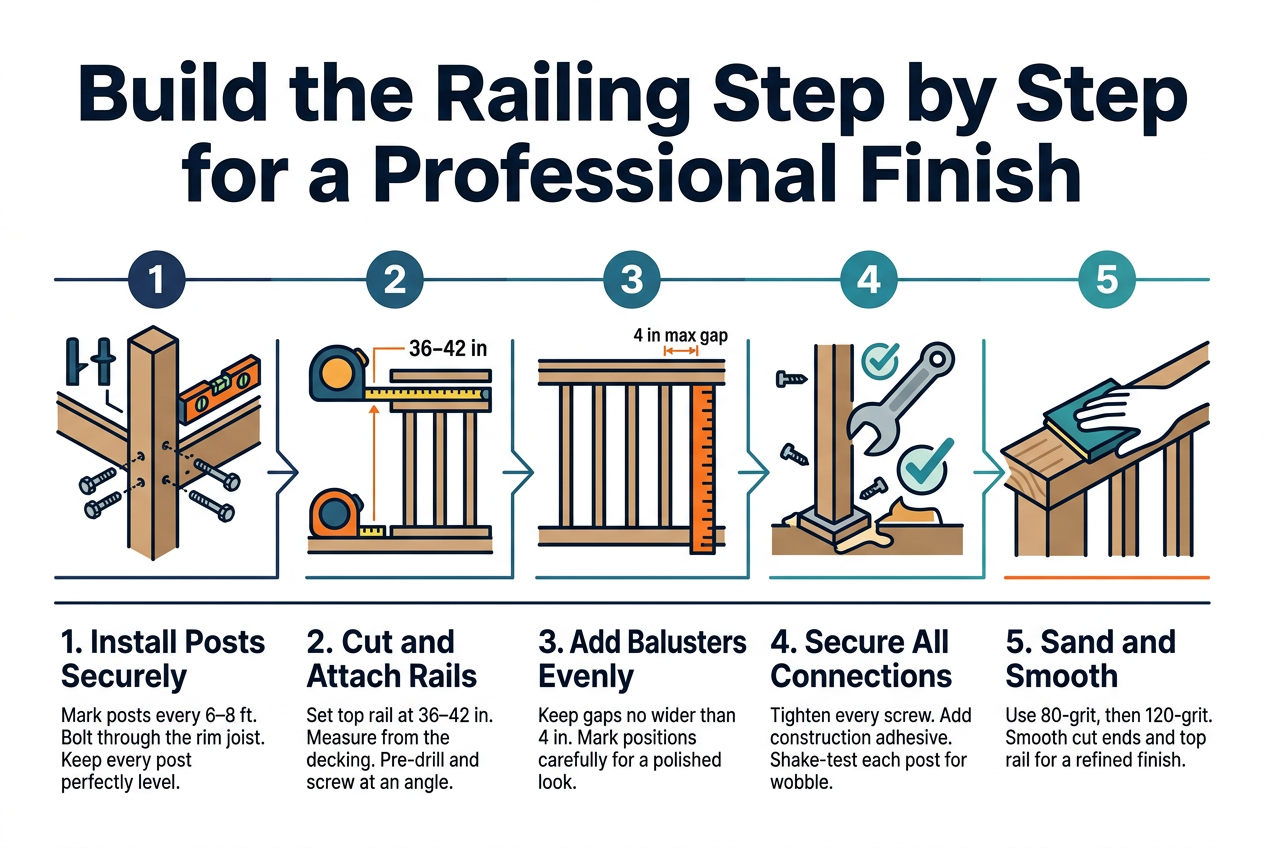
Install Posts Securely to Ensure Safety and Stability
Start by marking your post locations every 6 to 8 feet along the deck edge. Drill through the decking and secure each post with 1/2-inch carriage bolts running through the rim joist. Use a level constantly — even a slight lean will throw off your entire railing. Tighten every bolt fully before moving on.
Cut and Attach Rails at the Right Height for Code Compliance
Most building codes require your top rail to sit between 36 and 42 inches high, depending on your deck’s elevation. Measure from the decking surface up, mark each post at the same height, and cut your top and bottom rails to fit snugly between posts. Pre-drill your holes to avoid splitting the wood, then drive your screws at an angle for a stronger hold.
Add Balusters Evenly for a Clean and Polished Appearance
Spacing your balusters correctly is what separates a DIY-looking railing from one that looks professionally done. Keep gaps no wider than 4 inches to meet safety codes. To space them evenly, divide the total rail length by the number of balusters you need, then mark each position with a pencil before driving a single screw.
Secure All Connections to Prevent Wobbling and Wear
Go back over every connection point once everything is in place. Add construction adhesive at post bases for extra holding power, and double-check that no screws are backing out. A quick shake test on each post tells you right away if something needs tightening before you consider the frame finished.
Sand and Smooth All Surfaces for a Refined Look
Run 80-grit sandpaper over all cut ends and rough spots, then follow up with 120-grit for a smoother finish. Pay close attention to the top rail since that’s what people grab and run their hands along. Smooth edges not only look better — they also help your stain or paint stick evenly for a finish that actually lasts.


