The $50 Raised Garden Bed Hack That Grows More Food Than a $500 Kit

You Don’t Need to Spend $500 to Grow More Food
If you’ve been eyeing those fancy raised garden bed kits online and wondering if they’re actually worth it, the short answer is no. A $50 DIY raised bed built the right way will outgrow, outlast, and outperform most premium kits on the market.
This guide is for home gardeners who want real food production without throwing money at overpriced cedar frames and thin instruction booklets. Whether you have a small backyard, a side yard, or just a patch of grass you’re ready to transform, this build is for you.
Here’s what you’ll walk away with after reading this:
- Why expensive raised bed kits actually underperform and what they consistently get wrong
- A step-by-step $50 build breakdown that gives you more growing space and better durability
- The soil and filling strategy that most gardeners skip but that makes the biggest difference in your harvest
No fluff, no expensive tools, no contractor required. Just a practical setup that gets food in the ground fast.
You Might Also Love These Ideas


Why Expensive Raised Bed Kits Fail to Deliver on Their Promise
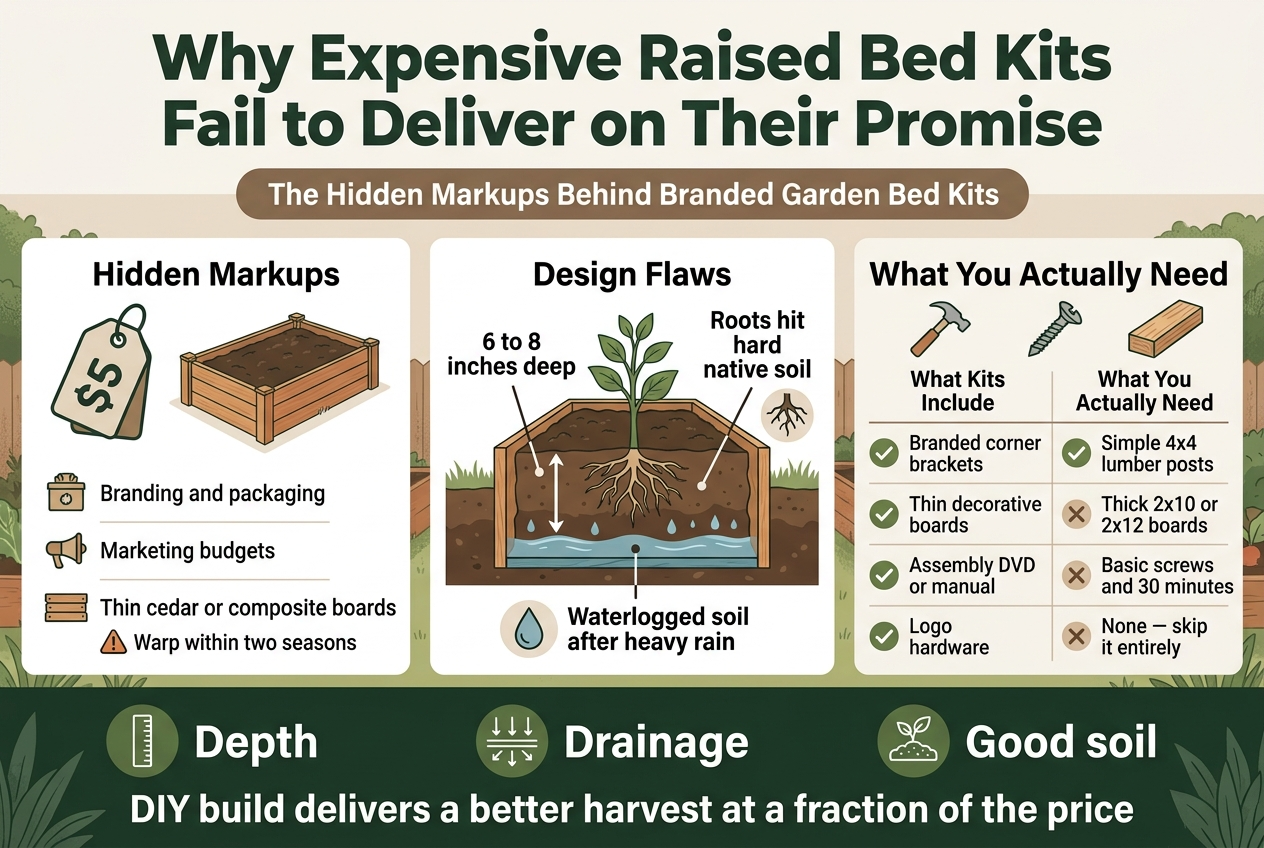
The Hidden Markups Behind Branded Garden Bed Kits
When you walk into a garden center or scroll through Amazon, those sleek $400–$500 raised bed kits look incredibly appealing. But what you’re really paying for is branding, fancy packaging, and marketing budgets — not better growing results. Most kits use thin cedar or composite boards that warp within two seasons, leaving you with a crumbling structure that costs more to replace than it ever saved you in grocery bills.
Common Design Flaws That Limit Plant Growth and Yield
The depth on most kits is shockingly shallow — often just 6 to 8 inches — which sounds fine until your carrots, tomatoes, or squash hit a hard wall of native soil beneath. Your plants can’t root deeply enough, which directly cuts your harvest. Many kits also skip proper drainage planning entirely, so your roots sit in waterlogged soil after heavy rain and slowly rot.
What You Actually Need Versus What Kits Bundle In
Here’s a quick breakdown of what you’re getting versus what actually matters for growing food:
| What Kits Include | What You Actually Need |
|---|---|
| Branded corner brackets | Simple 4×4 lumber posts |
| Thin decorative boards | Thick 2×10 or 2×12 boards |
| Assembly DVD or manual | Basic screws and 30 minutes |
| Logo hardware | None — skip it entirely |
Your plants don’t care about the brand name on your garden bed. They care about depth, drainage, and good soil — three things your DIY build delivers at a fraction of the price.
The $50 Build Breakdown That Outperforms Premium Kits
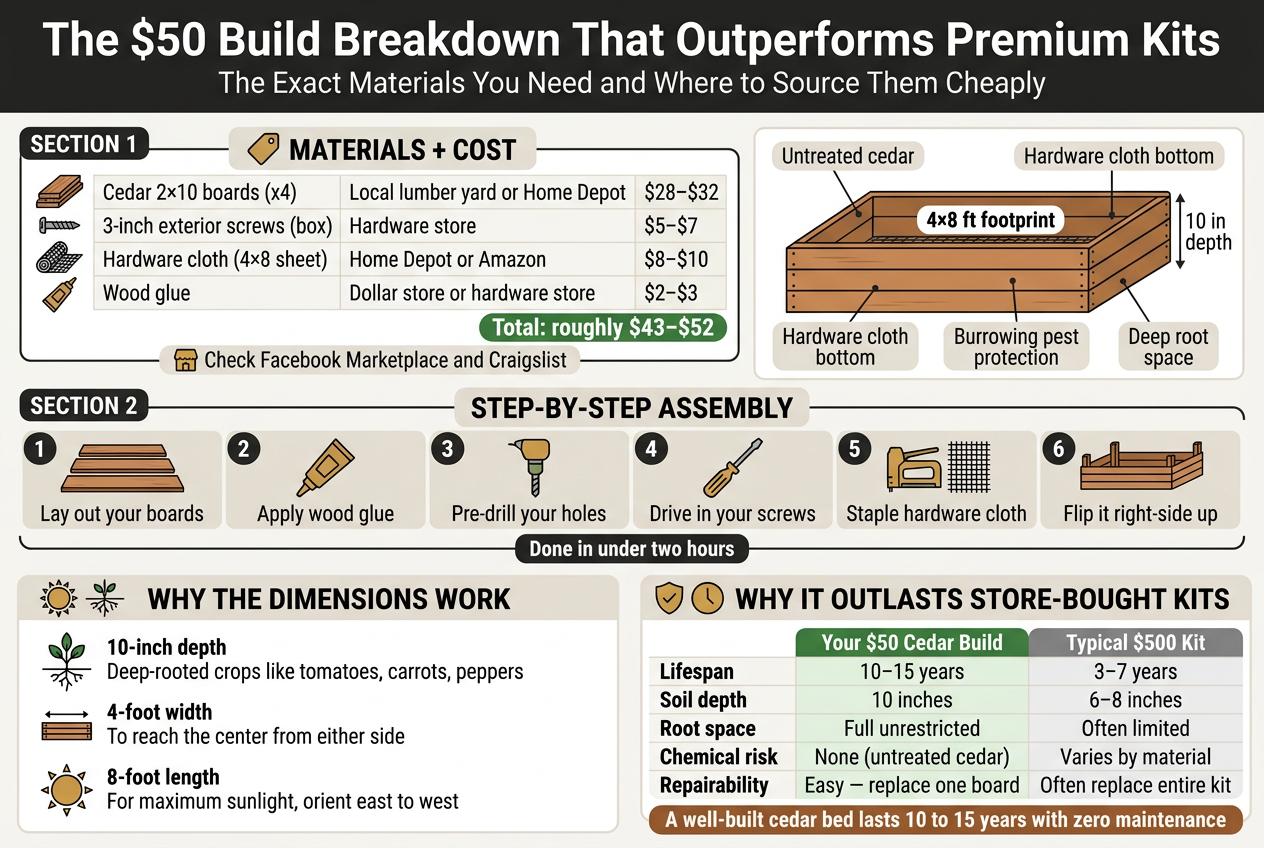
The Exact Materials You Need and Where to Source Them Cheaply
Skip the fancy garden centers and head straight to your local lumber yard or big-box store. You need four pieces of untreated cedar or Douglas fir — two 8-foot boards and two 4-foot boards, all cut to 2×10 dimensions. Cedar naturally resists rot without any chemical treatment, making it your safest bet for food crops. Grab a box of 3-inch exterior screws, a tube of wood glue for extra joint strength, and a sheet of hardware cloth (also called galvanized mesh) for the bottom to keep out burrowing pests. Here’s a quick breakdown of what you’re spending:
| Material | Where to Buy | Approximate Cost |
|---|---|---|
| Cedar 2×10 boards (x4) | Local lumber yard or Home Depot | $28–$32 |
| 3-inch exterior screws (box) | Hardware store | $5–$7 |
| Hardware cloth (4×8 sheet) | Home Depot or Amazon | $8–$10 |
| Wood glue | Dollar store or hardware store | $2–$3 |
Total: roughly $43–$52 depending on your location.
Check Facebook Marketplace and Craigslist before you buy anything — people give away cedar boards constantly after fence replacements and deck teardowns. Your wallet will thank you.
Step-by-Step Assembly Anyone Can Complete in Under Two Hours
You don’t need any carpentry experience to pull this off. Here’s exactly what you do:
- Lay out your boards flat on a driveway or garage floor — two long boards parallel to each other, two short boards forming the ends.
- Apply a thin bead of wood glue along each connecting end before screwing, so your joints stay tight through years of wet soil pressure.
- Pre-drill your holes to stop the wood from splitting — two screws per corner, top and bottom.
- Drive in your screws until they’re flush but not biting too deep into the wood.
- Flip the frame upside down and staple your hardware cloth across the entire bottom opening using a heavy-duty staple gun.
- Flip it right-side up, move it to your chosen spot, and you’re done.
Seriously, if you start after breakfast, you’re done before lunch. No special tools, no complicated cuts, no frustration.
How the Dimensions Maximize Root Space and Sunlight Exposure
Your 4×8-foot footprint hits a sweet spot that most expensive kits completely miss. The 10-inch depth gives deep-rooted crops like tomatoes, carrots, and peppers the room they need to grow strong without hitting compacted ground beneath. Most kit beds max out at 6 or 8 inches, which quietly starves your plants from the bottom up.
The 4-foot width means you can reach the center of your bed from either side without stepping in and compacting your soil — your plants never get disturbed, and your soil structure stays loose and airy season after season. The 8-foot length catches maximum sunlight across your growing season, especially if you orient the long side east to west so every plant gets even sun exposure throughout the day.
Why This Design Outlasts Most Store-Bought Alternatives
Most kit beds use thin pine, plastic composite panels, or galvanized metal that either warps, cracks, or heats up in summer and cooks your root zone. Your cedar build doesn’t do any of that. Cedar contains natural oils — thujaplicins — that fight off fungi, insects, and moisture damage without you doing a single thing. A well-built cedar bed like this routinely lasts 10 to 15 years with zero maintenance.
Compare that to the average $400–$500 kit:
| Feature | Your $50 Cedar Build | Typical $500 Kit |
|---|---|---|
| Lifespan | 10–15 years | 3–7 years |
| Soil depth | 10 inches | 6–8 inches |
| Root space | Full unrestricted | Often limited |
| Chemical risk | None (untreated cedar) | Varies by material |
| Repairability | Easy — replace one board | Often must replace entire kit |
Your build is also easy to fix. If one board warps or cracks five years from now, you swap that single board for a few dollars — you’re not throwing out a whole system and starting over.


