How to Build Your First Brick Patio Pattern: Zero Experience Required

Building your first brick patio doesn’t require years of construction experience or expensive contractor fees. This comprehensive guide is designed for complete beginners who want to tackle their own brick patio installation and create a beautiful outdoor space from scratch.
You’ll learn the essential brick laying techniques that make DIY brick patio projects manageable, even if you’ve never laid a single brick before. We’ll walk you through the entire patio construction guide process, from gathering the right tools to adding those final details that transform your backyard.
This beginner brick patio project guide covers everything you need to know. First, we’ll help you plan your patio layout and choose from proven brick patio patterns for beginners that look professional but stay simple to execute. Next, you’ll discover how to prepare your ground properly – the foundation work that separates successful DIY patio installation from costly do-overs. Finally, we’ll show you the finishing touches that make your new patio look like it was built by a pro, complete with brick patio design ideas you can customize to match your home’s style.
By the end of this guide, you’ll have all the knowledge needed to complete your own how to build brick patio project with confidence, plus you’ll save thousands compared to hiring contractors.


Essential Tools and Materials You’ll Need
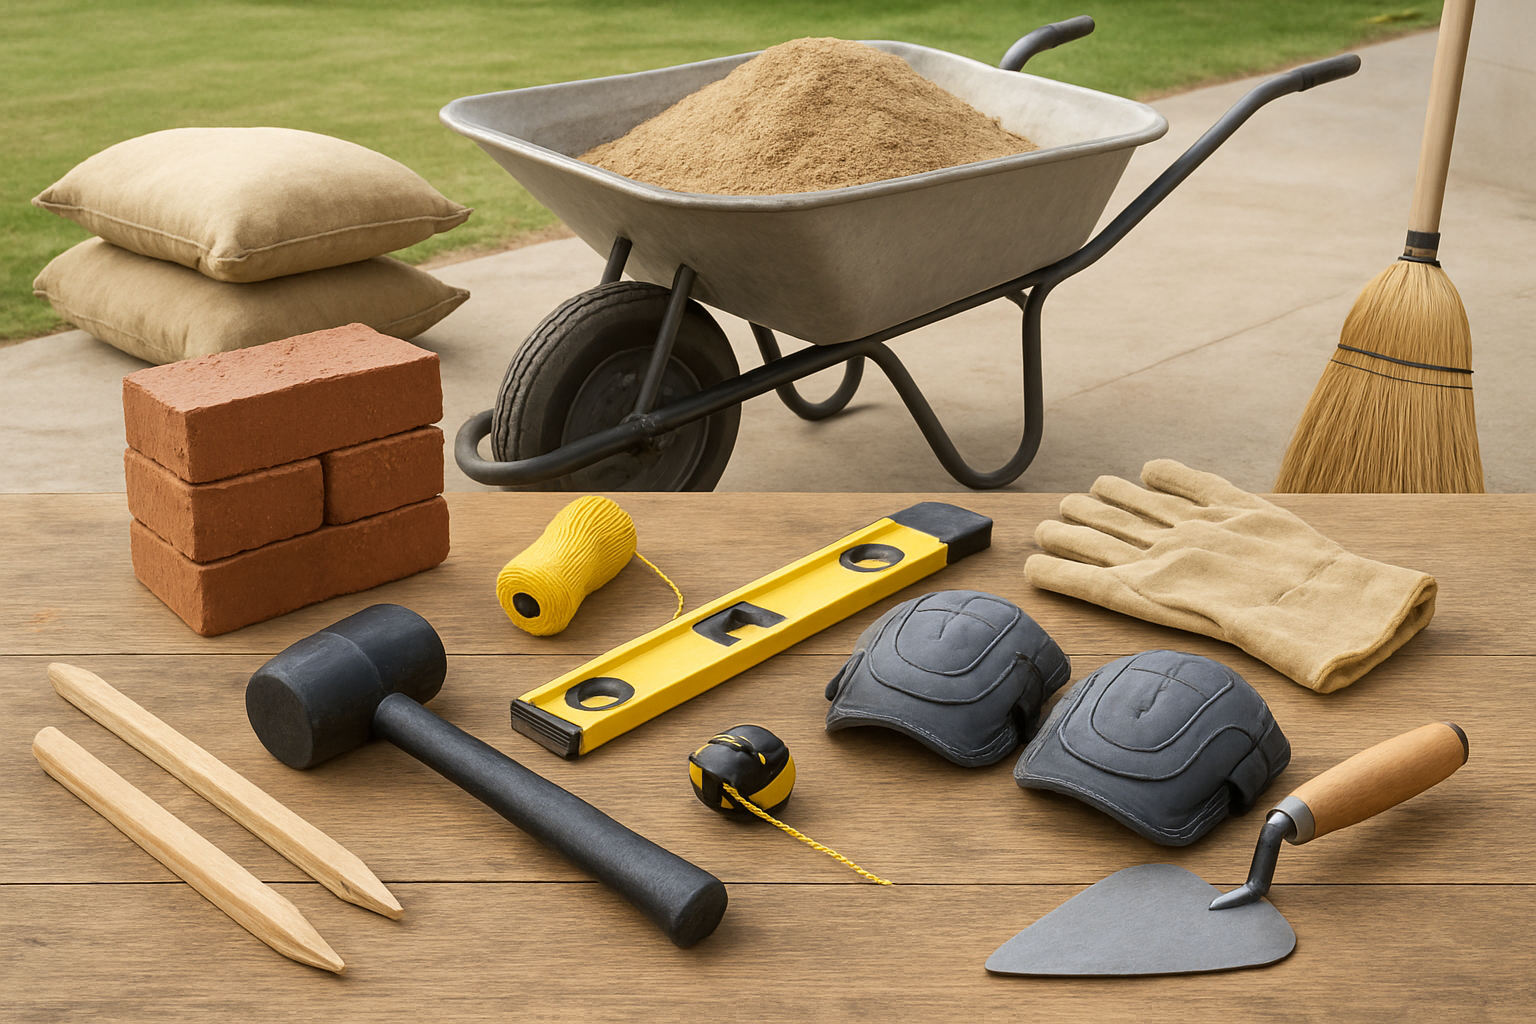
Basic Hand Tools for Measuring and Cutting
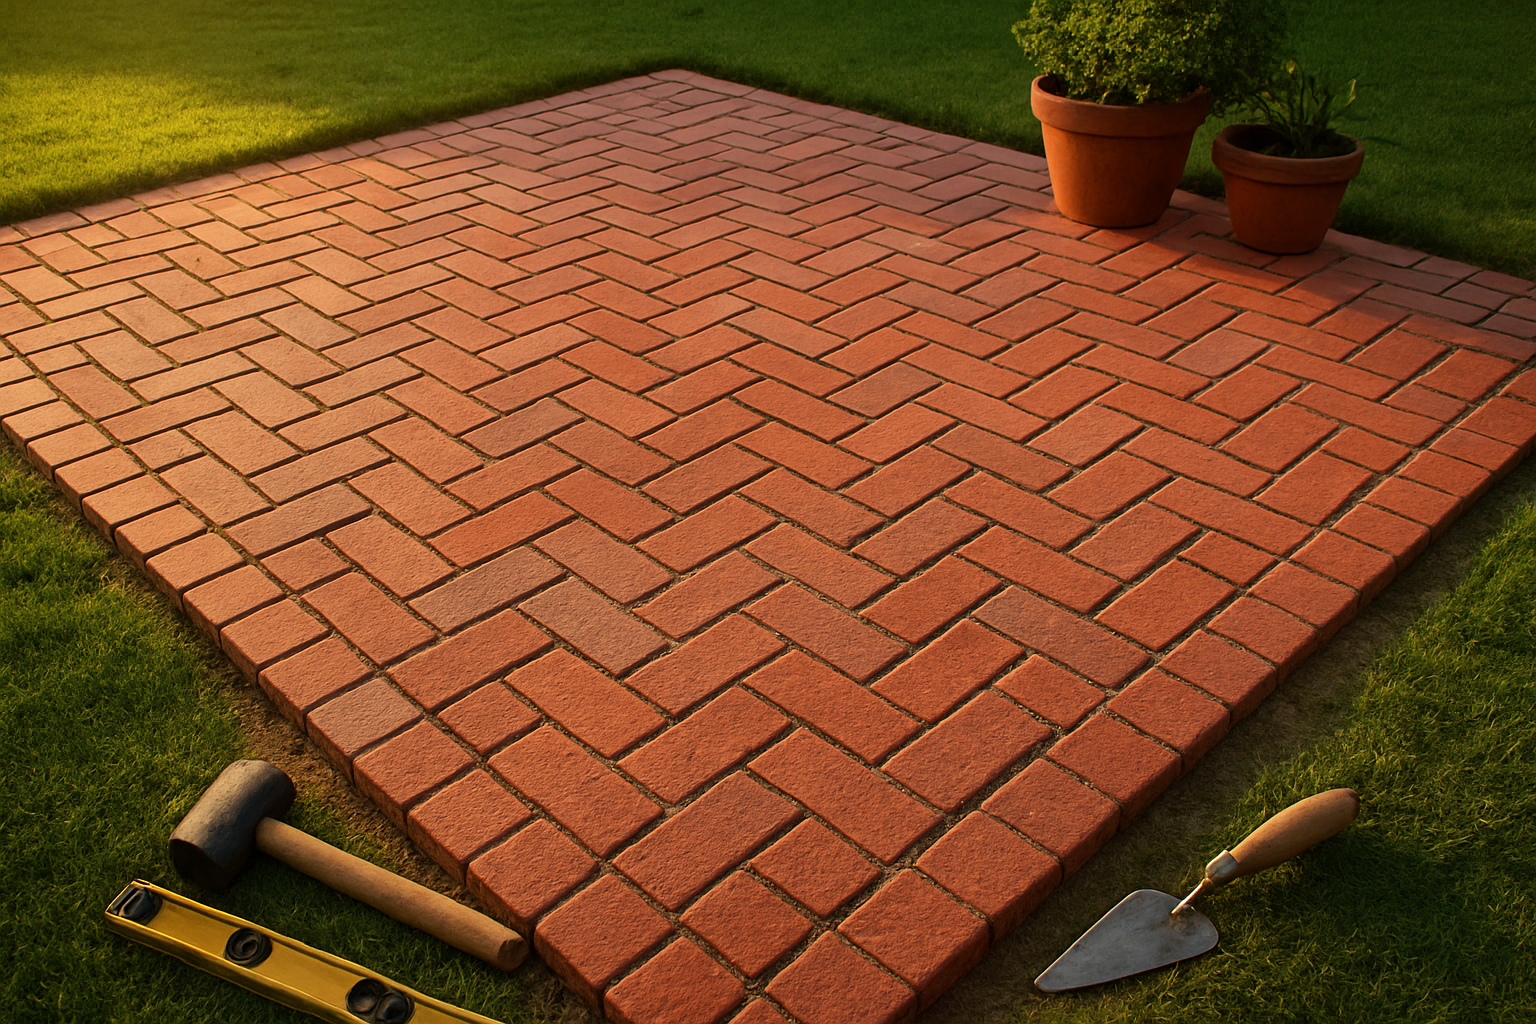
You’ll need a measuring tape, level, rubber mallet, and brick chisel for accurate brick patio installation. A string line helps maintain straight edges, while a chalk line marks your layout. Don’t forget safety glasses and work gloves for protection during your DIY brick patio project.
Types of Bricks and Their Best Uses
Clay bricks work best for traditional patio construction, offering durability and classic appeal. Concrete pavers provide more color options and uniform sizing, perfect for beginner brick patio projects. Choose permeable options for better drainage, or select recycled bricks for an authentic, weathered look that complements various brick patio patterns for beginners.
Sand and Gravel Requirements
Your base needs coarse gravel (3-4 inches deep) topped with leveling sand (1-2 inches). Use angular gravel for better compaction and polymeric sand for joints to prevent weeds. Calculate roughly 1 ton of gravel and 3 cubic feet of sand per 100 square feet for proper patio construction guide specifications.
Edge Restraints and Borders
Install plastic or metal edging before laying bricks to prevent shifting and maintain your brick patio design ideas. Concrete borders offer permanent solutions, while flexible edging accommodates curves. Stake edging every 3 feet and backfill with soil. Quality restraints ensure your brick laying techniques produce professional results that last for years.
Planning Your Patio Layout and Design

Measuring your space accurately
Grab your tape measure and start by marking the corners where you want your brick patio to sit. Measure the length and width twice to avoid costly mistakes, and don’t forget to account for any obstacles like trees, downspouts, or garden beds. Mark these measurements clearly on paper – you’ll need them for calculating materials and creating your design sketch.
Choosing the right brick pattern for beginners
Start with simple brick patio patterns that won’t overwhelm your first DIY brick patio project. The running bond pattern works perfectly for beginners, requiring you to offset each row by half a brick length. Stack bond offers even easier brick laying techniques, with bricks aligned in straight rows both horizontally and vertically. Avoid complex patterns like herringbone until you’ve mastered basic brick patio installation skills.
Creating a simple design sketch
Draw your patio space to scale on graph paper, using one square to represent one foot of actual space. Sketch in your chosen brick pattern, marking the starting point and direction of your layout. Include measurements, drainage slopes, and any curves or angles in your brick patio design ideas. This sketch becomes your roadmap during construction, helping you visualize the final result and calculate exactly how many bricks you’ll need for your beginner brick patio project.
Preparing the Ground for Success
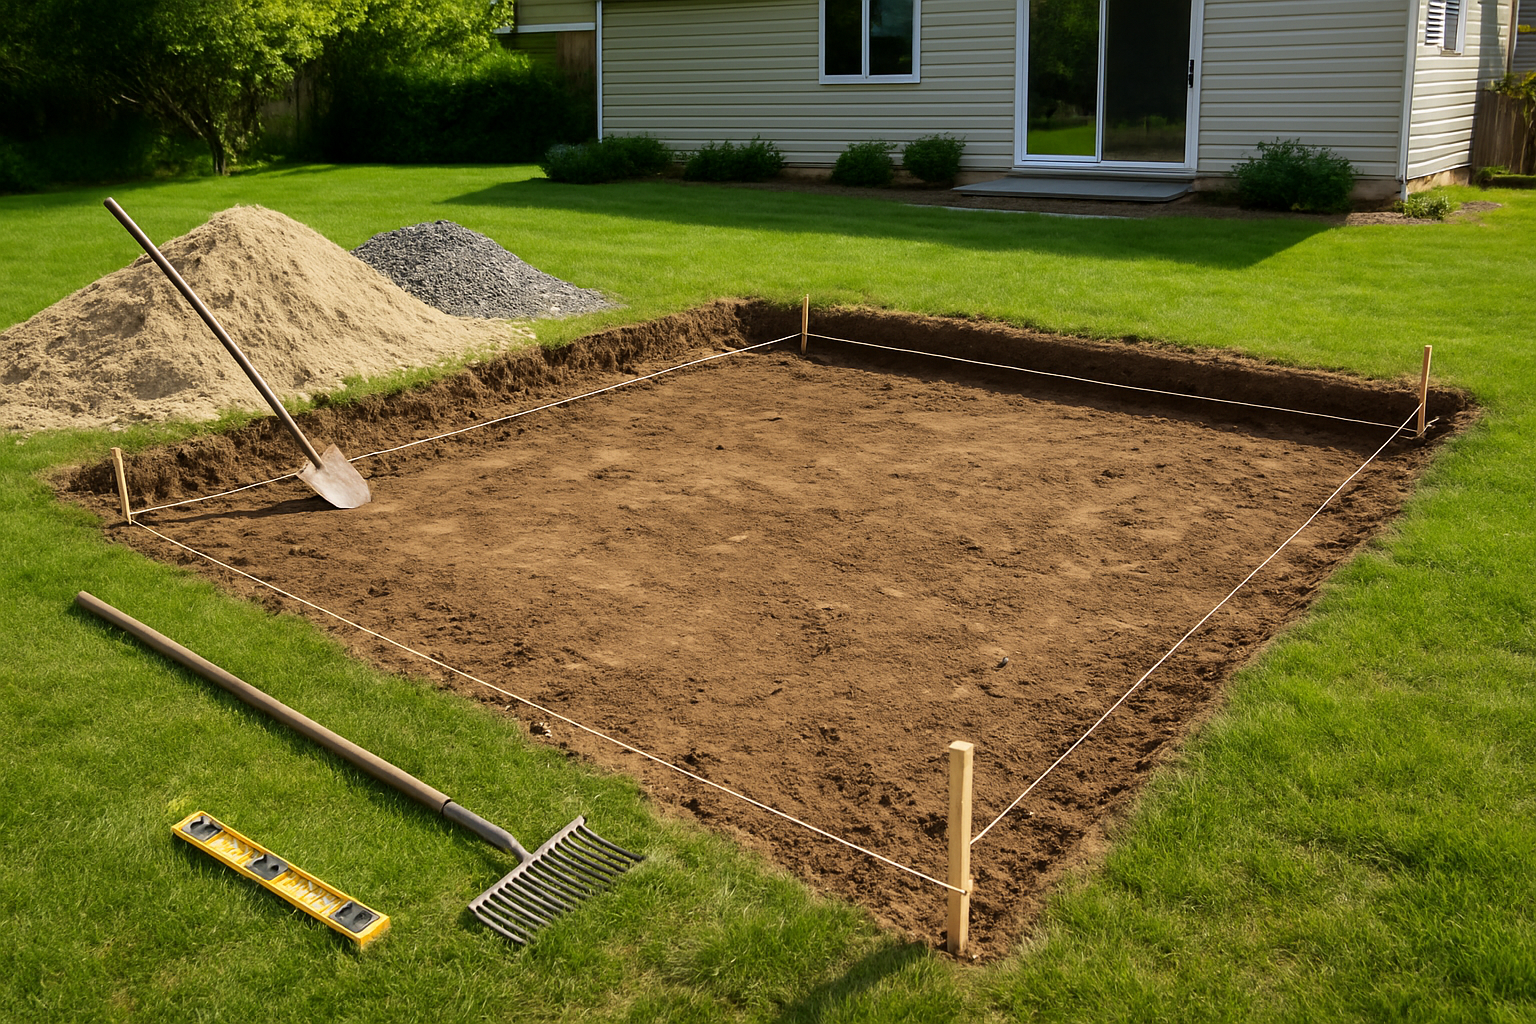
Marking and excavating the area
Start by marking your patio boundaries using spray paint or stakes and string. Measure twice to ensure accuracy – you don’t want to discover sizing issues after digging. Excavate to a depth of 6-8 inches below your desired finished patio height, accounting for your brick thickness plus base materials. Remove all grass, roots, and organic matter that could cause settling later. A clean excavation creates the foundation for successful brick patio installation.
Creating proper drainage with gravel base
Your gravel base prevents water damage and frost heaving that destroys patios over time. Spread 3-4 inches of crushed gravel or limestone screening evenly across your excavated area. Choose angular gravel rather than rounded stone – it locks together better and creates a more stable base for your DIY brick patio project. Proper drainage keeps your patio level and prevents costly repairs down the road.
Leveling and compacting techniques
Use a plate compactor to compress your gravel base in 2-inch lifts, making multiple passes until the surface feels solid underfoot. Check for level using a long straightedge and adjust low spots with additional gravel. Rent a plate compactor if you don’t own one – hand tamping won’t achieve the density needed for long-term stability. This step determines whether your brick patio patterns for beginners will look professional or amateur.
Installing edge restraints securely
Install plastic or metal edge restraints before laying any bricks to prevent your patio from spreading over time. Drive 10-inch spikes through the restraint flanges every 3 feet, ensuring the top sits just below your planned brick surface. For curved areas, use flexible plastic edging that bends smoothly. Secure restraints keep your brick laying techniques on track and maintain clean patio edges for years to come.
Laying Your First Brick Pattern
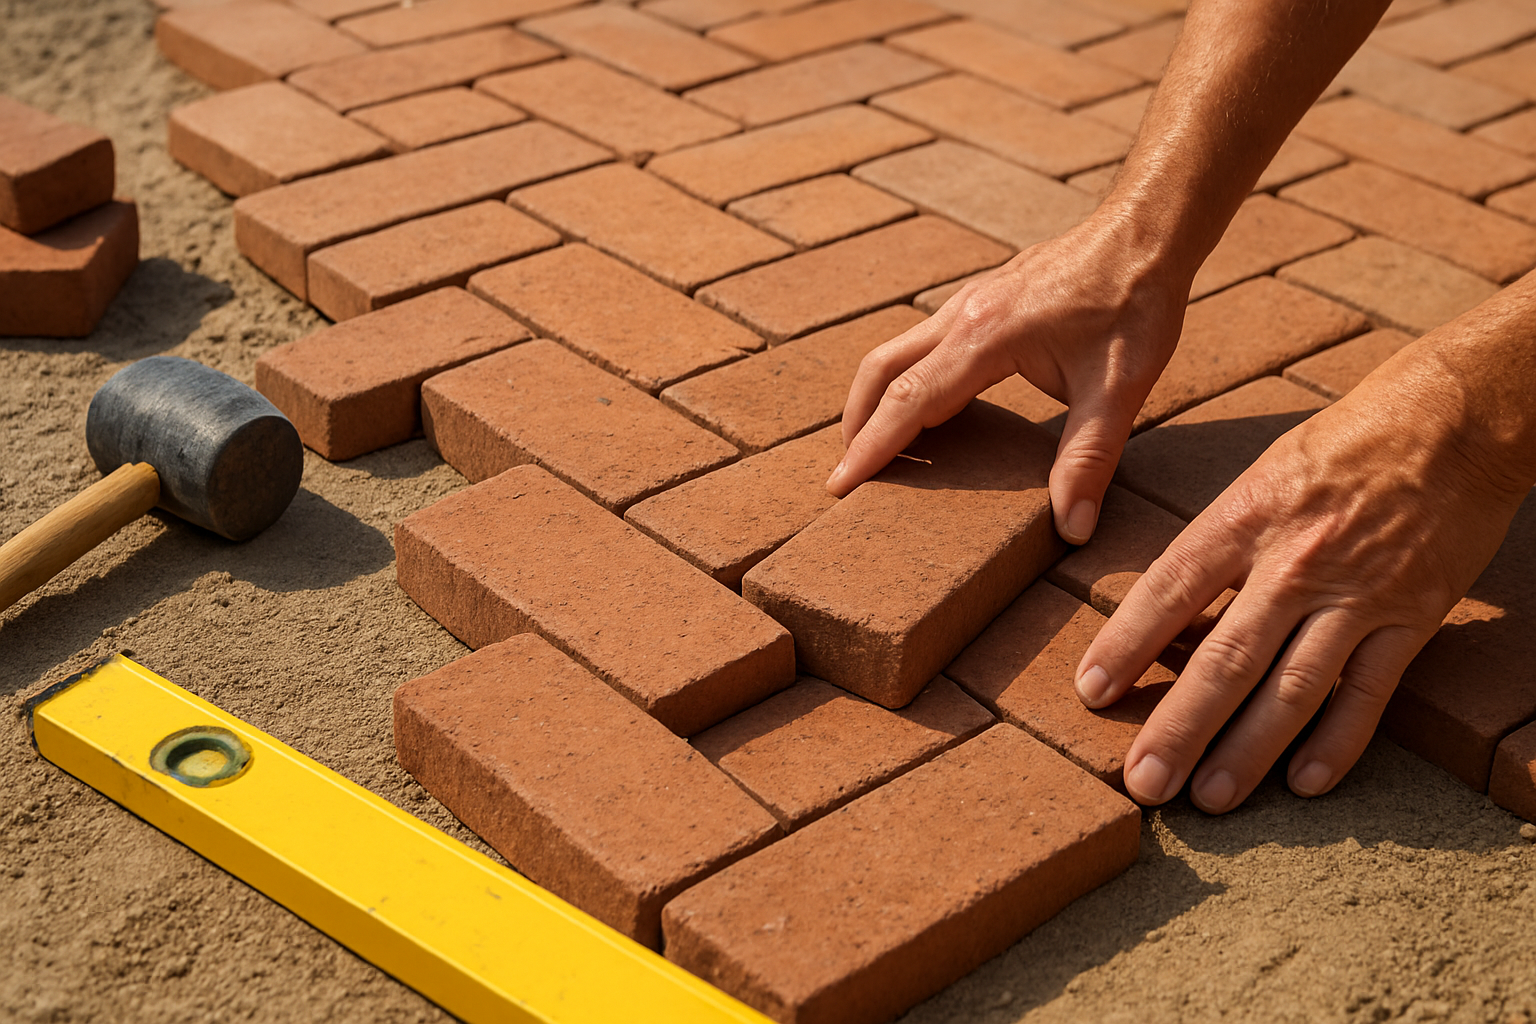
Starting with the right corner placement
Begin your brick patio installation at a 90-degree corner where two edges meet, preferably the most visible corner from your house. This starting point serves as your reference for the entire DIY brick patio project. Place your first brick square and level, then work outward in both directions. Your corner brick determines the success of your entire brick laying technique, so take time to position it perfectly using your string lines as guides.
Maintaining consistent spacing and alignment
Keep uniform gaps between bricks by using spacers or your fingers as measuring tools throughout your brick patio patterns for beginners. Check alignment frequently by sighting down rows and using your string lines as references. Tap bricks gently with a rubber mallet to adjust positioning without damaging them. Consistent spacing creates professional-looking results and ensures proper drainage between pavers in your DIY patio installation.
Checking level as you work
Test each brick’s level individually and in relation to surrounding bricks using a spirit level. Place the level across multiple bricks to catch any dips or rises early. Add or remove sand beneath individual bricks to achieve proper height. Your patio construction guide success depends on maintaining consistent elevation across the entire surface. Check level every few rows rather than waiting until you’ve laid large sections.
Cutting bricks to fit edges
Measure gaps at patio edges carefully before cutting bricks to fit. Mark cutting lines with chalk or pencil, then score with a chisel and hammer or use a wet saw for cleaner cuts. Practice cutting techniques on spare bricks first. Cut bricks should be at least half their original size for structural integrity. Wear safety glasses and work gloves when cutting, and remember that cut edges should face the patio border where they’re less noticeable.
Working in manageable sections
Divide your brick patio design ideas into sections of about 3×3 feet to maintain quality control. Complete each section fully before moving to the next, including leveling and spacing checks. This approach prevents you from getting overwhelmed and allows you to fix problems immediately. Work from your established corner outward, completing one section at a time. Take breaks between sections to step back and assess your progress on this beginner brick patio project.
Finishing Touches That Make the Difference
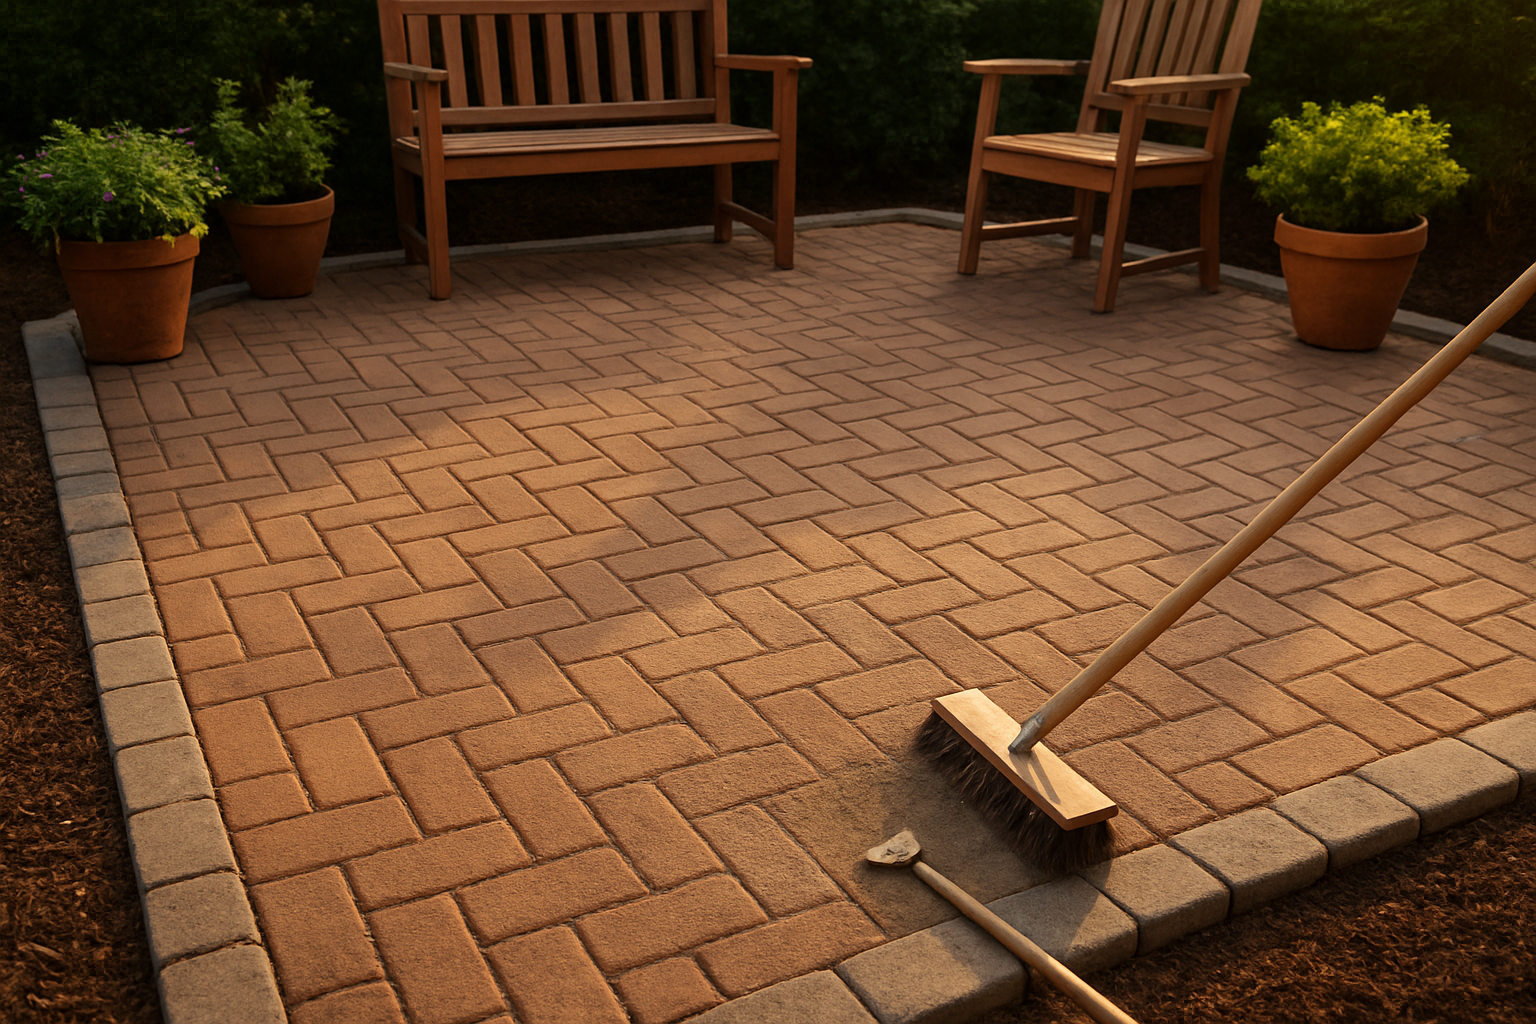
Sweeping Sand Into Joints Properly
Once your bricks are perfectly positioned, you’ll need to fill the gaps with polymeric sand or fine mason sand. Pour the sand over your entire patio surface and use a push broom to sweep it diagonally across the bricks, working the sand deep into every joint. Make multiple passes in different directions to ensure complete coverage. Avoid leaving excess sand on brick surfaces, as it can stain during the next step.
Compacting the Completed Surface
Your DIY brick patio installation requires one final compaction to lock everything in place. Run your plate compactor over the entire surface using overlapping passes, moving slowly to avoid shifting bricks. The vibration settles the sand deeper into joints and creates a solid, unified surface. Pay special attention to edges and corners where bricks might be less stable. This step transforms individual bricks into a cohesive patio structure.
Final Cleanup and Inspection
Walk your finished patio systematically, checking for loose bricks, uneven joints, or areas needing touch-ups. Sweep away any remaining sand debris and hose down the surface gently to activate polymeric sand if you used it. Inspect your brick patio patterns for consistency and make small adjustments where needed. Your beginner brick patio project is complete when every joint is filled, the surface is level, and your new outdoor space looks professionally installed.
Building your first brick patio doesn’t have to feel overwhelming when you break it down into manageable steps. You’ve learned about gathering the right tools and materials, planning your layout carefully, preparing a solid foundation, laying bricks in your chosen pattern, and adding those final touches that really make your patio shine. Each phase builds on the last, creating a straightforward path from bare ground to beautiful outdoor space.
Your patio project is totally doable, even as a complete beginner. Take your time with each step, especially the ground preparation and pattern laying – these make all the difference in how your finished patio looks and lasts. Don’t rush the process, and remember that small mistakes can usually be fixed as you go. Once you complete this project, you’ll have both a gorgeous new outdoor space and the confidence to tackle your next DIY adventure.


