The Paver Patio Trick That Costs Under $200 (No Contractor, No Experience Needed)

You Don’t Need a Contractor to Build a Stunning Paver Patio
If you’ve been scrolling through backyard inspiration photos and thinking “there’s no way I can afford that,” this is for you. A DIY paver patio doesn’t have to cost thousands of dollars or require any prior experience — and this guide proves it.
This is specifically for homeowners and renters who want a clean, functional outdoor space without hiring anyone or blowing their budget. If you can dig, level, and set a few pavers in place, you can pull this off over a weekend.
Here’s what you’ll walk away knowing: exactly how to gather all your materials for under $200 paver patio budget, how to prep your ground correctly so your patio doesn’t shift or sink after the first rain, and how to lay pavers step by step without making the common mistakes that turn a fun DIY project into a frustrating redo.
No jargon, no contractor, no experience needed. Just a simple, affordable process that actually works.
You Might Also Love These Ideas


Why This Paver Patio Method Works Without Breaking the Bank

How Skipping the Contractor Saves You Thousands
Hiring a contractor for a patio project can easily run you $3,000 to $10,000 once you factor in labor, markup on materials, and scheduling delays. When you handle the work yourself, you cut out that massive labor cost entirely, keeping your total spend right around $200 for a clean, functional outdoor space.
Why No Prior Experience Is Required
This method is built around simplicity. You’re not mixing concrete, cutting complex angles, or dealing with drainage engineering. The process breaks down into straightforward steps that anyone can follow — if you can dig, level sand, and place pavers in a pattern, you already have every skill this project demands.
What Makes This Approach Different From Traditional Patio Builds
Traditional patio builds rely on deep excavation, concrete footings, and professional-grade equipment. This approach skips all of that by working with compacted gravel base and dry-laid sand — a proven technique that still delivers a solid, long-lasting surface. Here’s how the two methods compare:
| Feature | Traditional Build | This Method |
|---|---|---|
| Cost | $3,000–$10,000 | Under $200 |
| Experience Needed | Professional | Zero |
| Time to Complete | Days to weeks | A weekend |
| Equipment Required | Heavy machinery | Basic hand tools |
| Results | Permanent slab | Durable, flexible patio |
Your weekend project can genuinely look like something a professional crew installed — without the invoice to match.
Gathering Everything You Need for Under $200

The Exact Materials to Buy and Where to Find Them Cheap
Your best move is hitting up local home improvement stores like Home Depot or Lowe’s for concrete pavers — the 12×12 or 16×16 inch ones typically run between $0.50 and $2.00 each. Facebook Marketplace and Craigslist are goldmines for leftover pavers people are practically giving away after their own projects. You’ll also need polymeric sand, landscape fabric, and paver base gravel, all of which you can grab in one trip.
| Material | Estimated Cost | Best Place to Buy |
|---|---|---|
| Concrete pavers (approx. 40–50) | $40–$80 | Home Depot, Lowe’s, Facebook Marketplace |
| Paver base gravel (0.5 cubic yards) | $30–$45 | Local landscape supply yard |
| Polymeric sand (1–2 bags) | $20–$30 | Home Depot, Amazon |
| Landscape fabric (50 sq. ft. roll) | $10–$15 | Walmart, Lowe’s |
The Simple Tools That Get the Job Done
You don’t need a truck full of fancy equipment. Here’s what actually gets your patio done:
- Rubber mallet — seats your pavers without cracking them
- Level — keeps everything flat and professional-looking
- Garden rake — spreads your gravel base evenly
- Tape measure — helps you plan your layout accurately
- Plate compactor (rent it) — firms your base so pavers don’t shift later
Most of these are already sitting in your garage. The plate compactor is the one thing worth renting from Home Depot for about $50 a day — skipping it is the #1 reason DIY patios sink and wobble within a year.
Smart Shopping Tips to Stay Within Budget
Timing your purchase saves you real money. Pavers go on clearance at the end of summer and again after the holidays when stores need to clear shelf space. Buying your gravel directly from a landscape supply yard instead of bagged from a big-box store cuts your cost almost in half. Always buy about 10% more pavers than your measurements call for — you’ll need extras for cuts and breakage, and running back to the store mid-project is a headache you don’t want.
What You Can Skip to Save Even More Money
You can absolutely skip renting an expensive transit level — a basic $10 bubble level from any hardware store does the job perfectly fine for a small patio. Skip paver edging restraints if your patio borders a garden bed, fence, or existing structure on at least two sides, since those natural borders hold your pavers in place. You also don’t need to buy a tamper if you can rent the plate compactor, and you definitely don’t need special paver sealer right away — that’s something you can add six months down the road once you’re happy with how everything looks.
Preparing Your Space the Right Way
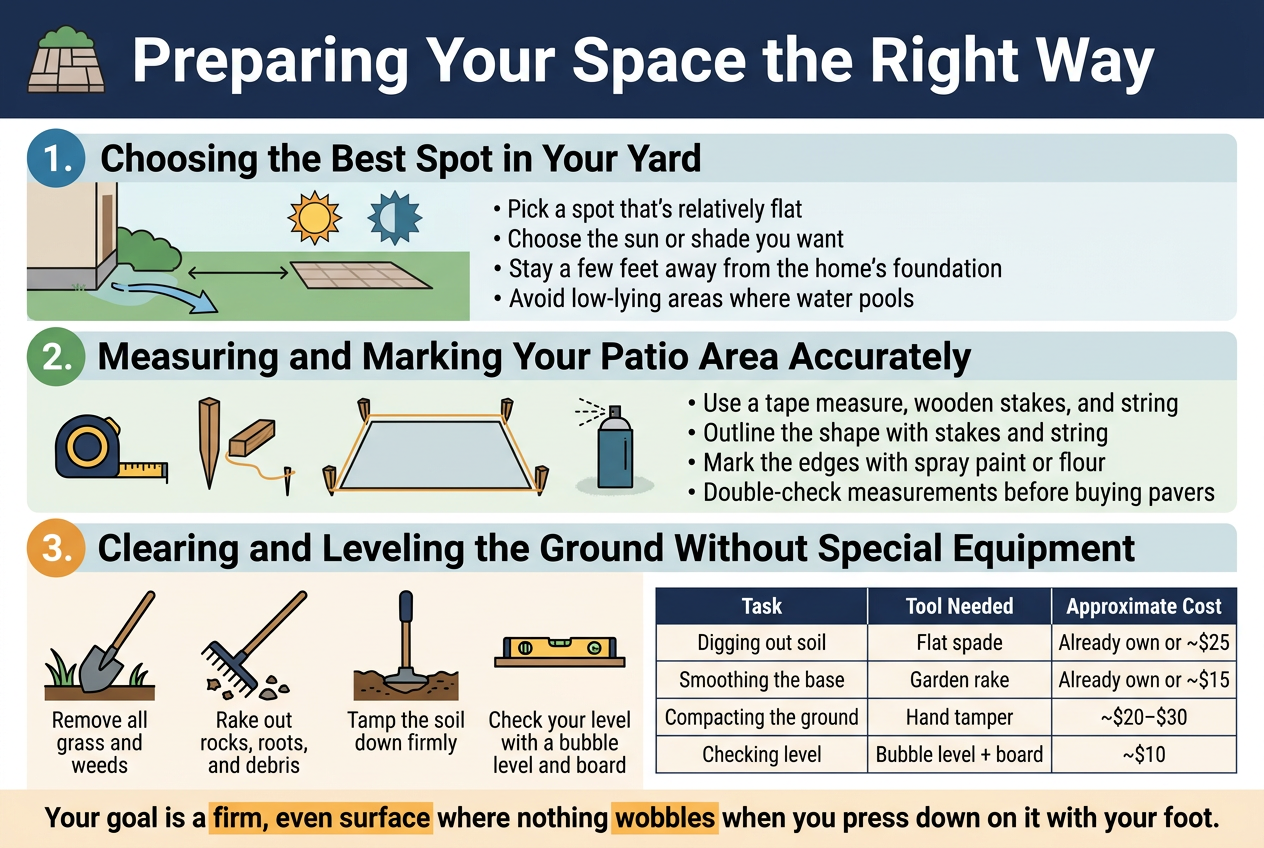
Choosing the Best Spot in Your Yard
Pick a spot that’s relatively flat, gets the amount of sun or shade you actually want, and sits at least a few feet away from your home’s foundation. Your patio should also drain naturally — avoid low-lying areas where water pools after rain, since that’ll cause your pavers to shift and sink over time.
Measuring and Marking Your Patio Area Accurately
Grab a tape measure, some wooden stakes, and a ball of string. Drive your stakes into the corners of your planned patio area, then run the string between them to outline the shape. Spray paint or flour works great for marking the edges directly on the ground. Double-check your measurements — adding or losing even six inches changes how many pavers you’ll need to buy.
Clearing and Leveling the Ground Without Special Equipment
- Remove all grass and weeds by cutting into the soil about 4–6 inches deep using a flat spade
- Rake out rocks, roots, and debris until the surface is as smooth as you can get it
- Tamp the soil down firmly using a hand tamper or even the flat bottom of a heavy post — you don’t need a rented plate compactor for smaller patios
- Check your level with a simple $10 bubble level resting on a long straight board
| Task | Tool Needed | Approximate Cost |
|---|---|---|
| Digging out soil | Flat spade | Already own or ~$25 |
| Smoothing the base | Garden rake | Already own or ~$15 |
| Compacting the ground | Hand tamper | ~$20–$30 |
| Checking level | Bubble level + board | ~$10 |
Your goal is a firm, even surface where nothing wobbles when you press down on it with your foot.


