Dog Potty Area Drainage System Explained (Gravel, Sand, Pipe Layers)

Your dog’s outdoor potty area needs proper drainage to stay clean, odor-free, and usable year-round. Without the right dog potty area drainage system, you’ll deal with standing water, muddy messes, and unpleasant smells that make your yard less enjoyable for both you and your pet.
This guide is for dog owners who want to create or improve their pet’s outdoor bathroom area, whether you’re setting up a designated spot in your backyard or upgrading an existing space that’s become soggy and smelly.
We’ll walk you through the essential drainage materials you need—including the right types of gravel, sand, and drainage pipes—and show you exactly how to layer them for maximum effectiveness. You’ll also learn how each component works together to keep water flowing away from the surface and how to troubleshoot problems when your system isn’t performing as expected.
Understanding Dog Potty Area Drainage Fundamentals

You Might Also Love These Ideas


Why Proper Drainage Prevents Odors and Bacterial Growth
Your dog’s potty area becomes a breeding ground for harmful bacteria when urine and waste accumulate without proper drainage. Stagnant moisture creates the perfect environment for ammonia buildup, which produces that unmistakable smell that makes your yard unpleasant. When you install a multi-layer drainage system, liquids flow through gravel and sand layers instead of pooling on the surface, preventing bacterial colonies from establishing themselves and eliminating odor-causing compounds before they can develop.
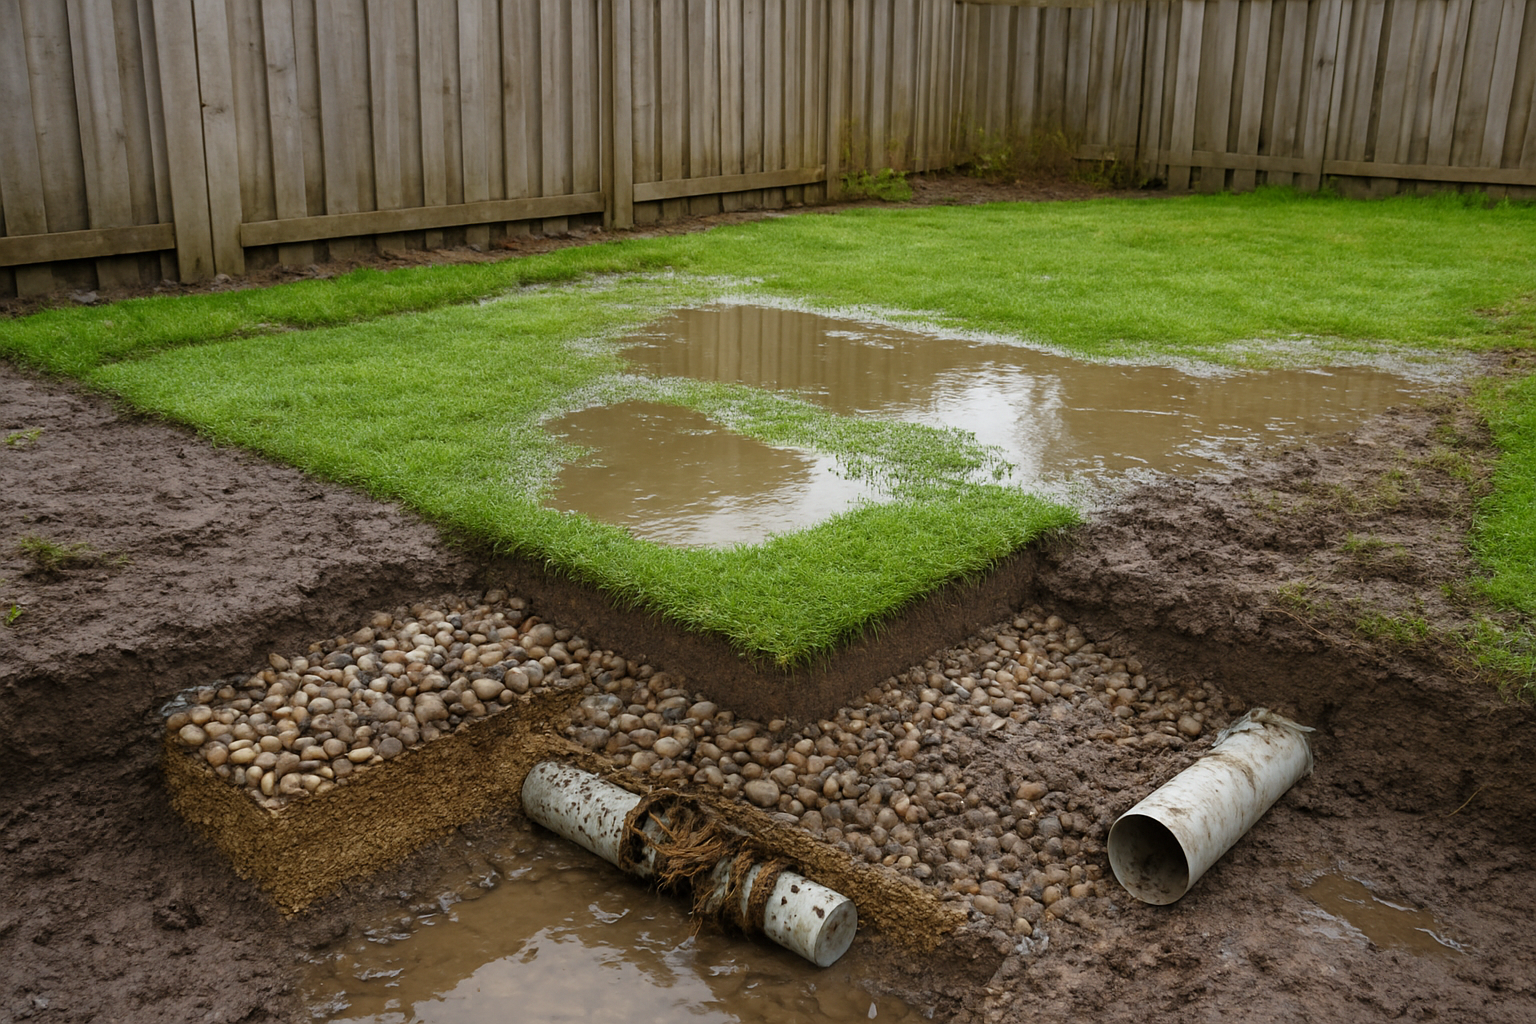
How Standing Water Creates Health Hazards for Pets
Standing water in your dog’s bathroom area poses serious health risks that go beyond bad smells. Your pet can develop paw infections, skin irritations, and digestive issues when they come into contact with contaminated puddles. Mosquitoes and other disease-carrying insects thrive in these wet conditions, putting your dog at risk for parasites and vector-borne illnesses. The constant moisture also creates slippery surfaces where your dog might slip and injure themselves during their daily routine.
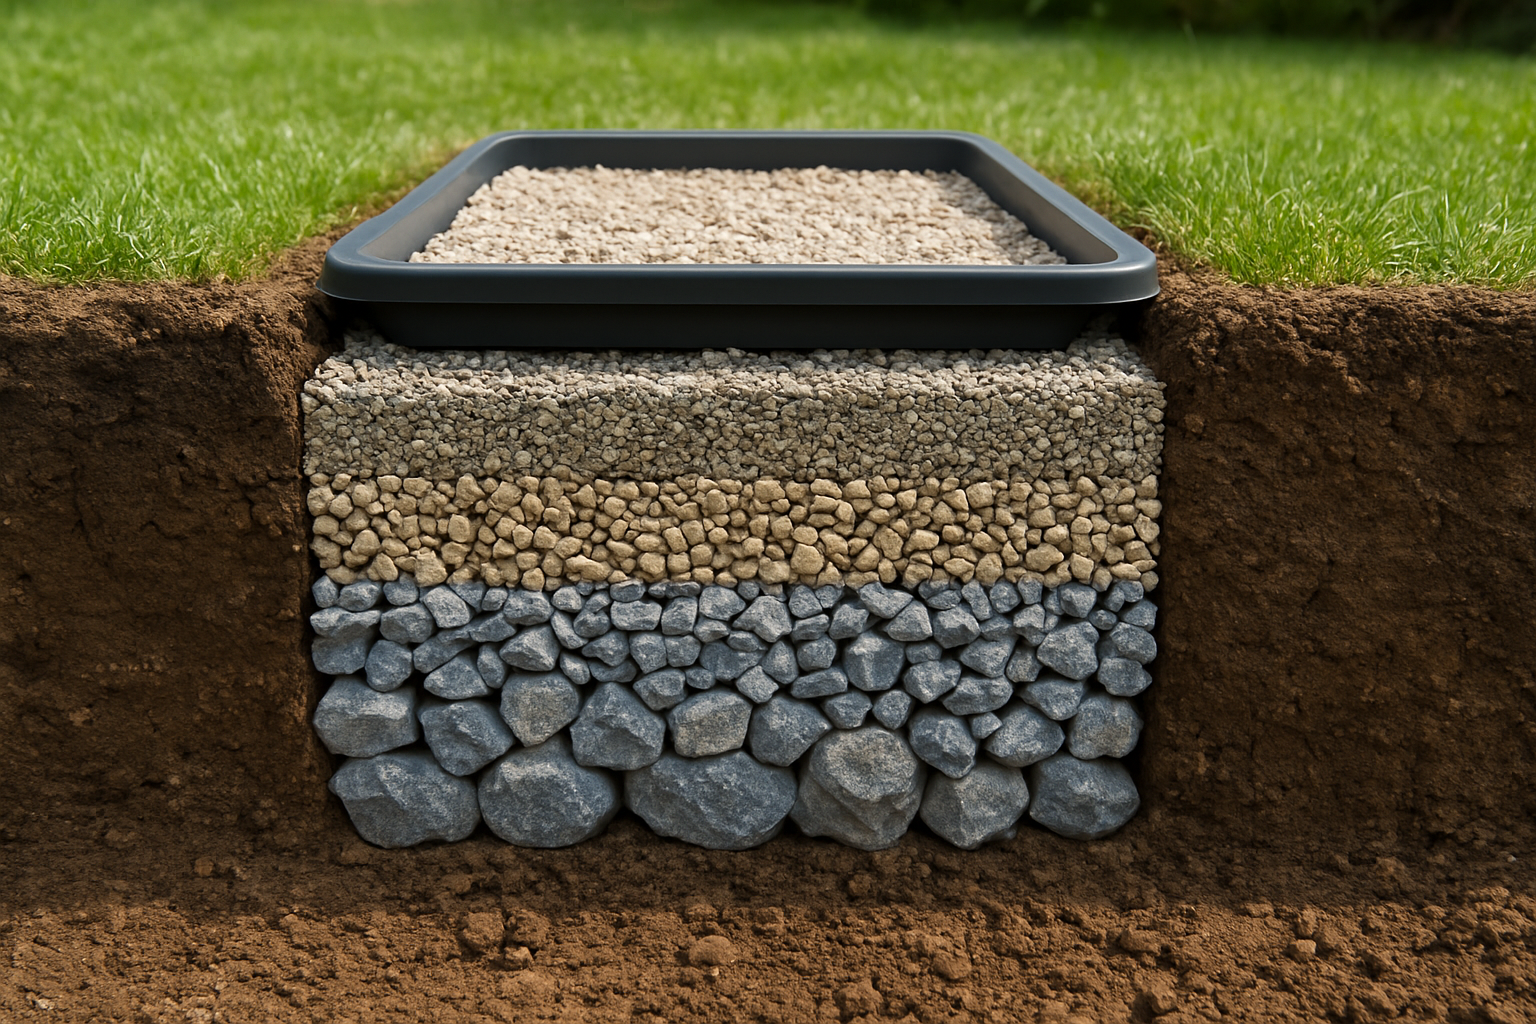
Benefits of Multi-Layer Drainage Systems
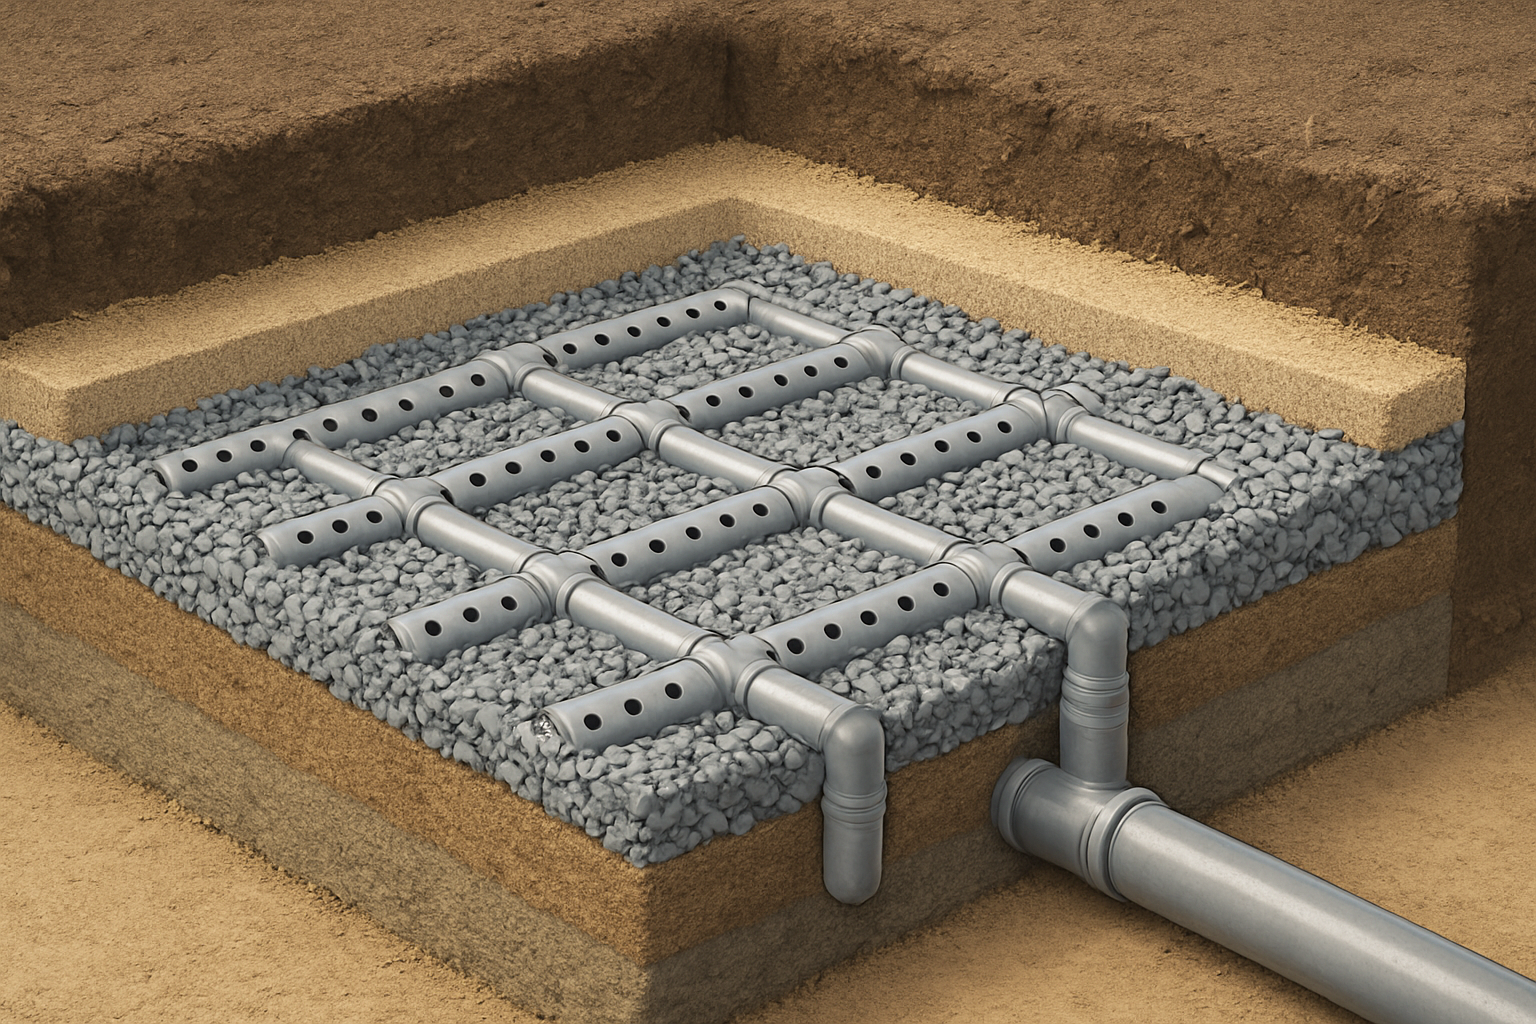
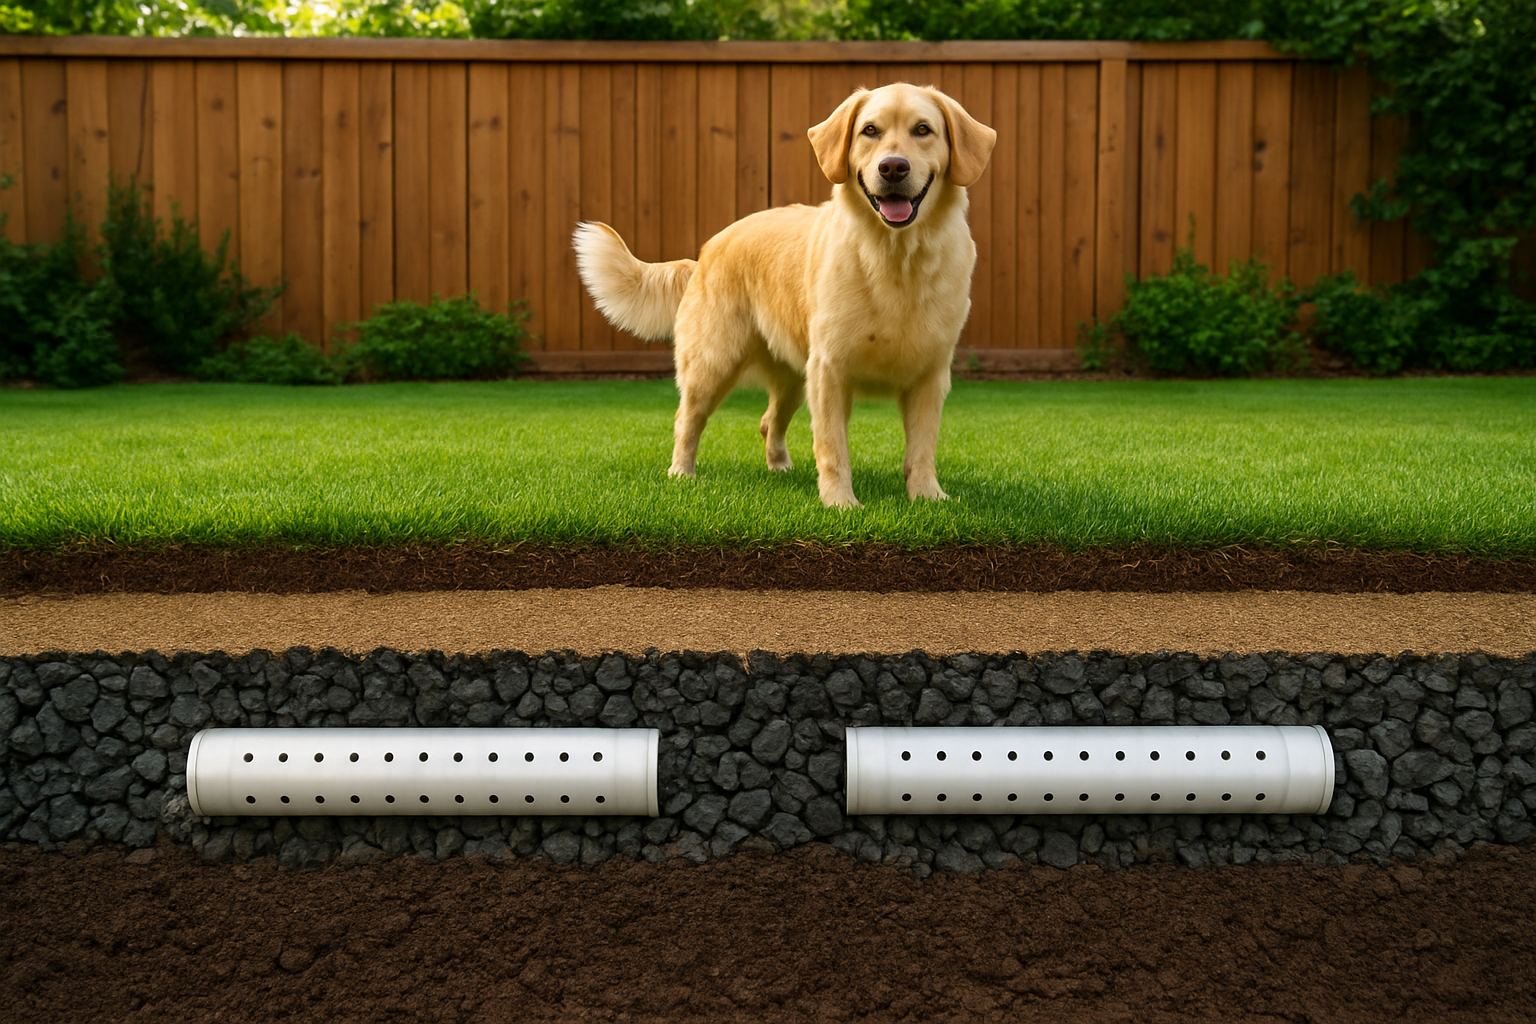
Your drainage system works like a natural filter when you layer different materials strategically. The top gravel layer catches solid waste while allowing liquids to pass through quickly. Below that, your sand layer acts as a fine filter, removing smaller particles and distributing moisture evenly. The bottom drainage pipe layer carries everything away from the area completely, ensuring nothing backs up or creates problems later. This three-tier approach handles heavy rain, multiple dogs, and daily use without breaking down or requiring constant maintenance.
Cost Savings from Preventing Lawn Damage
Your grass dies when dog urine concentrates in one spot repeatedly, leaving you with brown patches and bare dirt areas that need expensive repairs. Installing proper drainage protects your existing landscaping by directing waste away from healthy plants and preventing nitrogen burn from concentrated urine. You’ll save money on grass seed, sod replacement, and soil amendments that would otherwise be necessary to restore damaged areas. The initial investment in a drainage system pays for itself by preserving your property value and eliminating ongoing lawn repair costs.
Essential Materials for Effective Drainage Systems
Choosing the Right Gravel Size and Type
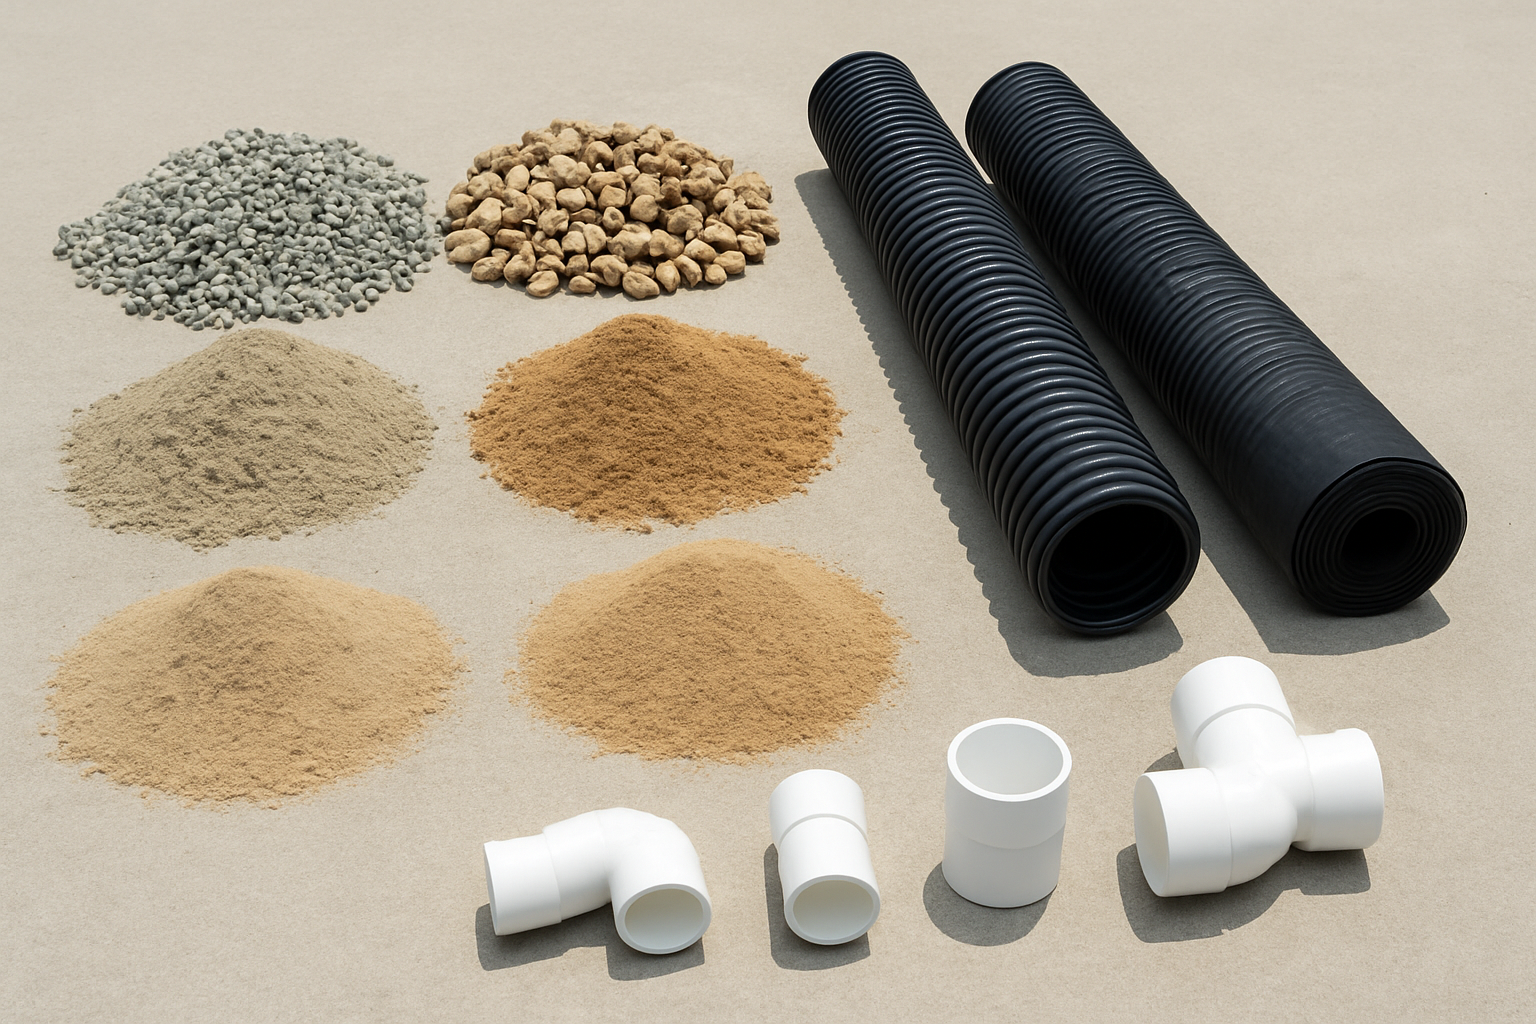
You’ll need crushed stone or pea gravel ranging from ¼-inch to ¾-inch for optimal drainage performance. Avoid smooth river rock since it doesn’t compact well and creates gaps that trap waste. Angular crushed granite or limestone works best because the jagged edges lock together while maintaining excellent water flow. Your gravel should be washed and free of fine particles that could clog the drainage system over time.
Selecting Appropriate Sand for Filtration
Your sand layer requires coarse, sharp sand with particles between 0.5mm and 2mm for proper filtration without clogging. Skip fine play sand or masonry sand as these compact too tightly and block water movement. Construction sand or concrete sand provides the right balance of filtration and permeability. You want angular grains that create small pockets for water flow while catching solid waste particles effectively.
Understanding Drainage Pipe Options and Specifications
Your drainage pipe system needs perforated PVC or corrugated plastic pipes with 4-inch diameter minimum for adequate flow capacity. Place pipes with holes facing down to prevent clogging from debris above. Solid pipes work better for the main outlet line leading away from the potty area. You’ll want a slight slope of 1-2% toward your drainage exit point to ensure proper water movement without creating standing pools.
Step-by-Step Installation Process
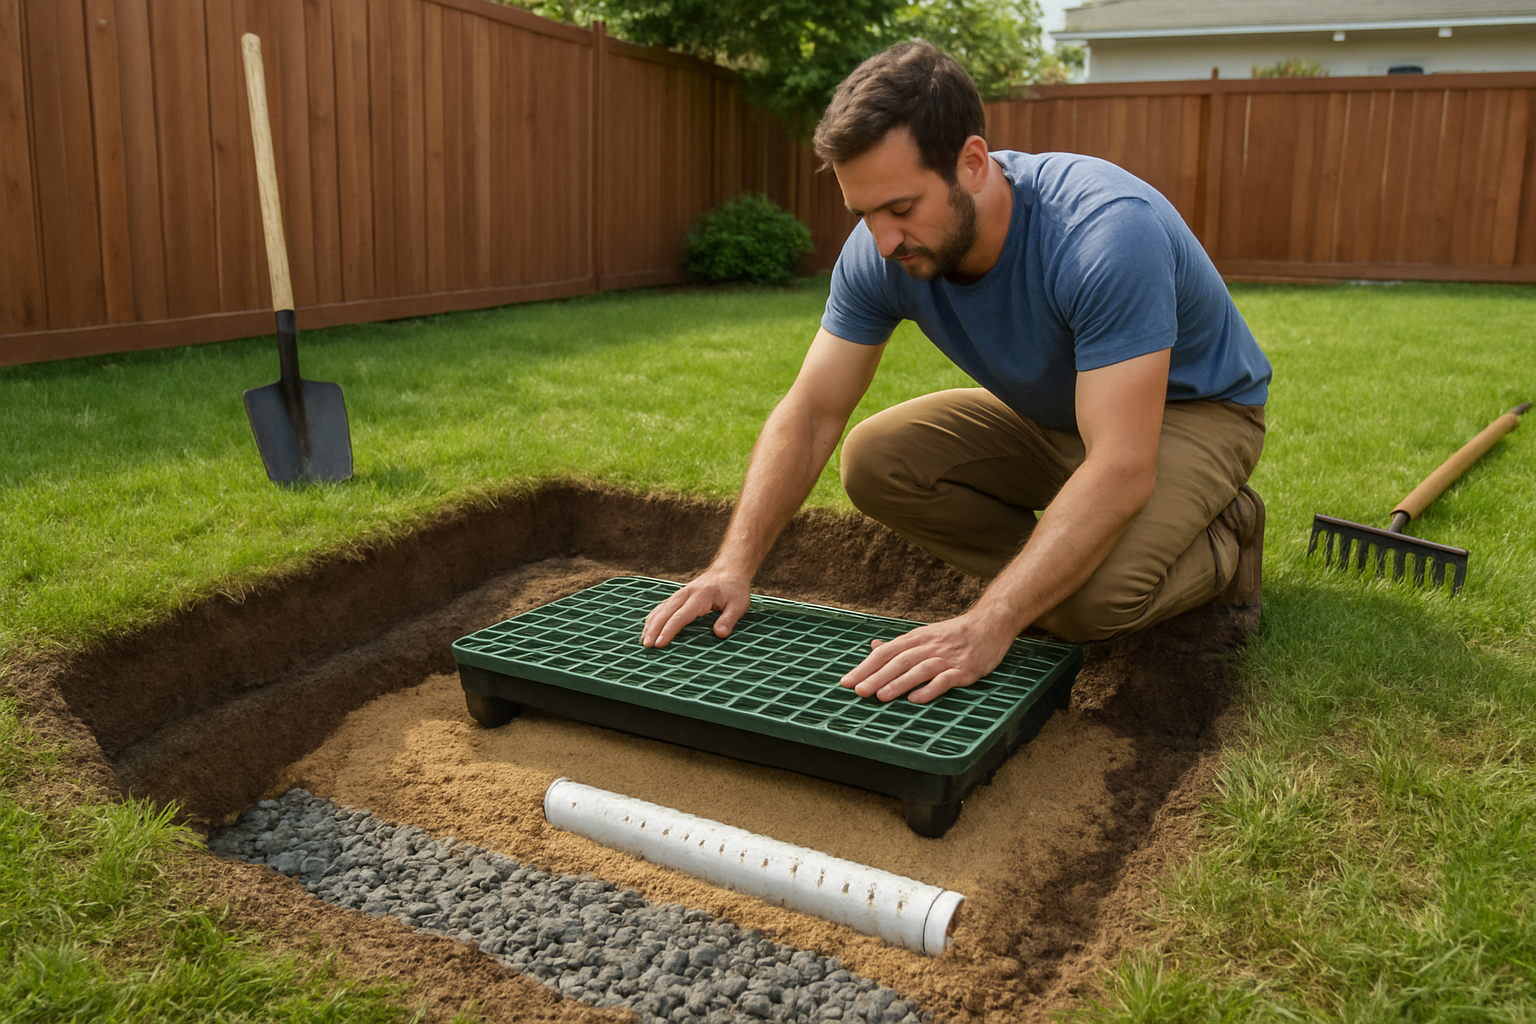
Excavating the Perfect Depth and Dimensions
Start by marking your designated potty area with spray paint or stakes to establish clear boundaries. Dig down 12-18 inches deep, creating a slight slope of 1-2% toward your drainage outlet. Make the area 2-3 feet wider than needed to accommodate proper gravel placement. Remove all roots, rocks, and debris that could interfere with water flow. Compact the soil base using a tamper to prevent future settling. Your excavation should resemble a shallow basin with smooth, sloped sides that direct water toward the drainage point.
Creating the Base Gravel Layer for Maximum Flow
Install 4-6 inches of coarse gravel (¾-inch to 1-inch diameter) as your foundation layer. Use angular crushed stone rather than rounded river rock, as it locks together better and creates stable voids for water movement. Level and compact this base layer gently with a plate compactor, maintaining your drainage slope. The gravel should feel firm underfoot but still allow water to flow freely between stones. This layer serves as your primary drainage highway, so don’t skimp on quality materials.
Installing Perforated Drainage Pipes Correctly
Place 4-inch perforated PVC pipes on top of your gravel base, with holes facing downward to prevent clogging. Connect pipes using standard PVC fittings and direct them toward your drainage outlet or dry well. Surround pipes with additional gravel, ensuring 2-3 inches of clearance on all sides. Install cleanout access points every 50 feet for maintenance. Cap pipe ends that don’t connect to outlets, and secure all joints with PVC primer and cement. Your pipe network should create a gentle downhill path for water collection.
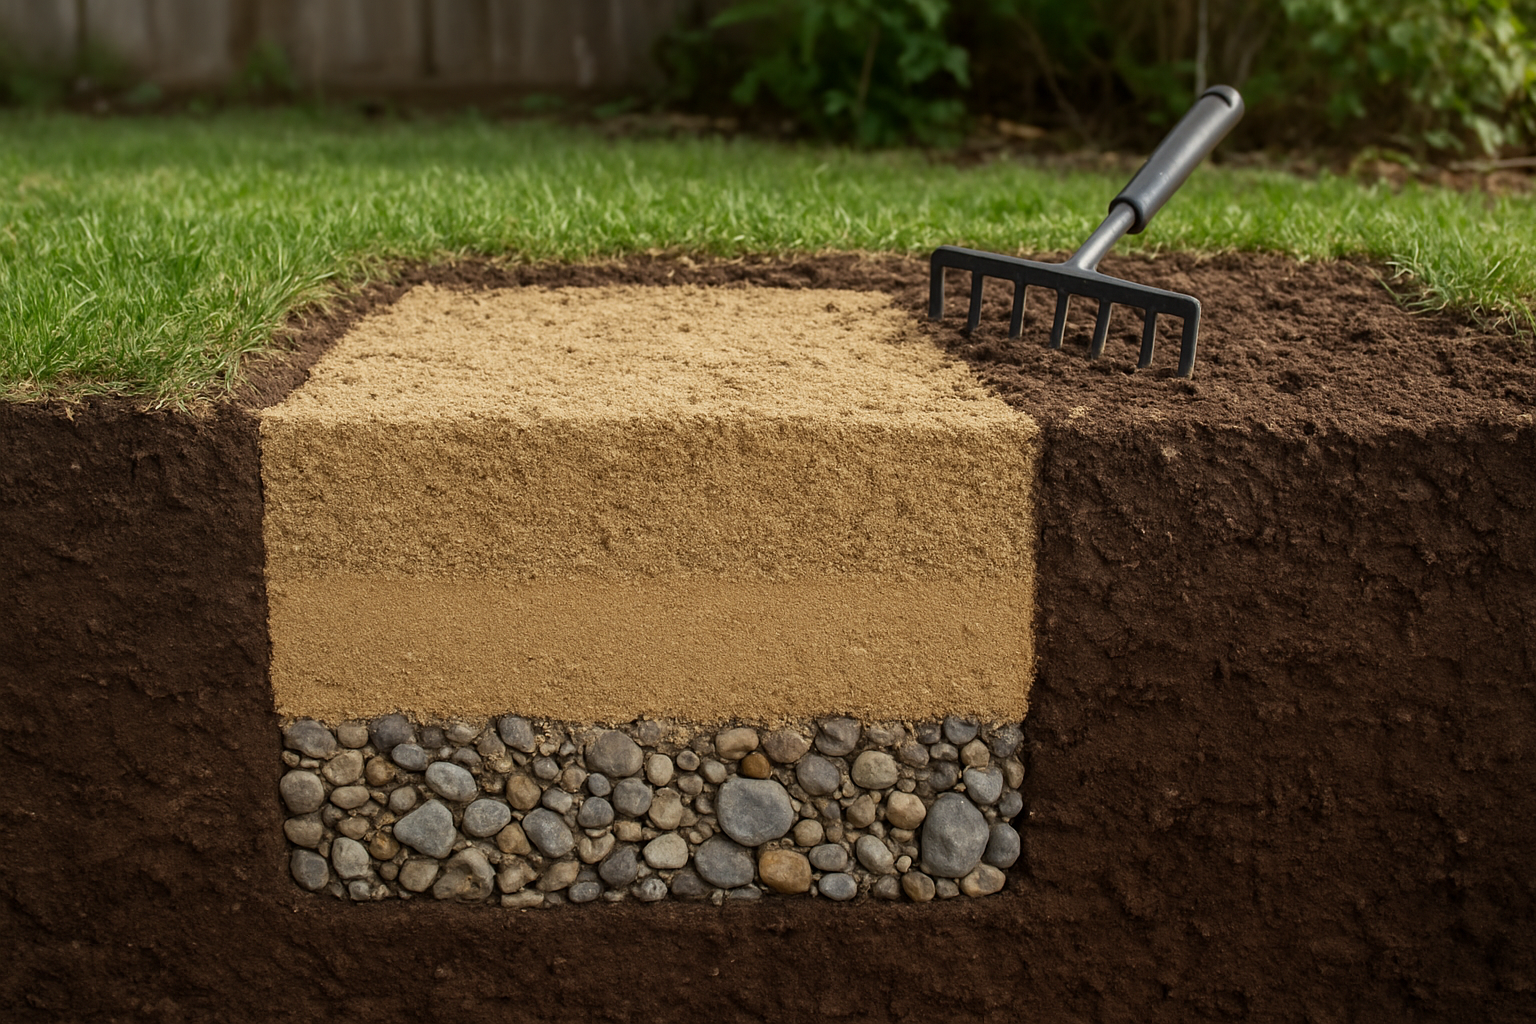
Adding Sand Layer for Optimal Filtration
Spread 2-3 inches of coarse sand over your gravel and pipe system to create an effective filtration barrier. Choose concrete sand or sharp sand rather than fine play sand, which can become compacted and reduce drainage. Level the sand carefully with a screed board, maintaining consistent depth across the entire area. Lightly mist and compact the sand to settle it into place, but avoid over-compaction that could reduce permeability. This layer catches solid waste while allowing liquids to pass through to your drainage system below.
Finishing with Top Layer Materials
Complete your installation with 1-2 inches of pea gravel or decomposed granite as your surface material. These materials provide comfortable footing for dogs while allowing excellent drainage and easy waste removal. Rake the surface smooth and add edging materials like landscape timber or stone to contain everything. Install any desired features like waste stations or rinse areas at this stage. Your finished surface should be level, well-draining, and easy to clean with a hose or pressure washer.
Gravel Layer Functions and Benefits
Promoting Rapid Water Drainage and Flow
Your gravel layer acts as a highway for water movement, allowing liquid waste and rainwater to flow freely through its porous structure. The angular edges of crushed gravel create countless channels that prevent water from pooling on the surface, directing it downward toward your drainage pipes. This rapid flow keeps your dog’s potty area dry and functional even during heavy use or wet weather conditions.
Preventing Soil Compaction Under Heavy Use
When your dogs repeatedly use the same area, their weight and movement would normally compress the soil underneath, creating an impermeable barrier that blocks drainage. Your gravel layer distributes this weight evenly across its surface, maintaining the structural integrity of your drainage system. The individual stones resist compression while still allowing water to pass through, ensuring your investment continues working year after year.
Creating Natural Odor Control Through Aeration
Your gravel layer works like a natural ventilation system, allowing air to circulate freely through the spaces between stones. This constant airflow helps break down waste materials and prevents the anaerobic conditions that create strong ammonia odors. The improved oxygen flow encourages beneficial bacteria that naturally decompose organic matter, keeping your outdoor space fresh and pleasant for both you and your pets.
Sand Layer Performance and Maintenance
Filtering Waste Particles Before Ground Absorption
Your sand layer acts as your first line of defense against waste contamination reaching the soil beneath. The sand particles trap solid waste materials while allowing liquid to filter through at a controlled rate. This natural filtration process prevents larger waste particles from clogging your drainage pipes below and keeps harmful bacteria from spreading into surrounding ground areas.
Maintaining Proper Sand Replacement Schedule
You’ll need to replace your sand every 3-6 months depending on usage frequency and climate conditions. Heavy rainfall areas require more frequent changes since wet sand loses its filtering effectiveness faster. Watch for discoloration, odors, or clumping as signs that replacement time has arrived. Mark your calendar and stick to a regular schedule rather than waiting for obvious problems to develop.
Choosing Coarse vs Fine Sand for Different Climates
Coarse sand works best in wet climates because it drains quickly and prevents water from pooling on the surface. Fine sand suits dry climates better since it retains some moisture while still filtering effectively. Your local rainfall patterns should guide this decision – areas with heavy spring rains need coarse sand, while desert regions benefit from fine sand’s moisture retention properties.
Preventing Sand Migration and Loss
Install edging materials around your potty area perimeter to keep sand from washing away during storms. Landscape timbers, concrete blocks, or specialized pet area borders work well as containment systems. Rake your sand weekly to maintain even distribution and add fresh sand to low spots immediately. Wind barriers like small shrubs or decorative screens help reduce sand loss in exposed locations.
Drainage Pipe System Configuration
Determining Optimal Pipe Placement and Slope
Position your drainage pipes at the lowest point of your dog potty area, creating a consistent downward slope of 1-2% grade toward your drainage outlet. Space perforated pipes 3-4 feet apart for maximum coverage, burying them 12-18 inches deep beneath the sand layer. Your main collection pipe should run perpendicular to the slope, gathering water from smaller feeder lines.
Connecting to Existing Yard Drainage Systems
Tie your dog area drainage into your current yard system by locating the nearest drain line or catch basin. Run your main pipe to this connection point using non-perforated PVC pipe to prevent water loss during transport. Install a junction box where your new line meets the existing system, ensuring proper flow direction and preventing backups during heavy rains.
Installing Clean-Out Access Points for Maintenance
Place clean-out access points every 50 feet along your main drainage line and at each direction change. Install removable caps at ground level, marking their locations for easy future access. These access points let you snake out clogs, flush the system, and inspect pipe condition without excavating your entire dog area.
Troubleshooting Common Drainage Problems
Addressing Slow Drainage and Clogs
When your dog potty area isn’t draining properly, start by checking for compacted sand or gravel layers that may be blocking water flow. Remove accumulated waste buildup and flush the system with a garden hose to clear minor blockages. If drainage remains sluggish, you’ll need to dig down and replace the top sand layer, ensuring proper grading slopes toward your drainage outlets.
Fixing Uneven Water Distribution Issues
Uneven drainage creates puddles and soggy spots that defeat your system’s purpose. Check if your base layer has settled unevenly by probing different areas with a rod. You can fix low spots by adding more gravel base material and re-leveling the entire surface. Make sure your drainage pipes have consistent slopes and aren’t sagging in sections that could trap water.
Preventing Root Intrusion into Pipe Systems
Tree and shrub roots seek out moisture and can quickly clog your drainage pipes. Install root barriers around your potty area using plastic sheeting buried at least two feet deep. Choose PVC pipes with tight joints and consider using root-resistant pipe materials. Regular inspection of nearby vegetation and prompt removal of invasive roots will keep your system flowing smoothly for years.
Resolving Odor Problems Despite Proper Installation
Persistent odors usually mean waste isn’t breaking down properly or water isn’t moving through your system fast enough. Add beneficial bacteria products designed for pet waste areas to boost decomposition. Check that your sand layer isn’t too fine, which can create anaerobic conditions. Increase ventilation by adding perforated pipes near the surface or improving overall drainage flow rates.
Creating a proper drainage system for your dog’s potty area doesn’t have to be overwhelming once you understand the basics. You’ve learned how gravel provides the foundation, sand offers filtration, and drainage pipes handle the heavy lifting when it comes to moving waste and water away from the surface. Each layer works together to keep your yard clean, odor-free, and safe for both your pets and family.
The time you invest in setting up this system correctly will pay off with years of easy maintenance and a healthier outdoor space. Start with quality materials, take your time with the installation, and don’t skip any steps in the process. Your dogs will have a designated area that stays dry and clean, while you’ll enjoy a yard that’s both functional and pleasant to be around.


