Skip to content

[email protected] | About Us |ย Privacy Policy | Terms Of Use

Facebook Pinterest
logo
  • Home ImprovementExpand
    • Deck
    • Barn Doors
    • Patio
    • Bathroom
    • Garden Beds
    • Winter Home Prep
  • Mobile HomeExpand
    • Crawl Space
    • Skirting
  • BackyardExpand
    • Landscaping
    • Curb Appeal
    • Water Features
  • Porch
  • Garden
  • Contact
logo
Patio

How to Build a Fire Pit Patio for Under $300 (Complete Step-by-Step)

You want a backyard fire pit patio, but you don’t want to spend a fortune hiring a contractor or blowing your weekend budget at the hardware store. Good news โ€” you can build a solid, good-looking fire pit patio for under $300 with basic tools and a free weekend.

This guide is for homeowners and renters with outdoor space who want a DIY fire pit setup that actually looks intentional, not thrown together.

Here’s what you’ll find inside:

  • How to plan your budget so you know exactly what to buy before you spend a single dollar
  • A clear, step-by-step build process โ€” from prepping the ground to laying the last paver
  • Affordable finishing touches that pull the whole space together without blowing your budget

No prior masonry experience needed. Grab your coffee, read through this once, then head to the store ready to go.

Contents

Toggle
    • You Might Also Love These Ideas
      • 12 Stunning Concrete Patio Ideas for Jaw-Dropping Outdoor Transformations
      • Easy DIY Patio with Pavers: The Complete Step-by-Step Guide
      • Budget Outdoor Kitchen on a Patio: Installation Costs & ROI…
  • Plan Your Budget-Friendly Fire Pit Patio Like a Pro
      • Break Down the $300 Budget by Category
      • Choose Between DIY and Pre-Made Materials to Save More
      • Pick the Right Location to Avoid Costly Mistakes
  • Gather All the Materials and Tools You Need
      • Essential Materials to Buy Without Overspending
      • Must-Have Tools You Likely Already Own
      • Smart Shopping Tips to Stay Under Budget
      • Where to Find Affordable or Free Materials Locally
      • You Might Also Like!

You Might Also Love These Ideas

DIY Gravel Patio

DIY Gravel Patio: Complete Step-by-Step Guide to Creating Your Perfect…

How to Build Your First Brick Patio Pattern: Zero Experience Required

How to Build Your First Brick Patio Pattern: Zero Experience…

How To Prevent Dog Urine Damage On Concrete And Patio…

Plan Your Budget-Friendly Fire Pit Patio Like a Pro

Create a full-bleed infographic illustration in a 3:2 aspect ratio with a clean professional outdoor-home-improvement style, warm earthy colors, charcoal gray, brick red, tan, sand beige, and muted green accents. Use bold sans-serif typography for the title and clear readable sans-serif text for body copy. Layout should be wide and horizontal with three main sections across the page, not a narrow vertical poster.Top header across the full width:Large bold title text: "Plan Your Budget-Friendly Fire Pit Patio Like a Pro"Add a subtle fire pit and patio background motif behind the header, with a small flame icon near the title.Left section: budget breakdownHeading text: "Break Down the $300 Budget by Category"Place a neat horizontal budget chart with four stacked rows, each row with a small icon and cost range:1. Brick/block icon with text: "Fire pit materials (bricks/blocks)" and "$80โ€“$100"2. Paver/gravel icon with text: "Patio pavers or gravel" and "$100โ€“$120"3. Sand pile and gravel icon with text: "Sand and gravel base" and "$30โ€“$40"4. Tool kit icon with text: "Tools and extras" and "$20โ€“$40"Use thin dividers and small colored price tags on the right side of each row.Center section: save money tipsHeading text: "Choose Between DIY and Pre-Made Materials to Save More"Show a side-by-side comparison graphic: left side a branded fire pit kit box with a higher price feel, right side loose retaining wall blocks and pavers with a lower price feel. Add a green downward arrow and a dollar sign savings badge.Include a second small panel beneath it with a marketplace/hand-me-down theme: a phone screen, laptop, and swapped pavers icon, with text: "Check Facebook Marketplace or Craigslist for leftover pavers from neighbors' projects โ€” you can often score these for free or nearly nothing."Use small checkmark badges next to loose materials and secondhand finds.Right section: location safety and placementHeading text: "Pick the Right Location to Avoid Costly Mistakes"Draw a simple top-down yard diagram with a fire pit circle placed in a flat open area. Show labeled distance markers of "10 feet" from a house, fence, and tree icons. Include a blue puddle/low-spot area crossed out to show poor drainage. Add a green checkmark on the flat open spot.Include short text callouts:"At least 10 feet away from home, fences, and overhanging trees""Avoid low-lying spots where water pools after rain""A flat, open area gives you the safest and most budget-friendly foundation"Use clear iconography, rounded info cards, subtle shadows, and strong visual hierarchy. Keep all text legible and evenly spaced. No people, no extra decorative text, no watermark.

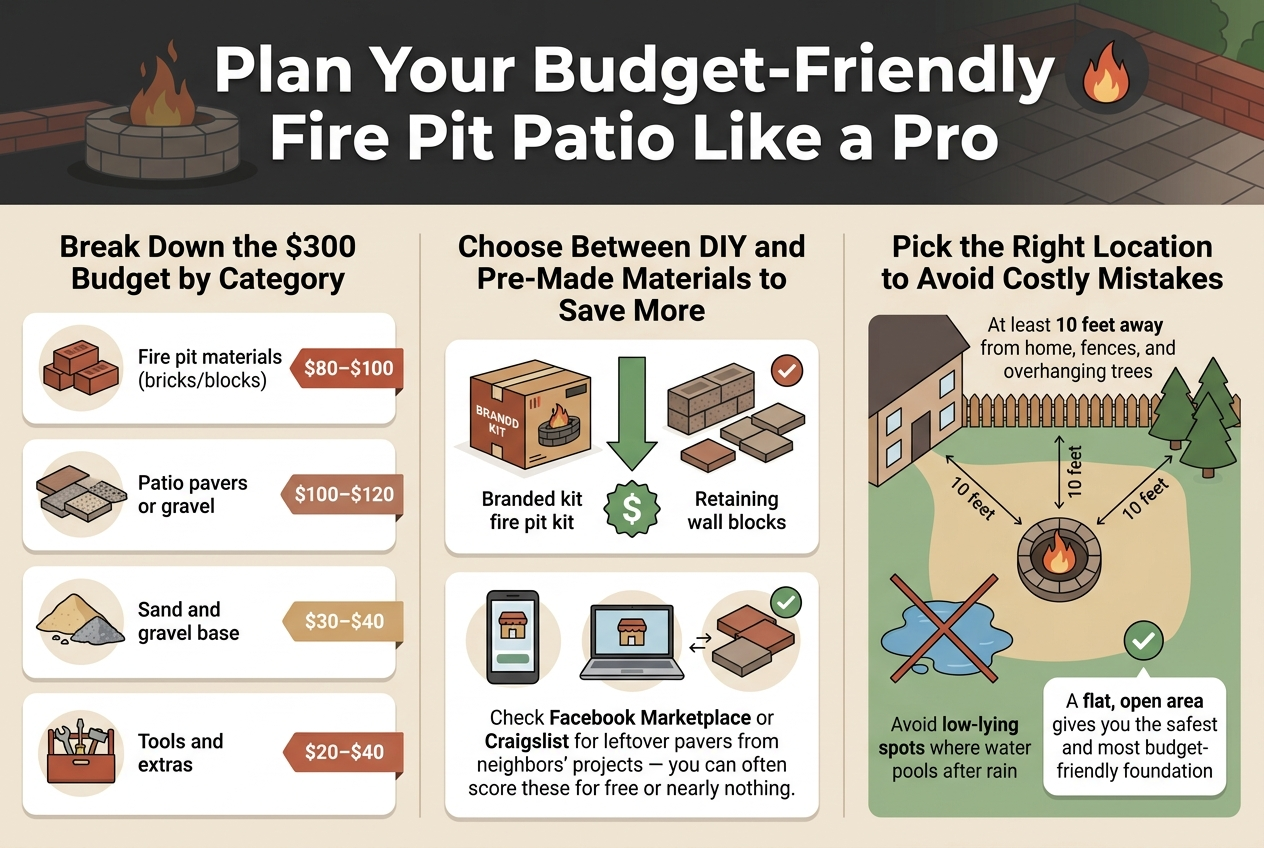
Break Down the $300 Budget by Category

Keeping your spending organized from the start saves you from nasty surprises at the checkout. Here’s a simple breakdown to guide your shopping:

Also Read  The Concrete Patio Trick That Saves $3,000 (Do This Before Hiring Anyone)
CategoryEstimated Cost
Fire pit materials (bricks/blocks)$80โ€“$100
Patio pavers or gravel$100โ€“$120
Sand and gravel base$30โ€“$40
Tools and extras$20โ€“$40

Choose Between DIY and Pre-Made Materials to Save More

Your biggest savings come from choosing loose materials over pre-packaged kits. Retaining wall blocks from a local home improvement store typically cost far less than branded fire pit kits, and you get the same durability. Check Facebook Marketplace or Craigslist for leftover pavers from neighbors’ projects โ€” you can often score these for free or nearly nothing.

Pick the Right Location to Avoid Costly Mistakes

Before you dig a single inch, scout your yard carefully. Your fire pit should sit at least 10 feet away from your home, fences, and any overhanging trees. Avoid low-lying spots where water pools after rain โ€” poor drainage turns your beautiful patio into a muddy mess. A flat, open area gives you the safest and most budget-friendly foundation to work with.

Gather All the Materials and Tools You Need
Create a clean, professional wide infographic in 3:2 aspect ratio, full-bleed layout, with a modern outdoor DIY theme using charcoal gray, warm orange, tan, slate blue, and white. Use bold sans-serif fonts, clear section headers, subtle shadows, and simple flat icons. Place a large bold title across the top: "Gather All the Materials and Tools You Need"Below the title, arrange four wide horizontal sections in a 2-column grid and one bottom callout band, avoiding a narrow vertical stack.Top left section: "Essential Materials to Buy Without Overspending" with a shopping cart icon and a neat table-style layout. Include these rows with small material icons:- "Retaining wall blocks or fire bricks" โ€” "30โ€“40 blocks" โ€” "$60โ€“$90"- "Pea gravel or crushed stone" โ€” "2โ€“3 bags" โ€” "$20โ€“$30"- "Landscape fabric" โ€” "1 roll" โ€” "$10โ€“$15"- "Patio pavers (concrete)" โ€” "30โ€“50 pieces" โ€” "$50โ€“$80"- "Construction adhesive" โ€” "1 tube" โ€” "$8โ€“$12"- "Sand (leveling base)" โ€” "2โ€“3 bags" โ€” "$10โ€“$15"Add a highlighted note box under the table with a block icon and the text: "Stick to concrete blocks instead of specialty fire pit kits โ€” they perform just as well at a fraction of the price."Top right section: "Must-Have Tools You Likely Already Own" with a toolbox icon and a horizontal checklist of tools, each with a small icon:- "Shovel"- "Level"- "Rubber mallet"- "Tape measure"- "Wheelbarrow"- "Work gloves"- "Marking paint or stakes and string"Add a small tip badge with a hammer and wood icon and the text: "If you're missing a rubber mallet, a regular hammer with a scrap wood buffer does the same job."Middle left section: "Smart Shopping Tips to Stay Under Budget" with a price tag icon and four numbered cards with small icons:1. "Buy in bulk when possible"2. "Check clearance sections first"3. "Compare prices online before walking in"4. "Avoid \"fire pit kits\""5. "Buy one bag of sand and one of gravel first"Use short supporting labels in smaller text beside each point:- "Cheaper per piece"- "Late summer and fall discounts"- "Prices vary by store"- "Pay for materials, not branding"- "Test quantities before committing"Middle right section: "Where to Find Affordable or Free Materials Locally" with a location pin icon and five source blocks with app/store icons:- "Facebook Marketplace and Craigslist"- "Habitat for Humanity ReStores"- "Nextdoor app"- "Construction sites"- "Local Buy Nothing groups"Bottom full-width callout band: large bold text "Even scoring your gravel or pavers for free knocks $40โ€“$80 off your total" followed by a standout budget badge: "Keep your entire project comfortably under $300". Include a small money-saving icon and a simple patio fire pit illustration in the background.Use clean spacing, aligned columns, strong visual hierarchy, and readable text throughout.

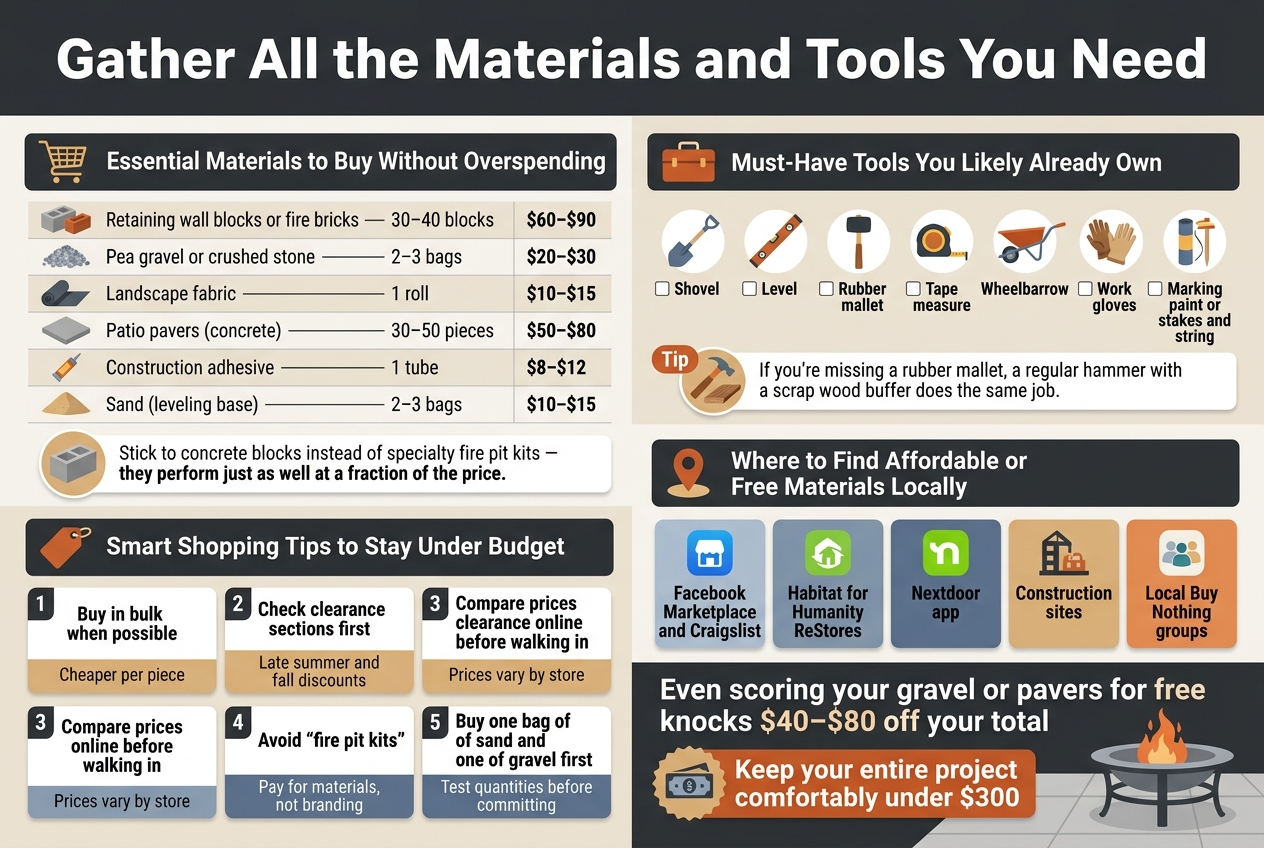
Essential Materials to Buy Without Overspending

Before you head to the hardware store, knowing exactly what you need saves you from costly impulse buys. Here’s a straightforward breakdown of what your fire pit patio requires:

MaterialEstimated QuantityAvg. Cost
Retaining wall blocks or fire bricks30โ€“40 blocks$60โ€“$90
Pea gravel or crushed stone2โ€“3 bags$20โ€“$30
Landscape fabric1 roll$10โ€“$15
Patio pavers (concrete)30โ€“50 pieces$50โ€“$80
Construction adhesive1 tube$8โ€“$12
Sand (leveling base)2โ€“3 bags$10โ€“$15

Stick to concrete blocks instead of specialty fire pit kits โ€” they perform just as well at a fraction of the price.

Also Read  DIY Backyard Patio Under $120: The Complete Step-by-Step Guide

Must-Have Tools You Likely Already Own

You probably have most of what you need sitting in your garage right now. Check for these before buying anything:

  • Shovel โ€” for digging and moving gravel
  • Level โ€” keeps your patio surface even and your fire pit walls straight
  • Rubber mallet โ€” for tapping pavers into place without cracking them
  • Tape measure โ€” layout accuracy matters more than you’d think
  • Wheelbarrow โ€” hauling gravel and sand by hand gets old fast
  • Work gloves โ€” blocks are rough on your hands
  • Marking paint or stakes and string โ€” for outlining your patio shape

If you’re missing a rubber mallet, a regular hammer with a scrap wood buffer does the same job.


Smart Shopping Tips to Stay Under Budget

Your biggest savings come from how and when you shop, not just where. Keep these strategies in your back pocket:

  • Buy in bulk when possible โ€” a pallet of pavers is almost always cheaper per piece than buying individually
  • Check clearance sections first โ€” Home Depot and Lowe’s regularly discount seasonal outdoor materials, especially in late summer and fall
  • Compare prices online before walking in โ€” prices vary widely between stores even in the same city
  • Avoid “fire pit kits” โ€” you’re paying for branding, not performance; plain retaining wall blocks handle heat just as well
  • Buy one bag of sand and one of gravel first โ€” test your quantities before committing to more

Where to Find Affordable or Free Materials Locally

Your neighborhood is a goldmine if you know where to look. Before spending full retail price, check these spots:

  • Facebook Marketplace and Craigslist โ€” people give away leftover pavers, bricks, and gravel after landscaping projects constantly
  • Habitat for Humanity ReStores โ€” discounted building materials, sometimes including pavers and blocks
  • Nextdoor app โ€” neighbors post free materials regularly, especially after home renovation projects
  • Construction sites โ€” leftover materials are sometimes available; always ask the site manager first
  • Local Buy Nothing groups โ€” surprisingly active for outdoor and garden materials
Also Read  How to Build a DIY Covered Patio: Transform Your Backyard for Under $1,800

Even scoring your gravel or pavers for free knocks $40โ€“$80 off your total, keeping your entire project comfortably under that $300 mark.

You Might Also Like!

  • How to Build a Smokeless Fire Pit for Under $50
    How to Build a Smokeless Fire Pit for Under $50?
  • DIY Patio
    How to Build a DIY Patio for Under $120: Complete Step-by-Step Guide
  • Sunny outdoor patio with poolside view, palm trees, and cozy seating at a tropical resort.
    DIY Backyard Patio Under $120: The Complete Step-by-Step Guide
Rafay Khan

Post navigation

Previous Previous
The Swing Set Trick That Makes Any Backyard Feel Like a Park
NextContinue
The Container Drainage Trick That Saves Every Plant (Most Beginners Skip This)

You Might Also Like!

  • How to Build a Smokeless Fire Pit for Under $50
    How to Build a Smokeless Fire Pit for Under $50?
  • DIY Patio
    How to Build a DIY Patio for Under $120: Complete Step-by-Step Guide
  • Sunny outdoor patio with poolside view, palm trees, and cozy seating at a tropical resort.
    DIY Backyard Patio Under $120: The Complete Step-by-Step Guide

Search More!

About DearWorld

We share practical DIY tips, budget-friendly ideas, and creative inspiration for mobile homes, backyards, patios, porches, gardens, and skirting. Helping you make every space feel like home โ€” one project at a time.

  • About Us
  • Privacy Policy
  • Terms & Conditions
  • Blog

© 2026 Dear World - WordPress Theme by Kadence WP

Facebook Instagram Pinterest
Scroll to top
  • Home Improvement
    • Deck
    • Barn Doors
    • Patio
    • Bathroom
    • Garden Beds
    • Winter Home Prep
  • Mobile Home
    • Crawl Space
    • Skirting
  • Backyard
    • Landscaping
    • Curb Appeal
    • Water Features
  • Porch
  • Garden
  • Contact
Search