Skip to content

[email protected] | About Us | Privacy Policy | Terms Of Use

Facebook Pinterest
logo
  • Home ImprovementExpand
    • Deck
    • Barn Doors
    • Patio
    • Bathroom
    • Garden Beds
    • Winter Home Prep
  • Mobile HomeExpand
    • Crawl Space
    • Skirting
  • BackyardExpand
    • Landscaping
    • Curb Appeal
    • Water Features
  • Porch
  • Garden
  • Contact
logo
Mobile Home

The Container Drainage Trick That Saves Every Plant (Most Beginners Skip This)

If your potted plants keep dying no matter what you do, drainage is almost certainly the problem — and the fix is easier than you think.

This guide is for anyone growing plants in pots, whether you’ve got a tiny apartment balcony or a full backyard setup. If you’ve ever lost a plant to root rot, watched leaves turn yellow for no obvious reason, or wondered why your soil stays soggy for days after watering, you’re in the right place.

Here’s what you’ll walk away knowing:

  • Why drainage matters more than watering schedules, sunlight, or fertilizer — and how ignoring it quietly kills even healthy plants
  • The specific drainage mistakes most beginners make without realizing they’re doing anything wrong
  • A simple, practical trick that actually improves container drainage fast, plus how to apply it to pots you already own

No complicated techniques, no expensive equipment. Just the one thing that makes the biggest difference in keeping your container plants alive and thriving.

Contents

Toggle
    • You Might Also Love These Ideas
      • How to Fix Mobile Home Skirting Moisture Problems: Long-Term Solutions
      • Mobile Homes for Sale: 10 Genius Hacks to Find Hidden…
      • 12 Stunning Mobile Home Shutters Ideas That Boost Curb Appeal…
  • Why Drainage Is the Single Most Important Factor in Container Gardening
      • How Poor Drainage Silently Kills Healthy Plants
      • The Difference Between Overwatering and Poor Drainage Symptoms
      • Why Even Drought-Tolerant Plants Suffer Without Proper Drainage
  • The Common Drainage Mistakes Beginners Make Without Realizing
      • A. Relying Solely on Drainage Holes Without Layering
      • B. Using the Wrong Potting Mix That Traps Excess Moisture
      • C. Choosing Containers That Restrict Water Flow
      • D. Placing Saucers That Block Drainage Entirely
  • The Container Drainage Trick That Actually Works
      • A. The Correct Layering Method That Promotes Fast Water Escape
      • B. Choosing the Right Drainage Materials for Different Plant Types
      • C. How to Test Your Container Drainage Before Planting
  • How to Upgrade Drainage in Containers You Already Own
      • A. Quick Fixes for Pots With Insufficient Drainage Holes
      • B. Adding Drainage Layers to Existing Planted Containers
      • C. Affordable Materials That Improve Drainage Immediately
      • D. When to Repot Versus When to Amend Current Drainage
  • Matching Drainage Setup to Specific Plant Needs
      • High-Drainage Setups for Succulents and Cacti
      • Moderate Drainage Configurations for Vegetables and Herbs
      • Moisture-Retaining Adjustments for Tropical Plants
      • You Might Also Like!

You Might Also Love These Ideas

Mobile home underbelly featured

Mobile Home Underbelly Maintenance: A Comprehensive Guide

DIY Mobile Home Skirting Installation

10 Common Mobile Home Wall Problems and How to Fix…

Healthy Sweet Potato Pumpkin Dog Treats (Easy Homemade Recipe)

Why Drainage Is the Single Most Important Factor in Container Gardening

Create a clean professional landscape infographic in a 3:2 aspect ratio, full-bleed edge-to-edge with no frame, using a modern flat vector style, white background with deep green, teal, blue, and warm yellow accents, bold sans-serif typography, clear hierarchy, and wide horizontal section layout.Top header across the full width:Large bold title text: "Why Drainage Is the Single Most Important Factor in Container Gardening"Add a small subtitle beneath in medium weight: "How Poor Drainage Silently Kills Healthy Plants"Include a wide illustration of a container plant with water pooling at the bottom and visible roots below the soil line, with a blue droplet icon and a crossed-out oxygen symbol.Middle left section in a large rounded rectangle with a dark teal header bar titled: "How Poor Drainage Silently Kills Healthy Plants"Inside, show a cross-section of a pot with stagnant water at the bottom, roots submerged, yellowing leaves above, and a warning icon. Add short text callout in a clean text block:"When water sits at the bottom of your container with nowhere to go, it suffocates your plant's roots by cutting off their oxygen supply.""Your roots literally drown in slow motion while the top of your soil looks perfectly fine."Middle right section split into two comparison cards with icons:Card 1 with a blue watering can icon and title: "Overwatering"Text: "means you're giving your plant too much water too often"Card 2 with a gray clogged-drain icon and title: "Poor drainage"Text: "means the water you give has nowhere to escape, even if your watering schedule is perfect"Below both cards, add a highlighted warning strip with yellow background and bold text:"Yellowing leaves, mushy stems, and wilting despite wet soil = roots are rotting, not a need for more water"Bottom wide section titled: "Why Even Drought-Tolerant Plants Suffer Without Proper Drainage"Place a clean 3-column table with thin lines and simple plant icons, using green check and red X symbols in the last column. Include exactly these rows and headers:"Plant Type" | "Drought Tolerance" | "Survives Poor Drainage?""Succulents" | "Very High" | "No""Lavender" | "High" | "No""Cacti" | "Extreme" | "No""Tomatoes" | "Moderate" | "No"Add a bottom-right callout with a small root rot illustration and bold text:"Surviving drought and surviving soggy soil are two completely different things."Use strong visual hierarchy, ample spacing, crisp iconography, and readable text blocks. Ensure all text is sharp and clearly visible.

How Poor Drainage Silently Kills Healthy Plants

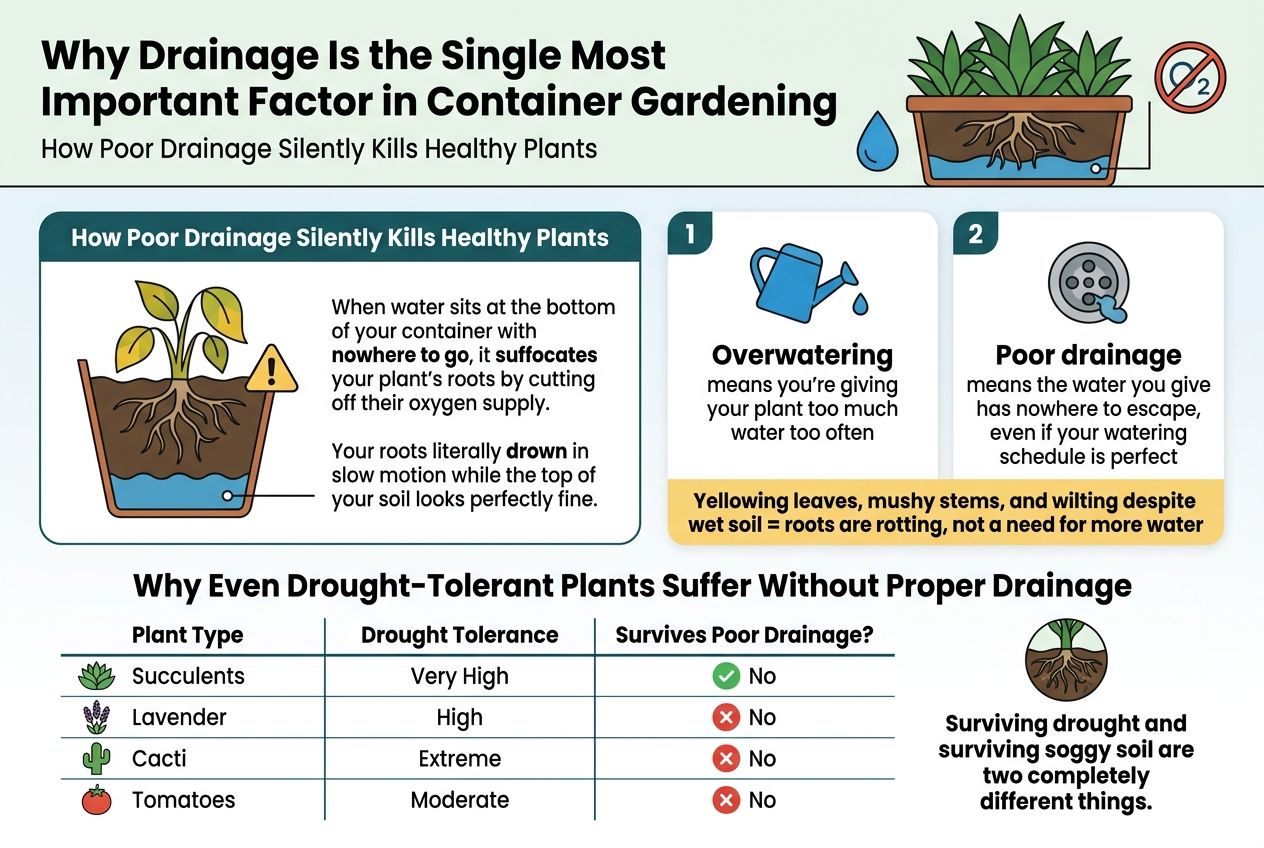
When water sits at the bottom of your container with nowhere to go, it suffocates your plant’s roots by cutting off their oxygen supply. Your roots literally drown in slow motion while the top of your soil looks perfectly fine, which is why so many plants die and you never see it coming until it’s too late.

Also Read  7 Insane Mobile Home Garage Door Hacks That Cost Less Than Your Monthly Coffee Budget

The Difference Between Overwatering and Poor Drainage Symptoms

  • Overwatering means you’re giving your plant too much water too often
  • Poor drainage means the water you give has nowhere to escape, even if your watering schedule is perfect

You can water your plants exactly right and still lose them if your container traps moisture. Your yellowing leaves, mushy stems, and wilting despite wet soil are your plant screaming that its roots are rotting — not that it needs more water.

Why Even Drought-Tolerant Plants Suffer Without Proper Drainage

Plant TypeDrought ToleranceSurvives Poor Drainage?
SucculentsVery HighNo
LavenderHighNo
CactiExtremeNo
TomatoesModerateNo

Your succulents and cacti evolved to handle dry spells, but their roots were never designed to sit in stagnant water. Even your toughest plants will rot from the roots up when drainage fails, because surviving drought and surviving soggy soil are two completely different things.

The Common Drainage Mistakes Beginners Make Without Realizing
Create a clean professional landscape infographic in a 3:2 aspect ratio, full-bleed edge-to-edge layout with no frame, no inset margins, and no tall centered poster stack. Use a bright white background with soft blue and green accent colors, dark charcoal text, and subtle terracotta and soil-brown details. Use modern sans-serif fonts with a bold title at the top and four wide horizontal sections arranged in a 2x2 grid across the page. Include simple flat vector garden icons and drainage symbols.Top header across the full width:Large bold title text: "The Common Drainage Mistakes Beginners Make Without Realizing"Add a small subtitle line beneath in lighter text: "Avoid soggy roots and improve container drainage"Main body: four equal content blocks, each with a colored number badge, a small icon, a bold section heading, and 1–2 short explanatory lines.Top left block:Number badge "A" in a blue circle.Icon: a plant pot with drainage holes at the bottom and a blocked water line.Heading text: "Relying Solely on Drainage Holes Without Layering"Body text:"Drainage holes alone are not enough.""Coarse material like perlite or gravel helps prevent trapped moisture."Top right block:Number badge "B" in a green circle.Icon: dense heavy soil in a pot with a droplet trapped inside.Heading text: "Using the Wrong Potting Mix That Traps Excess Moisture"Body text:"Garden soil compacts in containers.""Use a lightweight, well-draining container mix."Bottom left block:Number badge "C" in an orange circle.Icon: two pots side by side, one narrow-bottomed glazed ceramic pot holding water, one terracotta pot draining better.Heading text: "Choosing Containers That Restrict Water Flow"Body text:"Narrow shapes slow water exit.""Non-porous glazed ceramic holds moisture longer than terracotta."Bottom right block:Number badge "D" in a teal circle.Icon: a pot sitting in a saucer with pooled water under it, plus a small raised stand version beside it.Heading text: "Placing Saucers That Block Drainage Entirely"Body text:"Pooled water in a saucer creates a soggy root zone.""Raise the pot slightly to keep drainage clear."Add thin arrows and small water drop symbols near each pot icon, plus subtle warning marks where needed. Use clear visual hierarchy, ample spacing, crisp lines, and balanced composition. Keep all text fully legible and perfectly spelled. Include only the following text exactly as written in the infographic:"The Common Drainage Mistakes Beginners Make Without Realizing""A. Relying Solely on Drainage Holes Without Layering""Drainage holes alone are not enough.""Coarse material like perlite or gravel helps prevent trapped moisture.""B. Using the Wrong Potting Mix That Traps Excess Moisture""Garden soil compacts in containers.""Use a lightweight, well-draining container mix.""C. Choosing Containers That Restrict Water Flow""Narrow shapes slow water exit.""Non-porous glazed ceramic holds moisture longer than terracotta.""D. Placing Saucers That Block Drainage Entirely""Pooled water in a saucer creates a soggy root zone.""Raise the pot slightly to keep drainage clear."

A. Relying Solely on Drainage Holes Without Layering

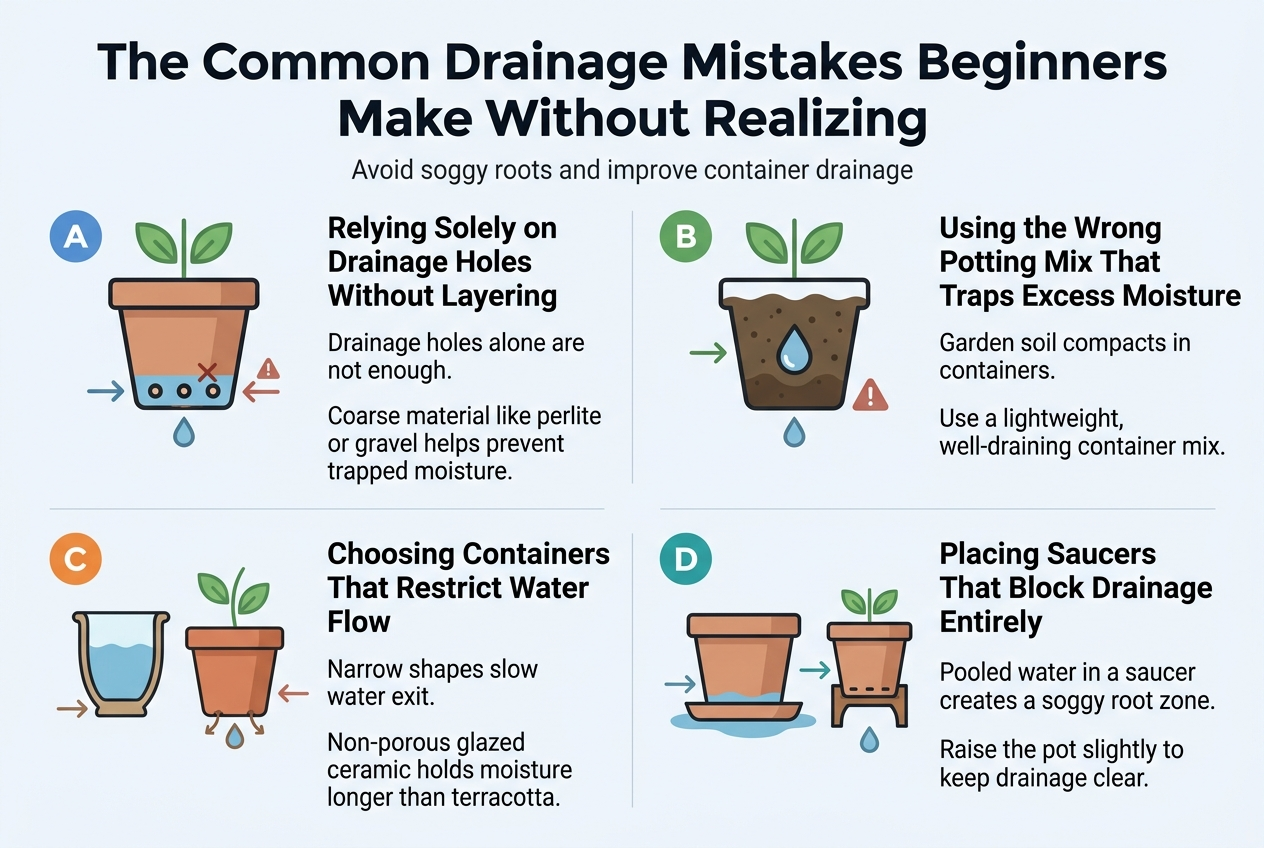
Having drainage holes in your container doesn’t automatically mean your plant roots are safe from sitting water. When you skip adding a layer of coarse material at the bottom, like perlite or gravel, compacted soil can block those holes and trap moisture right where your roots live.

B. Using the Wrong Potting Mix That Traps Excess Moisture

If your potting mix feels dense and heavy when wet, your plant is already struggling. Regular garden soil compacts inside containers and holds way too much moisture, cutting off airflow to roots. You need a well-draining, lightweight mix specifically formulated for containers to keep things breathing properly.

Also Read  12 Stunning Mobile Home Interior Design Ideas to Transform Your Space on a Budget

C. Choosing Containers That Restrict Water Flow

Your container’s material and shape matter more than you’d think. Narrow-bottomed pots make it harder for water to exit quickly, and non-porous materials like glazed ceramic hold moisture longer than terracotta. Picking the wrong container for your plant’s water needs creates drainage problems before you’ve even added soil.

D. Placing Saucers That Block Drainage Entirely

Saucers protect your surfaces, but if your pot is sitting directly in pooled water inside that saucer, you’ve essentially created a swamp at the root zone. Your plant pulls that standing water back up, keeping the soil soggy. Elevating your pot slightly inside the saucer fixes this completely.

The Container Drainage Trick That Actually Works
Create a clean, professional wide infographic illustration in 3:2 aspect ratio, full-bleed layout, bright natural gardening colors with white background, deep green and earthy tan accents, modern sans-serif typography, bold hierarchy, crisp flat vector style.Top header across the full width: large bold title text exactly "The Container Drainage Trick That Actually Works" with a small watering can icon and a healthy potted plant icon beside it.Below the title, arrange three wide horizontal sections in a 2-row layout with strong visual separation and clear icons.Left large section labeled exactly "A. The Correct Layering Method That Promotes Fast Water Escape" with a simple cutaway container diagram:- a container pot cross-section- top layer: well-aerated potting mix- bottom base: breathable landscape fabric covering drainage holes- water droplets flowing freely downward through the soil and out the holes- a crossed-out gravel layer icon with a red X and a small label exactly "Skip gravel at the bottom"- include short callout text exactly "Well-aerated potting mix" and "Breathable landscape fabric"Right upper section labeled exactly "B. Choosing the Right Drainage Materials for Different Plant Types" with a clean 2-column mini table and four plant icons:- row 1: succulent icon, text exactly "Succulents & Cacti" and "Coarse perlite or pumice mixed 50/50 with soil"- row 2: tropical leaf icon, text exactly "Tropical Plants" and "Bark chips blended into standard potting mix"- row 3: herb sprig icon, text exactly "Herbs & Vegetables" and "Perlite at roughly 20–30% of your total mix"- row 4: fern icon, text exactly "Ferns & Moisture Lovers" and "Lightweight LECA pebbles at the pot base"Add a small soil bag icon and a short emphasized line below the table exactly "Your soil mix does most of the heavy lifting"Bottom wide section spanning the full width labeled exactly "C. How to Test Your Container Drainage Before Planting" with a step-by-step visual:- a hand pouring water into an empty planted container- water exiting drainage holes quickly- a stopwatch icon showing "30 sec"- a warning callout with a red triangle icon and text exactly "If water pools on top for more than 30 seconds or trickles out slowly, add more perlite or widen the holes with a drill."- include a small checkmark label exactly "Fast drainage = ready to plant"Use clear numbered markers "A.", "B.", and "C." in colored circles, consistent icon style, strong contrast, ample whitespace, and a polished editorial infographic look.

A. The Correct Layering Method That Promotes Fast Water Escape

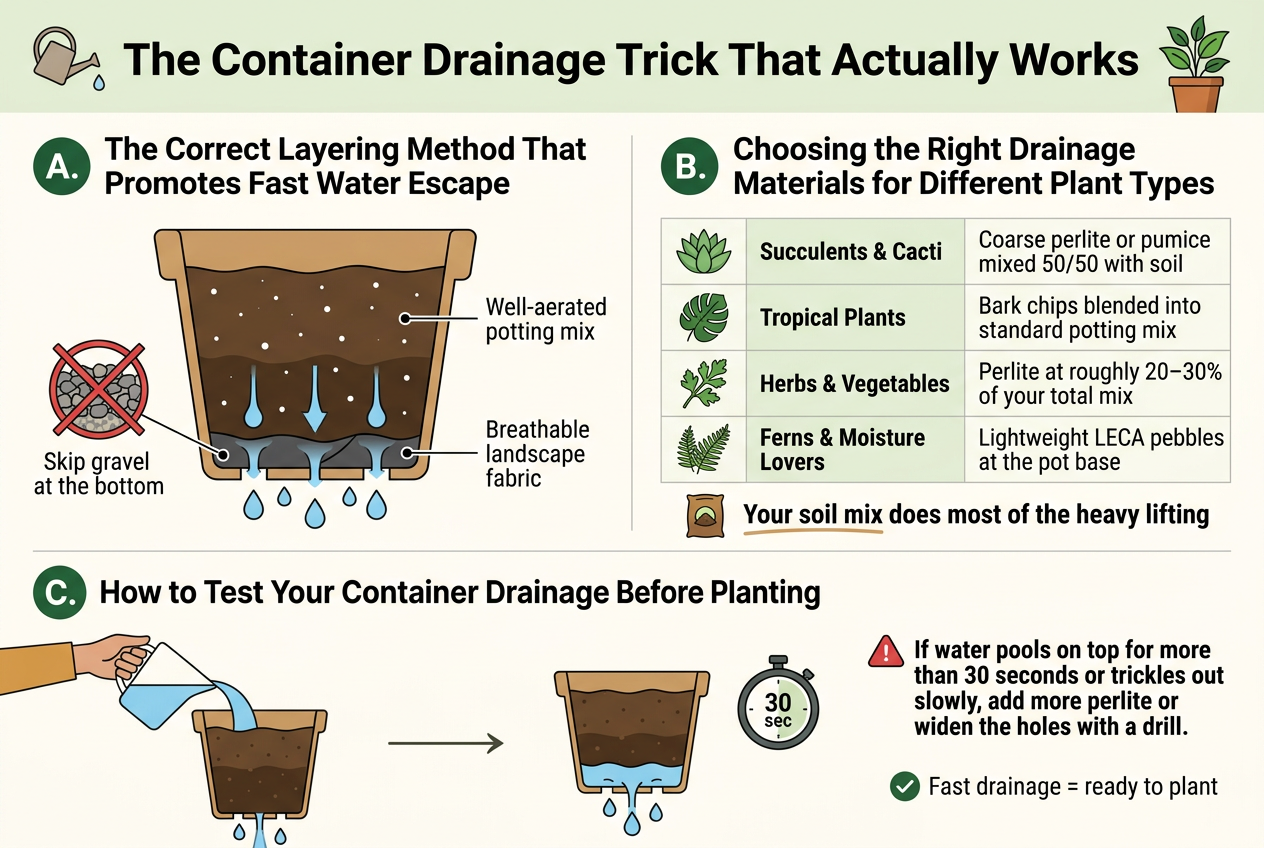
Skip the old gravel-at-the-bottom myth — it actually raises your water table and suffocates roots. Your best move is filling your container with a well-aerated potting mix, then placing a breathable landscape fabric layer at the base to keep soil from clogging your drainage holes without blocking water flow.

B. Choosing the Right Drainage Materials for Different Plant Types

Your plant type should drive your drainage material choice completely.

Plant TypeBest Drainage Material
Succulents & CactiCoarse perlite or pumice mixed 50/50 with soil
Tropical PlantsBark chips blended into standard potting mix
Herbs & VegetablesPerlite at roughly 20–30% of your total mix
Ferns & Moisture LoversLightweight LECA pebbles at the pot base

Your soil mix does most of the heavy lifting when it comes to drainage, so choosing the wrong one from the start puts your plants behind immediately.

Also Read  Budget Breakdown: $500 Mobile Home Makeover Challenge In 2025

C. How to Test Your Container Drainage Before Planting

Before your plant goes in, run a quick water test. Pour water steadily into your empty, soil-filled container and watch how fast it exits the drainage holes. If water pools on top for more than 30 seconds or trickles out painfully slowly, your mix needs more perlite or your holes need widening with a drill.

How to Upgrade Drainage in Containers You Already Own
Create a clean, professional full-bleed infographic illustration in a 3:2 landscape aspect ratio about container drainage upgrades. Use a bright garden-themed palette of deep green, teal, terracotta, warm gray, and white, with bold sans-serif typography and clear iconography. Place a large bold title across the top: "How to Upgrade Drainage in Containers You Already Own".Arrange the content in four wide horizontal sections or a 2x2 grid across the page, not a narrow vertical stack. Use clear section headers, numbered markers, and simple illustrated icons.Section 1 on the upper left: header text "A. Quick Fixes for Pots With Insufficient Drainage Holes". Show a clay pot and a plastic pot side by side with drilled holes in the base. Add a small drill icon. Include short bullet text: "Add 3 to 5 holes", "Use a masonry bit for ceramic or terracotta", "Use a regular drill bit for plastic". Use a caution symbol near the ceramic pot and a clean drilling motion line graphic.Section 2 on the upper right: header text "B. Adding Drainage Layers to Existing Planted Containers". Show a planted container with a healthy plant and a thin top dressing layer of coarse sand or perlite on the soil surface. Include a water drop moving downward through the soil. Add short bullet text: "Top with a thin layer of coarse sand or perlite", "Helps excess water move down faster", "Keeps the surface from staying soggy". Use a small root icon beneath the soil line.Section 3 on the lower left: header text "C. Affordable Materials That Improve Drainage Immediately". Show four labeled material chips or cards with icons: "Perlite — Very low — Garden centers, online", "Coarse sand — Low — Hardware stores", "Gravel or small stones — Low — Home improvement stores", "Broken terracotta pieces — Free — Repurpose old pots". Use a small price tag icon on each card and a tiny source/location icon. Add a subtle soil mixing graphic with arrows showing improved water flow.Section 4 on the lower right: header text "D. When to Repot Versus When to Amend Current Drainage". Split this section into two side-by-side decision boxes. Left box with a red/orange alert icon and text: "Repot if: Plant looks waterlogged, roots are rotting, water sits on top of the soil for more than a few minutes". Right box with a green check icon and text: "Amend current soil if: Plant is healthy, you want a small improvement, you want to avoid disturbing roots". Add a small visual of a plant in fresh soil for repotting and a plant with added perlite for amending.Use clear visual hierarchy: bold title, medium-size section headers, smaller body text. Keep text concise and highly legible. Use icons for drill, pot, sand, perlite, gravel, terracotta shards, water droplets, roots, alert, and checkmark. Maintain a balanced wide composition with generous spacing, crisp lines, and subtle shadows.

A. Quick Fixes for Pots With Insufficient Drainage Holes

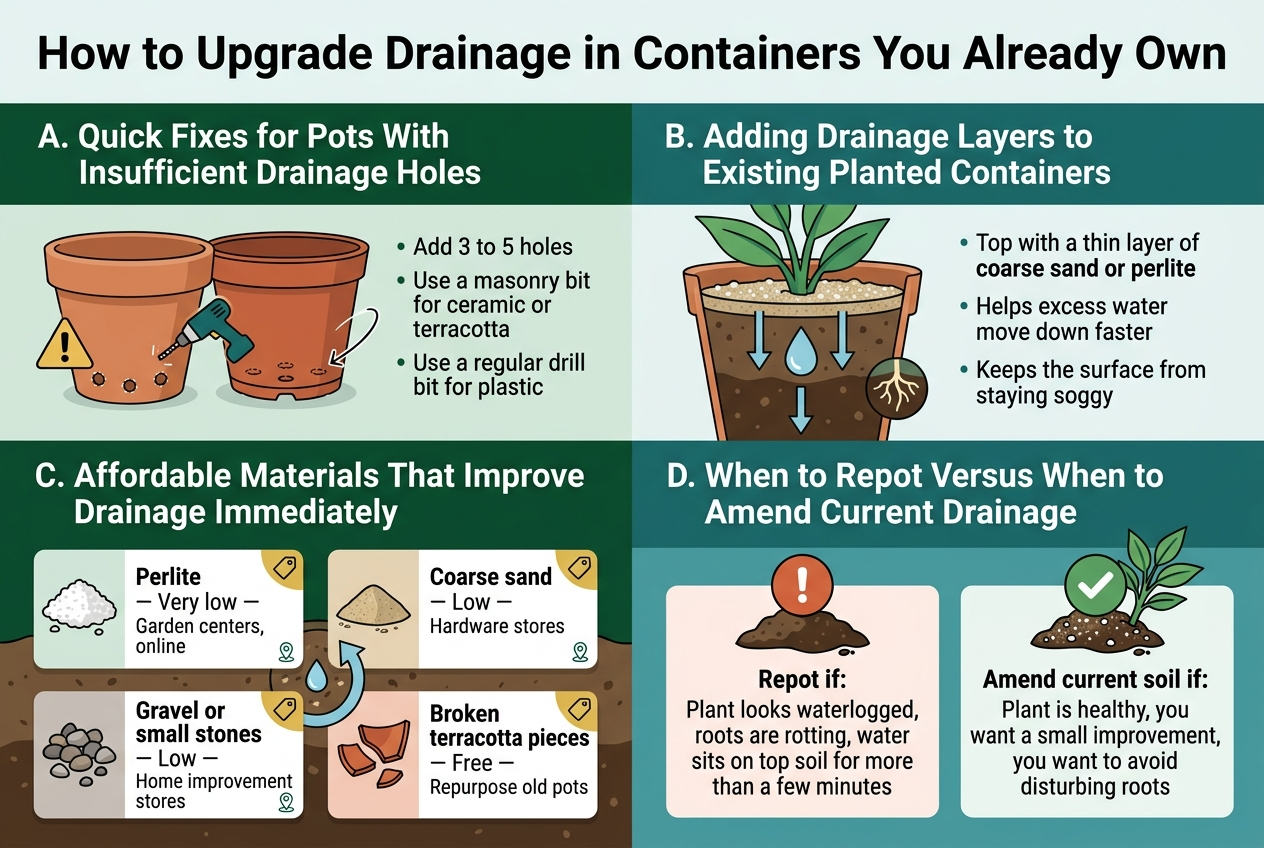
If your pot only has one tiny hole at the bottom, grab a drill and add more — aim for at least three to five holes spread evenly across the base. For ceramic or terracotta pots, use a masonry bit and go slow to avoid cracking. For plastic containers, a regular drill bit works perfectly.

B. Adding Drainage Layers to Existing Planted Containers

When your plant is already settled in, you can’t easily restructure the bottom layers without disturbing the roots. Your best move is topping the soil with a thin layer of coarse sand or perlite, which helps excess water move down faster and keeps the surface from staying soggy after watering.

C. Affordable Materials That Improve Drainage Immediately

MaterialCostWhere to Find It
PerliteVery lowGarden centers, online
Coarse sandLowHardware stores
Gravel or small stonesLowHome improvement stores
Broken terracotta piecesFreeRepurpose old pots

Mix any of these into your existing soil to open up the structure and let water flow through instead of pooling around roots.

D. When to Repot Versus When to Amend Current Drainage

If your plant looks waterlogged, roots are rotting, or water sits on top of the soil for more than a few minutes, repotting into fresh, well-draining mix is your smartest call. But if your plant seems healthy and you just want to improve things slightly, amending your current soil with perlite or coarse grit saves you the hassle of a full repot and keeps root disturbance to a minimum.

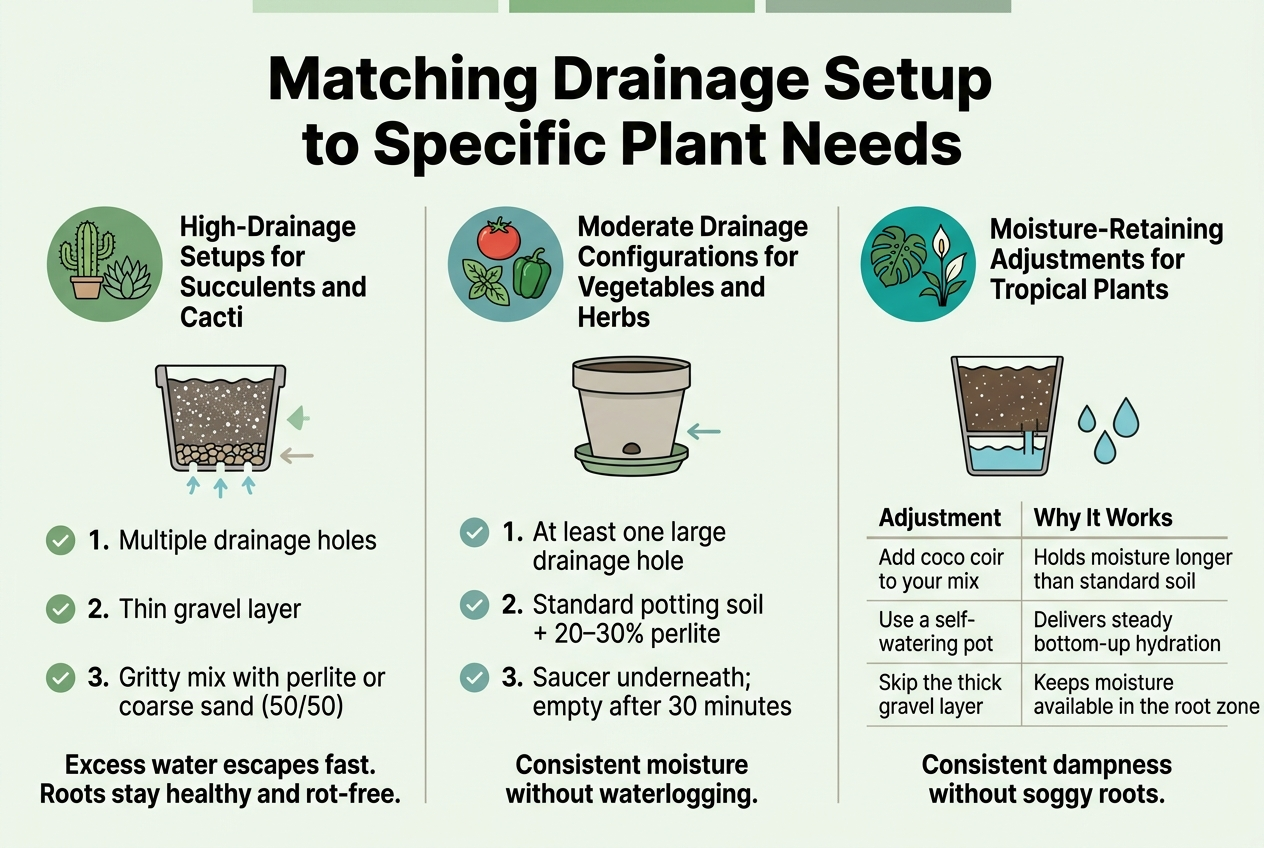
Matching Drainage Setup to Specific Plant Needs
Create a clean professional infographic in a 3:2 aspect ratio, full-bleed layout with no frame, wide horizontal composition, white background with subtle light green and خاک خاک? no, subtle sage green and خاک? Let's do clean. Use modern sans-serif fonts, bold dark charcoal headings, accent colors: cactus green, herb green, tropical teal, warm gray dividers. Place a large bold title across the top center: "Matching Drainage Setup to Specific Plant Needs".Below the title, divide the canvas into three wide horizontal sections or three equal columns with clear icons and color-coded headers.LEFT SECTION: High-Drainage Setups for Succulents and CactiUse a cactus and succulent icon in a green circle. Include a small container illustration with multiple drainage holes, a thin gravel layer at the bottom, and a gritty soil mix.Add 3 numbered bullet points with small check icons:1. "Multiple drainage holes"2. "Thin gravel layer"3. "Gritty mix with perlite or coarse sand (50/50)"Add a short bold line beneath: "Excess water escapes fast. Roots stay healthy and rot-free."CENTER SECTION: Moderate Drainage Configurations for Vegetables and HerbsUse a tomato, basil, and pepper icon cluster in a blue-green circle. Include a pot with one large drainage hole and a saucer beneath it.Add 3 numbered bullet points with small check icons:1. "At least one large drainage hole"2. "Standard potting soil + 20–30% perlite"3. "Saucer underneath; empty after 30 minutes"Add a short bold line beneath: "Consistent moisture without waterlogging."RIGHT SECTION: Moisture-Retaining Adjustments for Tropical PlantsUse a monstera leaf and peace lily icon in a teal circle. Include a self-watering pot illustration with bottom-up water reservoir and a soil mix showing no thick gravel layer.Add a two-column mini-table with thin lines and bold headers:"Adjustment" | "Why It Works""Add coco coir to your mix" | "Holds moisture longer than standard soil""Use a self-watering pot" | "Delivers steady bottom-up hydration""Skip the thick gravel layer" | "Keeps moisture available in the root zone"Add a short bold line beneath: "Consistent dampness without soggy roots."Use clear section headers, numbered points, small icons for each item, and neat spacing. Include subtle arrows or water droplet symbols to emphasize drainage and moisture balance. Ensure all text is legible, crisp, and exactly as written.

High-Drainage Setups for Succulents and Cacti

Your succulents and cacti hate sitting in wet soil, so you need a container with multiple drainage holes, a thin gravel layer at the bottom, and a gritty mix blended with perlite or coarse sand at roughly 50/50 ratio. This setup lets excess water escape fast, keeping roots healthy and rot-free.

Moderate Drainage Configurations for Vegetables and Herbs

  • Use containers with at least one large drainage hole
  • Mix standard potting soil with 20–30% perlite
  • Add a saucer underneath but empty it after 30 minutes

Your tomatoes, basil, and peppers need consistent moisture without waterlogging, so this balanced approach gives roots the hydration they need while still letting excess water drain away cleanly.

Moisture-Retaining Adjustments for Tropical Plants

AdjustmentWhy It Works
Add coco coir to your mixHolds moisture longer than standard soil
Use a self-watering potDelivers steady bottom-up hydration
Skip the thick gravel layerKeeps moisture available in the root zone

Your tropical plants like monstera and peace lilies love consistent dampness, so you want your mix to hold water a bit longer than usual without becoming a soggy mess that suffocates the roots.

You Might Also Like!

  • Dog Potty Area Drainage System Explained (Gravel, Sand, Pipe Layers)
  • How To Build A Backyard Dog Potty Area Step-By-Step (Drainage Done Right)
  • The Mobile Home Window Trim Trick That Adds Instant Curb Appeal
Rafay Khan

Post navigation

Previous Previous
How to Build a Fire Pit Patio for Under $300 (Complete Step-by-Step)
NextContinue
How to Fill a Raised Garden Bed for Under $30 (No Expensive Soil Needed)

You Might Also Like!

  • Dog Potty Area Drainage System Explained (Gravel, Sand, Pipe Layers)
  • How To Build A Backyard Dog Potty Area Step-By-Step (Drainage Done Right)
  • The Mobile Home Window Trim Trick That Adds Instant Curb Appeal

Search More!

About DearWorld

We share practical DIY tips, budget-friendly ideas, and creative inspiration for mobile homes, backyards, patios, porches, gardens, and skirting. Helping you make every space feel like home — one project at a time.

  • About Us
  • Privacy Policy
  • Terms & Conditions
  • Blog

© 2026 Dear World - WordPress Theme by Kadence WP

Facebook Instagram Pinterest
Scroll to top
  • Home Improvement
    • Deck
    • Barn Doors
    • Patio
    • Bathroom
    • Garden Beds
    • Winter Home Prep
  • Mobile Home
    • Crawl Space
    • Skirting
  • Backyard
    • Landscaping
    • Curb Appeal
    • Water Features
  • Porch
  • Garden
  • Contact
Search